
Introduction
As Microsoft says, Azure DevOps is everything that you need to take an idea and turn that idea into a working piece of software in the hands of your end-users, for any language, targeting any platform. With the introduction of Azure DevOps, Microsoft is offering developers a new continuous integration/continuous delivery (CI/CD) service called Azure Pipelines that enables you to continuously build, test, and deploy to any platform or cloud. It has cloud-hosted agents for Linux, macOS, and Windows; powerful workflows with native container support; and flexible deployments to Kubernetes, VMs, and serverless environments. In this post, I am going to show you how to integrate your GitHub project with Azure Pipelines.
How to Add CI/CD to GitHub Repos
Let us go to my GitHub and create a CI/CD pipeline into Azure Pipelines directly from GitHub. First, we need to go to the Marketplace and search for Azure Pipelines. Before we start, we need to configure it by clicking on the Configure access link. On the settings page, which will be opened (Image 6), I will choose “Only select repositories,” which means that I want to create a CI/CD pipeline for my specific repository.
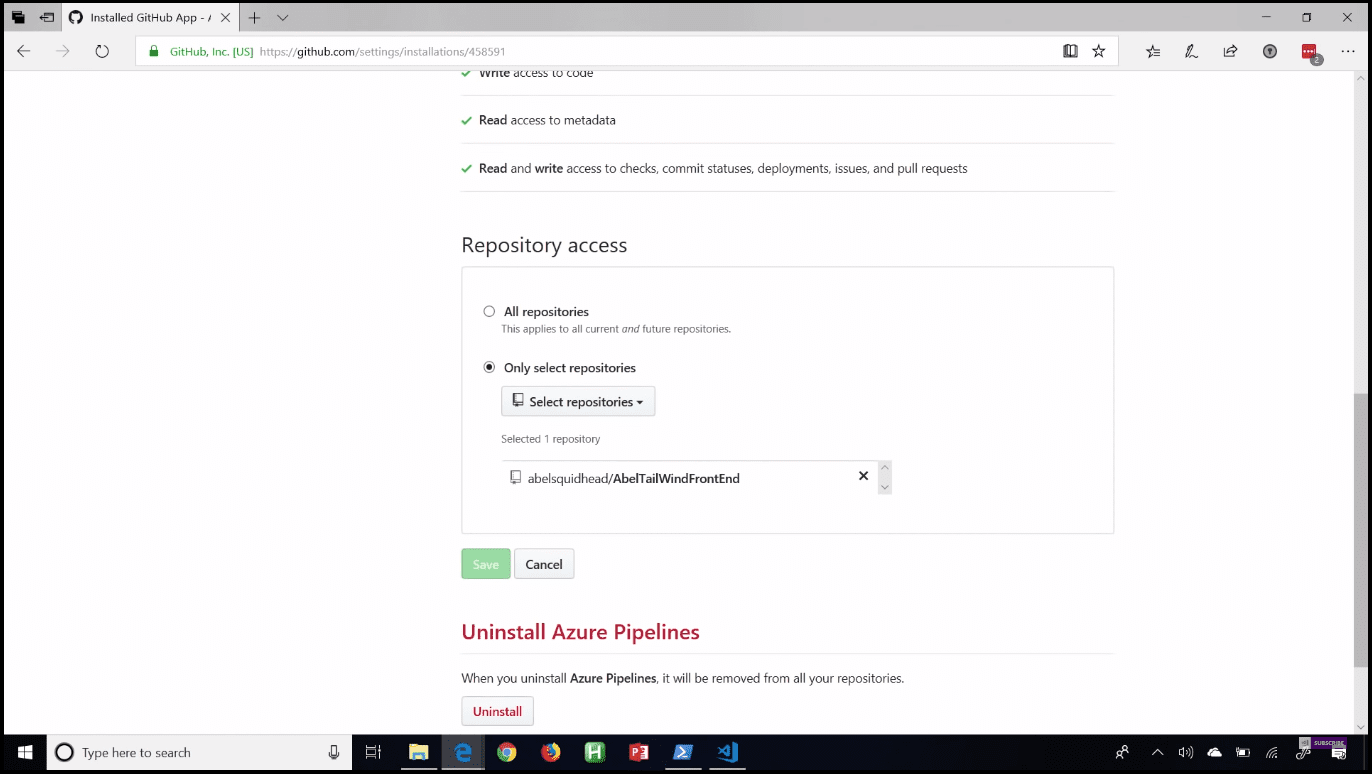 Image 6 - Configure repository access
After saving the changes, we will be back to Azure DevOps
And after login, it will ask which organization you want to use and which project. After choosing, it is going to walk us through a wizard to create our build pipeline. Then, selecting our repository, the technologies that are being used inside the chosen repo will be displayed. Our example repo is holding a Node.js app, so it is going to provide a Node.js template so I can start using it easily. In addition, it creates a build pipeline written in YAML.
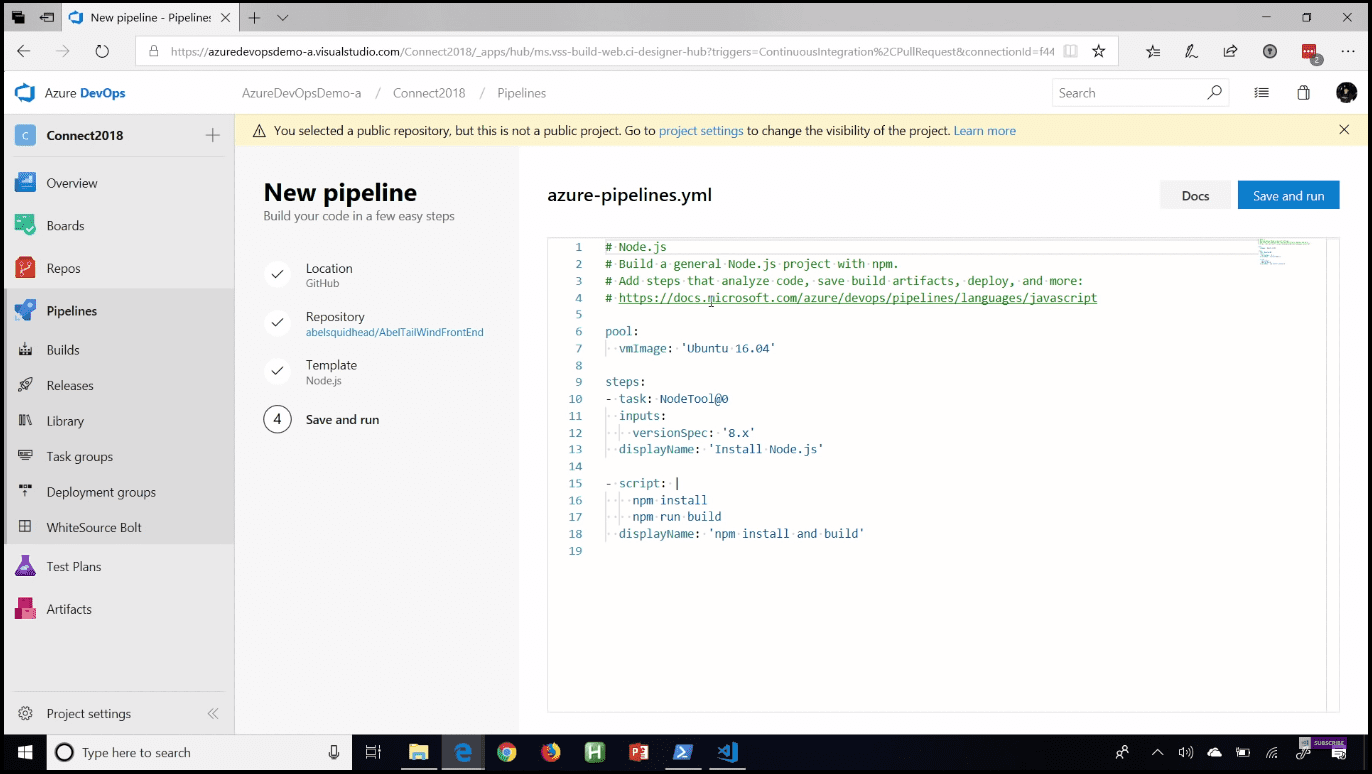 Image 7 - Node.js template
Tip: If you would like to know more about this new developer service available on the Azure platform
You can have a look at the following post: More about Azure DevTest Labs. If you prefer a more concise description of the same feature, have a look at Quick overview of Azure DevTest Labs.
Let’s now save it and run it. First, this YAML file will be saved in my GitHub repo, then all my source code will be downloaded, including the YAML file, and then the build will start executing all build steps described in the YAML file.
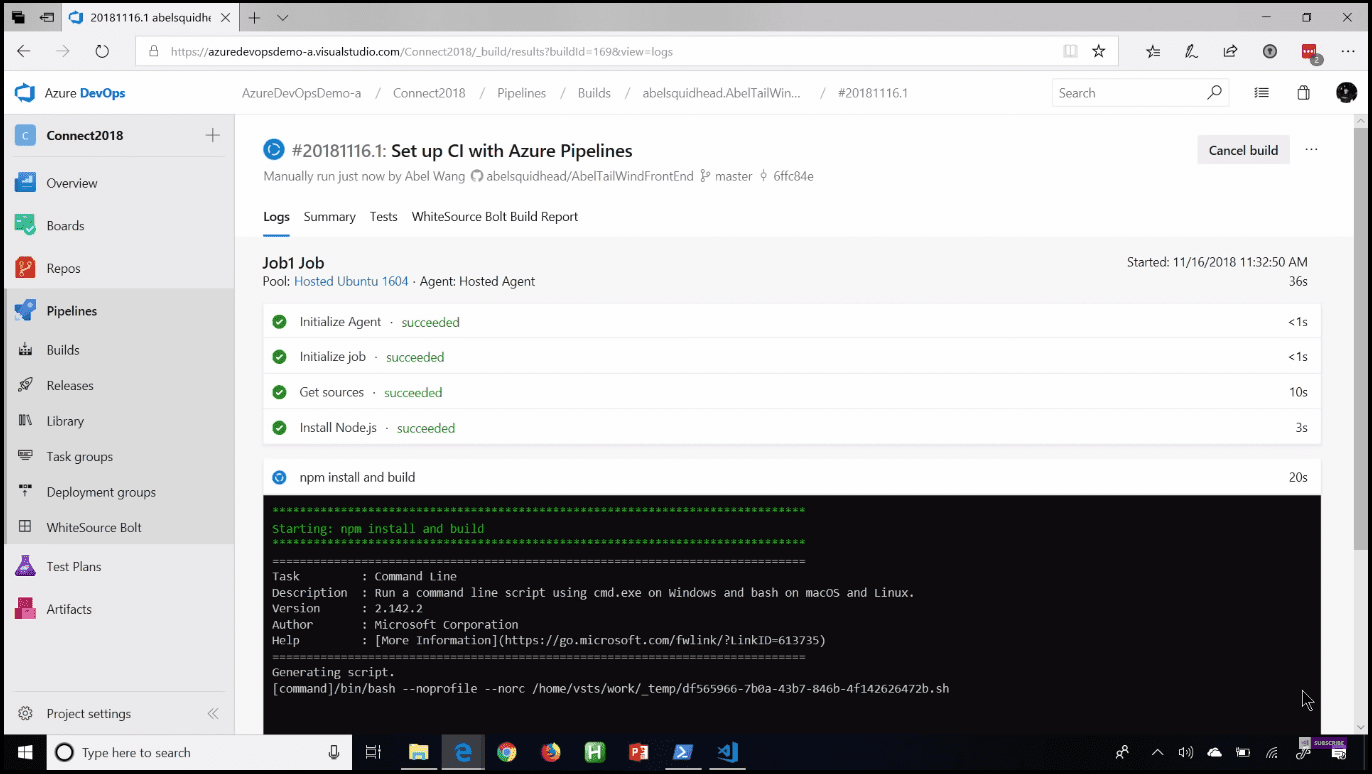 Image 8 - Running a build
It is doing the same thing as Visual Editor. On the other side, using Visual Editor, you can easily customize your tasks. Just click on the plus button, and you will see listed hundreds of tasks that you can download and start using. If you want to do something that does not exist, go to the marketplace where you can find over 500 build and release tasks that you can download and start using.
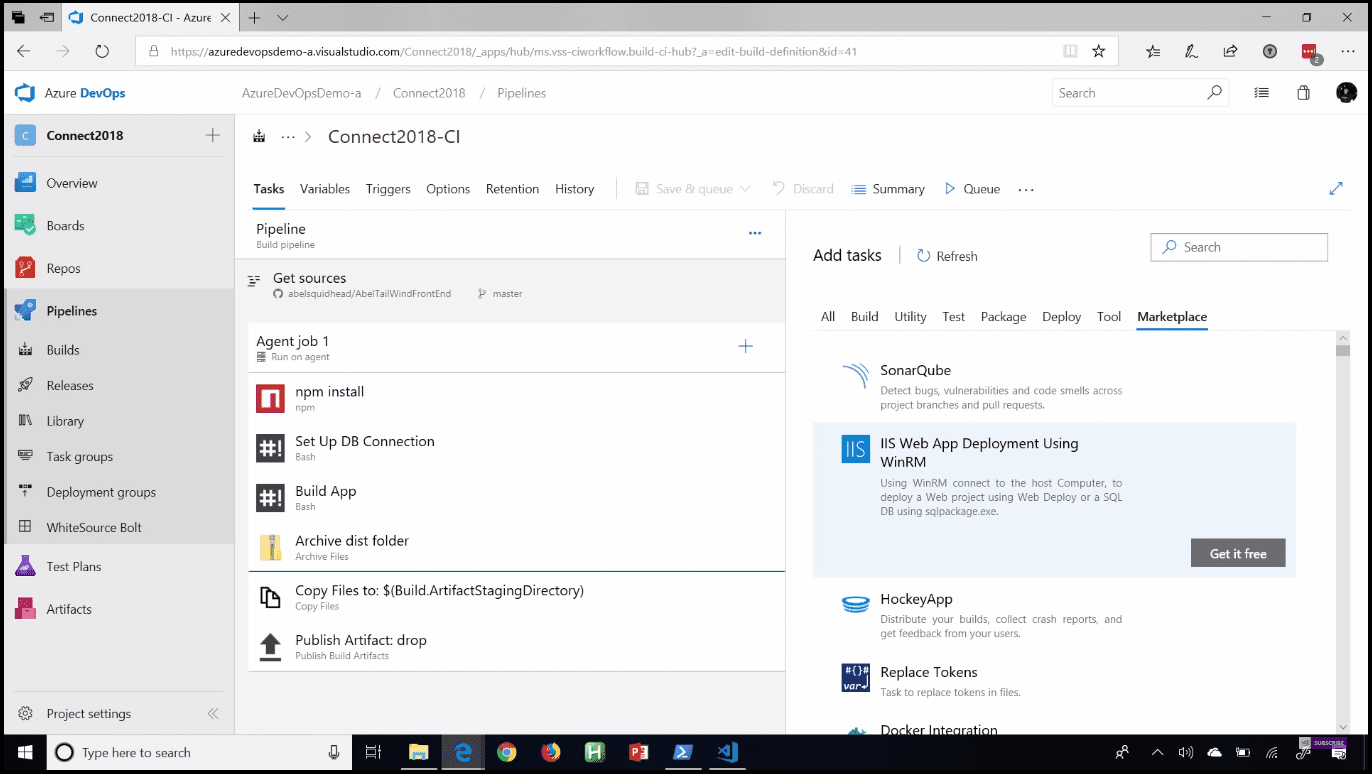 Image 9 - Tasks marketplace
If the task you want to do does not exist in the marketplace either, you can always write your own custom task in PowerShell or Node.js. Another great feature is customizing the build using the YAML file, the same way as using Visual Editor. Just click on the Pipeline (step 1 - Image 10) and the “View YAML” button will be displayed. Clicking on the “View YAML” file (step 2 - Image 10) will show a popup with the YAML code and a “Copy to clipboard” button (step 3 - Image 10).
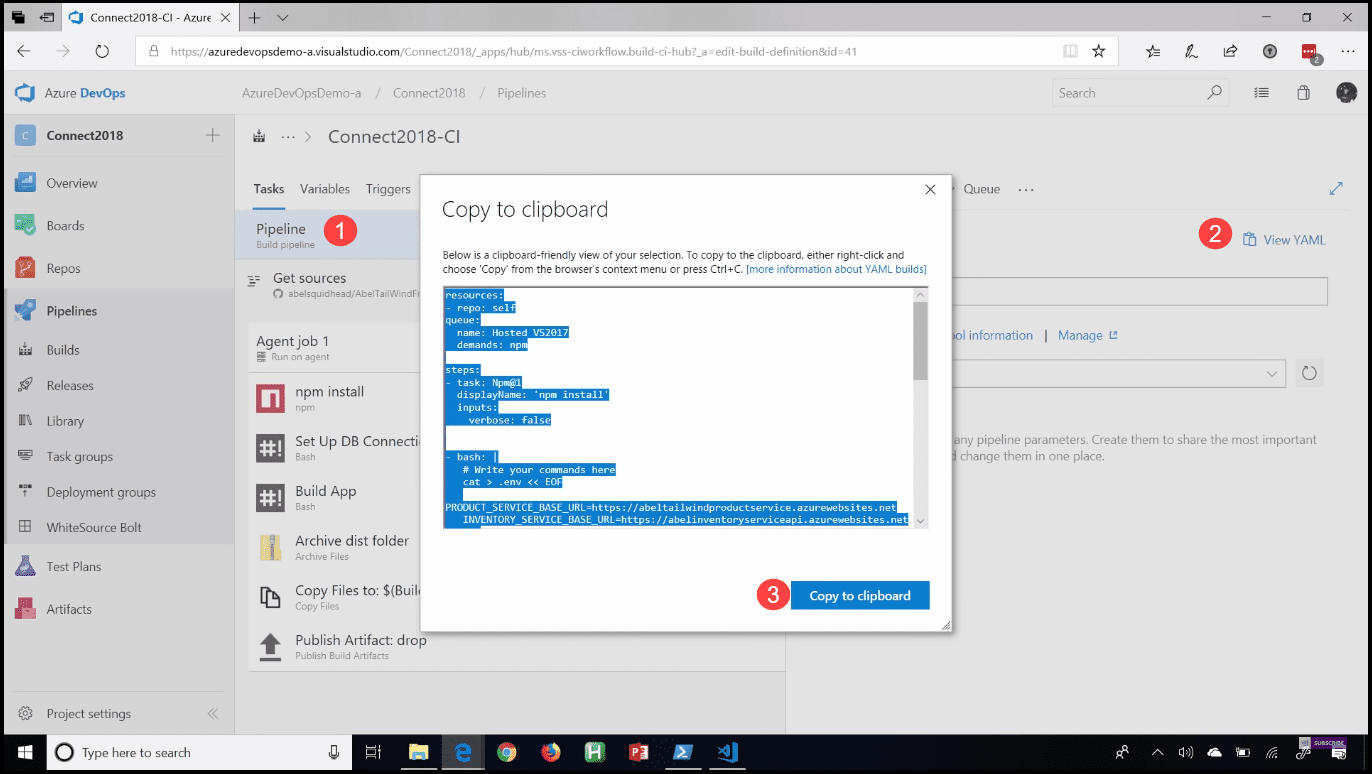 Image 10 - Copy YAML code to clipboard
After we pull our changes from our repo, we can see our azure-pipeline YAML file. While customizing it and adding new tasks, we will get autocomplete, syntax highlighting, and if we press control + space, we will get IntelliSense which will make our customization process a lot easier. After we are done with customization, we can upload our code using git add and git commit commands. Then we need to push the changes into GitHub, which will automatically trigger a new build.
Now we should create a Release pipeline. Just click on the “Release” button on our build page, which will take us to our Visual Editor. First, it is going to ask if we want to apply a template. In this demo, we are going to use the Azure App Service deployment template. Just click on the “Apply” button and describe what your first stage is going to be. Our first stage is going to be for our staging environment, using the name Staging. After we define what environment it is going to be, we can go into that particular staging environment and describe all of the steps we need to take to deploy our application into this particular stage. In our case, we have just one task, so we are going to pick our Azure subscription and select our App service.
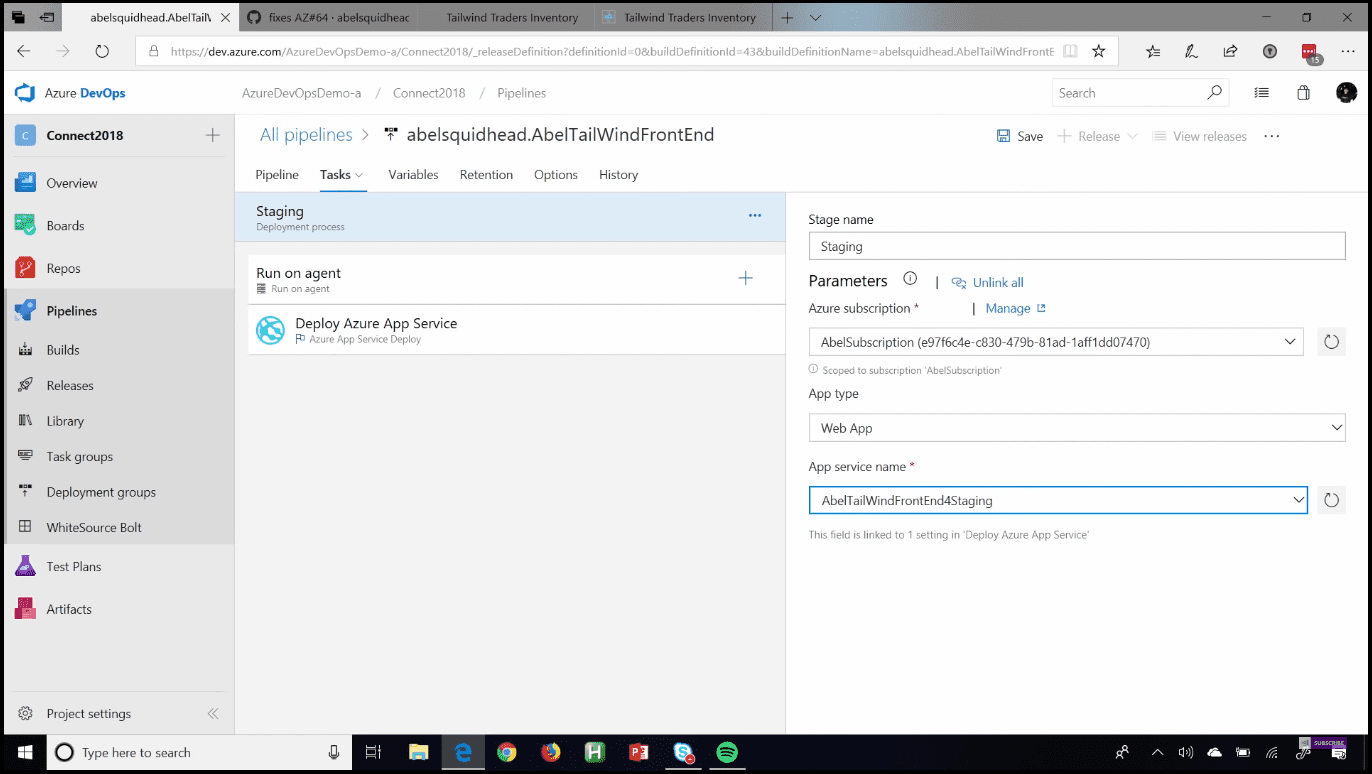 Image 11 - Task in staging environment
If you would like to learn more about what is the story behind containers and what drives the need for them, we will know why companies moved from traditional solution architecture to Microservices and how this put containers as the perfect solution for running them. We will get a quick intro to clear some definitions, tools, and keywords related to this ecosystem. For example, we will understand the difference between VM, Container, and Hyper-V Container, why we would prefer container over VM and when the VM is better. We will understand the difference between container and image and know the life cycle of creating a new image and why I do that. Like adding more layers to the base image, push that to container images registry on the cloud, then pull that from the registry to anywhere to have a new container. We will understand also different technologies and services around containers, like Docker, Docker Swarm, Kubernetes, Azure Container Services (ACS), Azure Container Registry, etc. - have a look at this post.
Next, we need to define the Approvers. Before and after each environment, you can add a set of manual approvers. You can add yourself as an approver, a list of people where every single person in the list has to approve before it can flow through the gate, a group of people where if one person approves then it will flow through the gate, or you can use a combination of lists and groups as well.
Now we need a production environment
We will clone our staging environment by clicking on the “Clone” button, which appears on hover on our environment. After the clone is done, we will change the description into “Prod environment” and edit the tasks inside. We will change the App service into the one used for our production environment. We can do the same customization here as in the build; we can add various tasks from the Marketplace or write our own. Next, we need to save it and kick off the release. Going to our pipeline, we can see a Release drop down with two options: Create a release and Create a draft release. We will use “Create a release,” which will actually grab the latest build and start releasing it through our dev environment, executing the steps that we defined previously. After the deployment is finished on our Staging environment, the approvers need to approve.
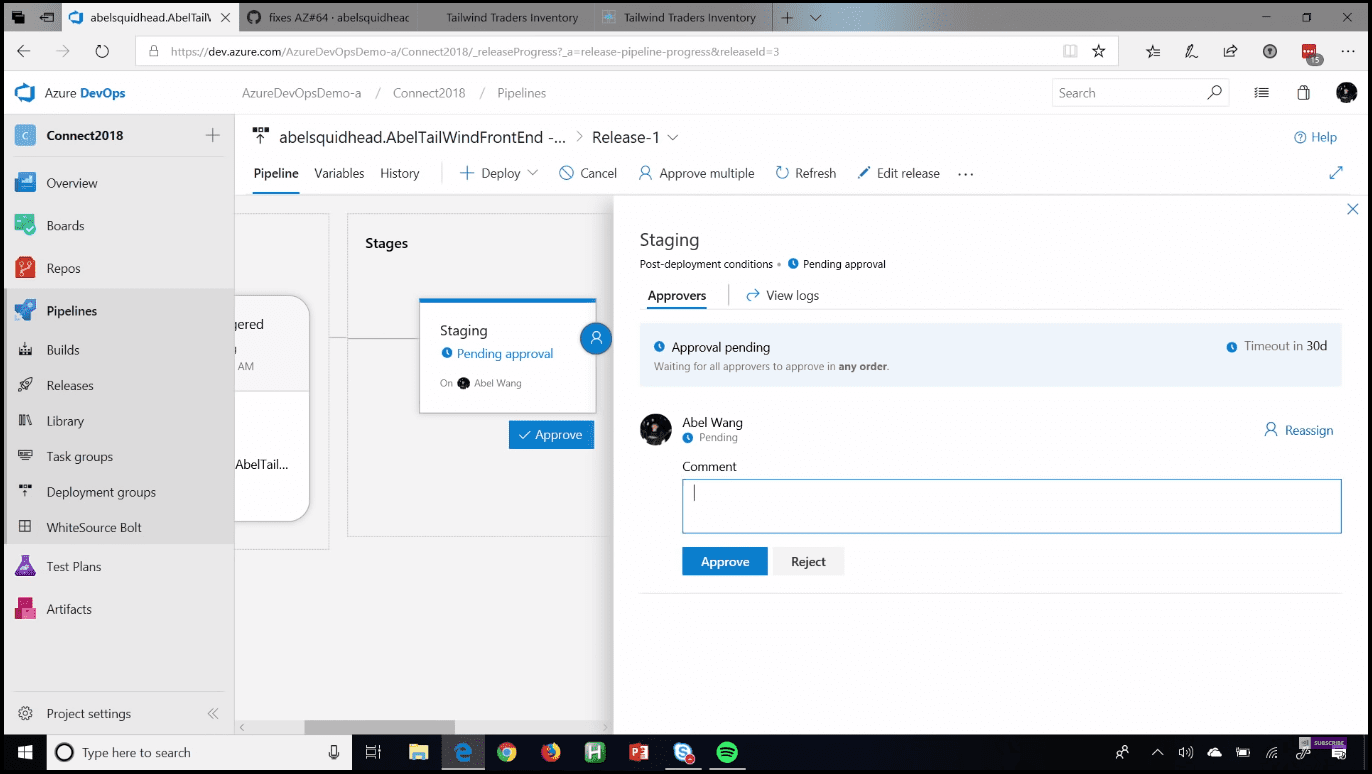 Image 12 - Approve the deployment on Staging environment
After the approval is done, it is going to flow into our Production environment. Then we have our application deployed on our Production environment. We have just simply created a full CI/CD pipeline, which took our code from GitHub all the way out into production.
Conclusion
Azure DevOps is the ultimate DevOps tool, making it simple to go from nothing to a full CI/CD pipeline for any language targeting any platform, from your code in your repository, deploying to wherever it needs to be deployed. It could be deployed on Azure, behind your firewall, or in front of your firewall. Any language targeting any platform, simple as that. If you have an open source project, you will get all of this for free, getting 10 parallel pipelines out of the box, and if you need more, just ask. Now we can easily do GitHub integration and easily create CI/CD pipelines for our code in GitHub using Azure Pipelines.
You can see this video, if you would like to find more information about how to get started with Release Management and its advantages. See how to create a build definition using CI/CD Tools for VSTS Extensions (I will be using Package Extension and Publish Artifact tasks) and also using DevOps-VSTS-POC trigger in order to enable CI. All of that to be able to publish, share, install, and query versions. You will see how to create a release definition, choose an artifact, and configure the source for the artifact and default version. See how to create different environments or clone the existing one. In my case, I am going to create QA, Preproduction, and Production environments, each with one phase and one task. See also how to configure the Publish Extension task for each environment. See an end-to-end continuous delivery pipeline using VSTS extension with Build and Release Management.