Introduction
Azure DevTest Labs is a self-service sandbox environment in Microsoft Azure, which allows developers and testers to quickly create test environments while minimizing waste and controlling costs. It is a free and very powerful service, which enables users to quickly create a pre-provisioned environment with everything that their team needs to develop and test the project in just a few clicks. Testing of the latest application versions can be done through reusable templates and artifacts. Artifacts are the pieces that can be deployed or configured after a new Virtual Machine is already provisioned. They can be tools for installation on Virtual Machine, applications for testing or actions that the user wants to run on Virtual Machine, such as a script to call the source repository. Azure DevTest Lab has been launched with many installed artifacts which are very simple in the process of creating Virtual Machine. Azure DevTest Labs also enables the creation of own artifacts for your particular scenario.
Step 1: Creating Lab VM
When Virtual Machine is created DevTest Labs Artifacts allow you to define all actions, which are performed in that process.
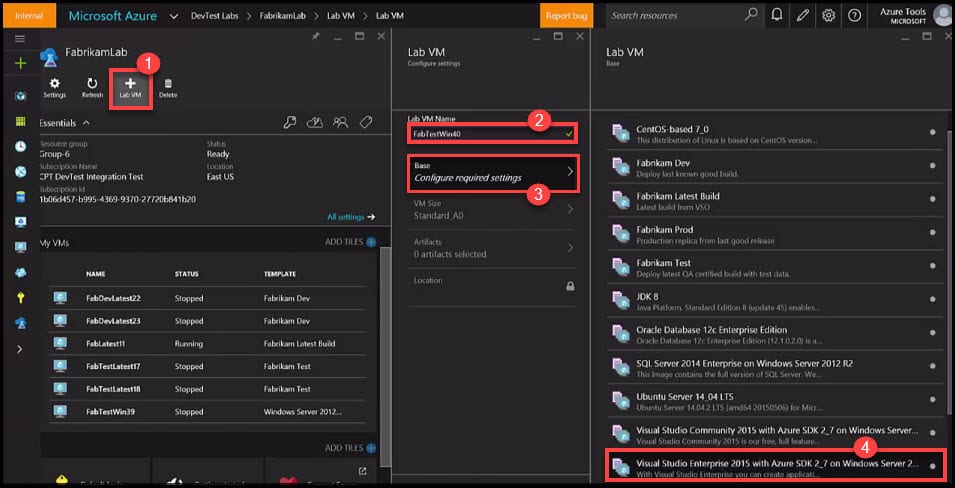
- In Microsoft Azure portal navigate to DevTest Labs and select the Lab in which you want to create a new Virtual Machine. On the lab’s blade click on create Lab VM icon.
- In the new column, on the right side type the Lab VM name.
- Click on Base Image from the list.
- Another new column will open on the right side of the portal. Choose a Windows Base Image.
Step 2: Choosing Artifact from the list
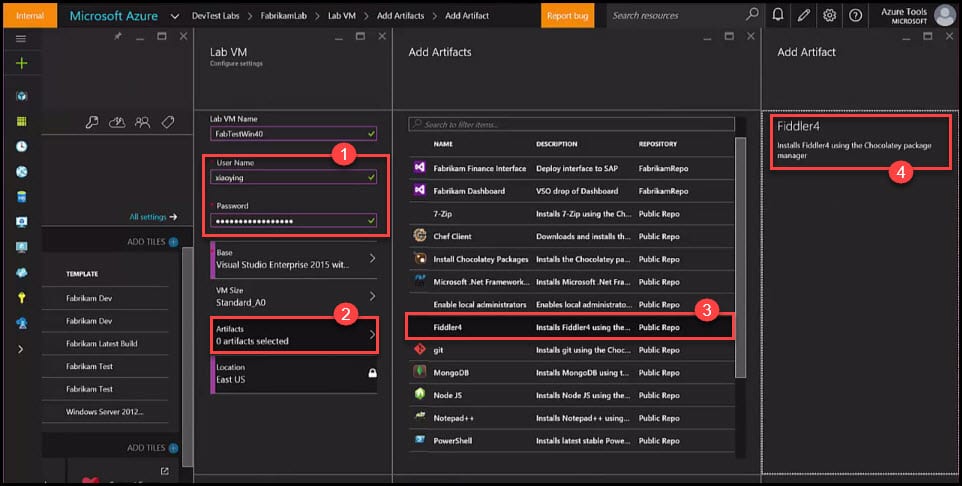
- When you selected the image, type in User Name and Password.
- You will see that the Artifact is enabled. Click on the Artifact to take a deeper look into it.
- A new column on the right side will appear, which will show the list of all new Artifacts which you can apply to the new Virtual Machine that you are going to create. In this list, you will see the names, description, and repository of each Artifact that works in this case for Windows. Also, for this case choose the Fiddler4 Artifact by clicking on it.
- After you click on the chosen Artifact on the right side a new column will appear with a description telling with which package manager this Artifact will be installed. In the lower right corner click on the Add button to add it.
Step 3: Choosing another Artifact from the list
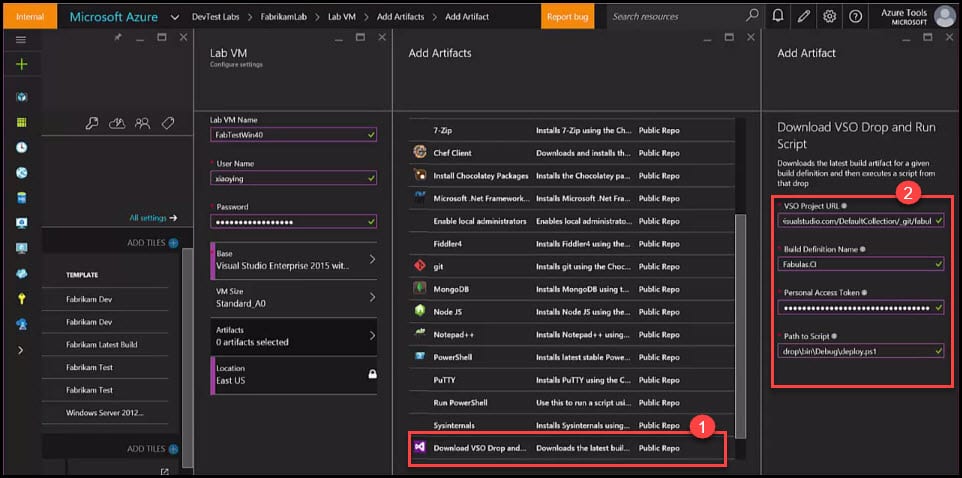
- Choose another Artifact to download a job from Visual Studio Online.
- This Artifact will take four parameters: VSO Project URL, Build Definition Name, Personal Access Token (which you can create in VSO by going to the security tab in your profile page) and Path to Script. Once you’ve inserted all required data, click on the Add button in the lower right corner.
Step 4: Finish Artifacts settings and create a Virtual Machine
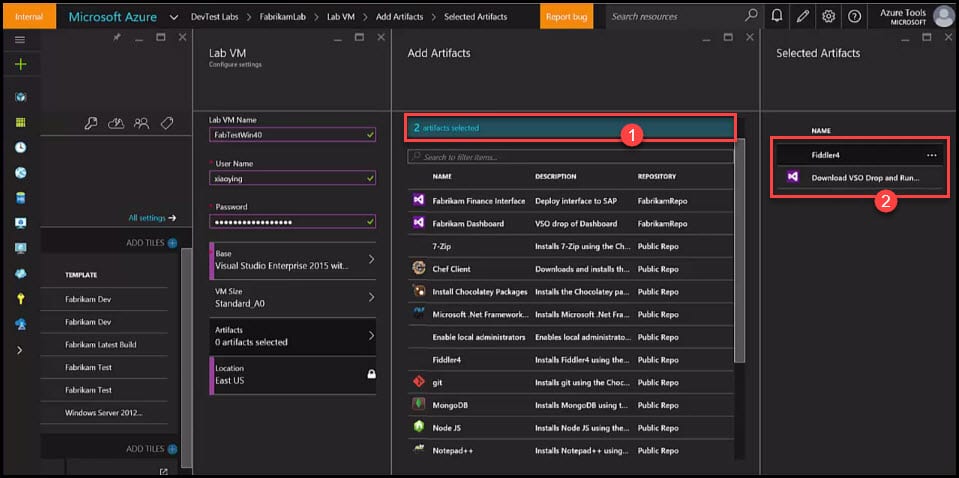
- In the Add Artifacts blade, now we see that two Artifacts were selected. Click on them to check which two Artifacts were just added.
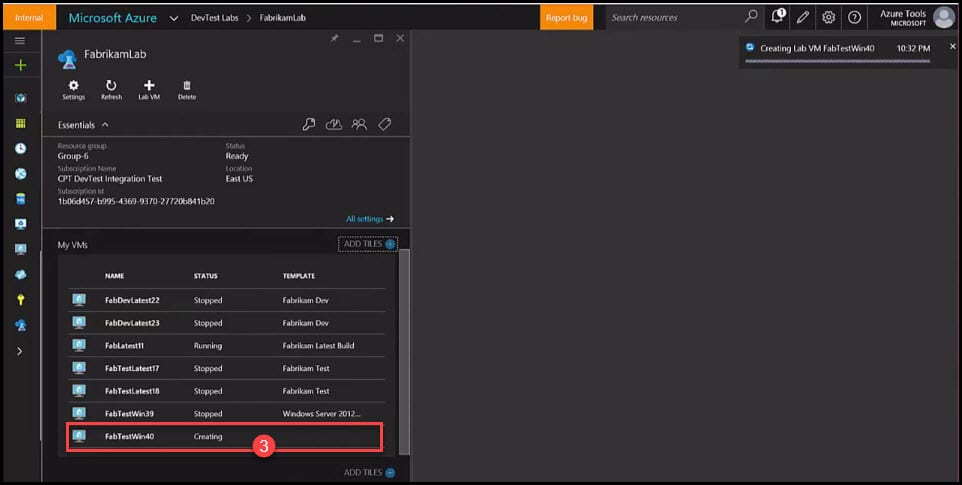
- In the Selected Artifacts blade, you will see the added Artifacts. From here you can drag and drop them to change the order or even delete them. Click Ok button in the lower right corner to finish the Artifact settings. In the Add Artifact blade click on the Ok button and in the Lab VM blade click on Create button to create a Virtual Machine.
- When the Virtual Machine is created, you will get both Artifacts installed on it as well.
Conclusion
This post described the basics about Artifact and how to create VMs with artifacts in DevTest Labs. The process is pretty simple and has many functionalities that add more value for the user. Features are very easy, fast, and very accessible.
You can see this video, if you would like to find more information about how to upload a virtual machine to Azure and how to create a virtual machine from the uploaded image or uploaded VHD file. Learn how to convert your virtual machine from VHDX to VHD format in order to be able to upload it on Azure. In order to be able to use PowerShell commands related to the upload of the virtual machine to Azure (e.g. Add-AzureVhd).
You must have Azure PowerShell version greater than 1.1. Learn more about the templates which may be used in order to create a virtual machine from a specialized VHD disk and which variables to use during the creation of the virtual machine (osDiskSizeInMB, resourceDiskSizeInMB). See how to customize the template parameters (LOCATION, OSDISKVHDURL, OSTYPE, VMSIZE, VMNAME). Also, I am going to show how to create a virtual machine from a User Image and which parameters need to be customized (USERIMAGESTORAGEACCOUNTNAME, USERIMAGESTORAGECONTAINERNAME, USERIMAGEVHDNAME, DNSNAMEFORPUBLICIP, ADMINUSERNAME, ADMINPASSWORD, OSTYPE, VMSIZE).

