Introduction
Delivery Plans is an extension for Visual Studio Team Services (VSTS) designed to provide a better cross-team visibility. The Delivery Plans extension is essential for management and organization of work especially. If several teams are available and working at the same time in the same project. For example when a team is developing the same project but for different platforms. The extension will give a general overview of the whole development process. Not only for a specific platform. After Installing Delivery Plan Extension from Visual Studio Market Place, Navigate to Work -> Plans to get started with Delivery Plans.
If you would like to know more about the best practices for DevOps, Continuous Integration and Continuous Delivery, you can have a look at the following post: Configure CI (Continuous Integration) and CD (Continuous Delivery Pipeline)
Delivery Schedule
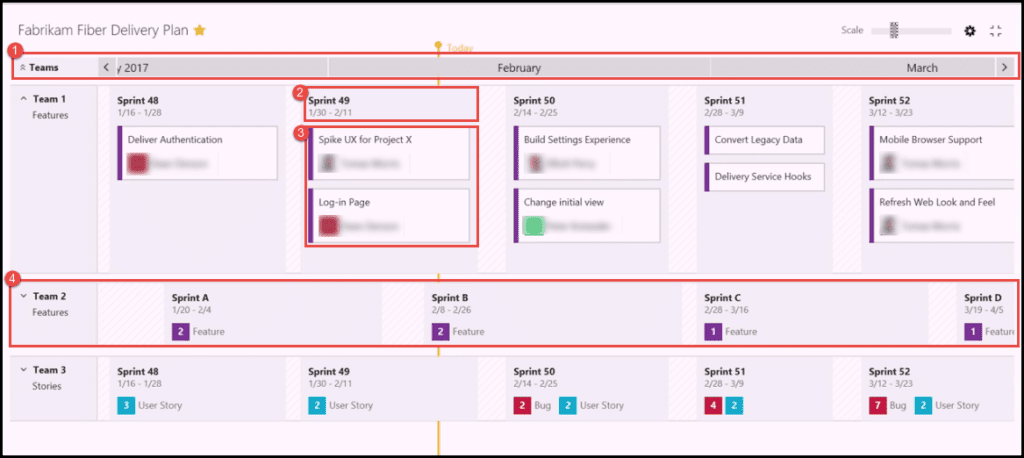
Delivery Plan extension group sprint deliverables for each team into a single calendar view. The purpose of a delivery plan is to see the work across multiple teams and to understand or better said. To see when the work will be completed. To be really Agile the teams don't need to run in the same cadence. As we want to give the teams the autonomy to choose their own sprint schedule and at the same time. All sprints are linked to iterations of the team's project, which are set in the admin section of the team project. The view presented in the image below, shows next information: 1- Calendar element, which will show to the team the current date with 'Today marker', so that the team can quickly understand the current state. From example below we can see for example that Team 1 will deliver in Sprint 49 two features. The same team delivered in the previous sprint, which was Sprint 48, 1 feature and it plans to deliver in Sprint 50 2 features. 2-Current Sprint - We can see the name of the Sprint and starting, as well as the ending date of the sprint. 3- Features showing the title or the name of the feature and to whom the feature is assigned to. 4- Team 2 showing a completely separate team, which is not necessarily running in the same cadence, as shown in the example below.
You can see this videoIf you would like to see a walkthrough in order to know more information about how to develop a VSTS Extension and how to configure Continuous Integration and Continuous Delivery Pipeline. Described the agenda of the next series of videos. Learn how to deploy from different environments using different Publishers ID and VSTS accounts. In addition, I am going to show how to develop a Single Page Application using HTML/CSS/JavaScript as a Front End developer. Also, learn how to download VSS-SDK JavaScript library and how to use it and its manifest file (vss-extension.json). Afterwards, how to pack the code into VSIX package using TFS command line, upload it, share and install on VSTS account. At the end, I am going to configure Continuous Integration and Continuous Delivery Pipeline and will discuss about errors which you may face it during this process and also sharing some notes.
We can see the current day marker across all teams in orange color, with each team has its spring information in a single row and with each team scheduled work visible, we have a quick overview for all teams.
If you are interested in developing a Visual Studio Team Service extension, and you would like to know and to follow the best practices for DevOps, Continuous Integration and Continuous Delivery, - have a look at the following post, Develop VSTS Extension and Configure CI (Continuous Integration) and CD (Continuous Delivery Pipeline).
Tasks and Teams Flexibility
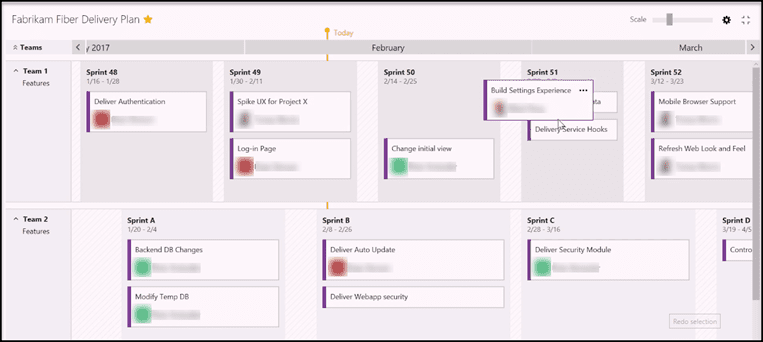
Delivery Plans extension allows you to move tasks between teams quickly, if you need to make any adjustment, just drag & drop it to the new team as you usually do in most of VSTS areas.++Also, Clicking on any team name will expand their row and show their expected deliverables in a specific sprint.
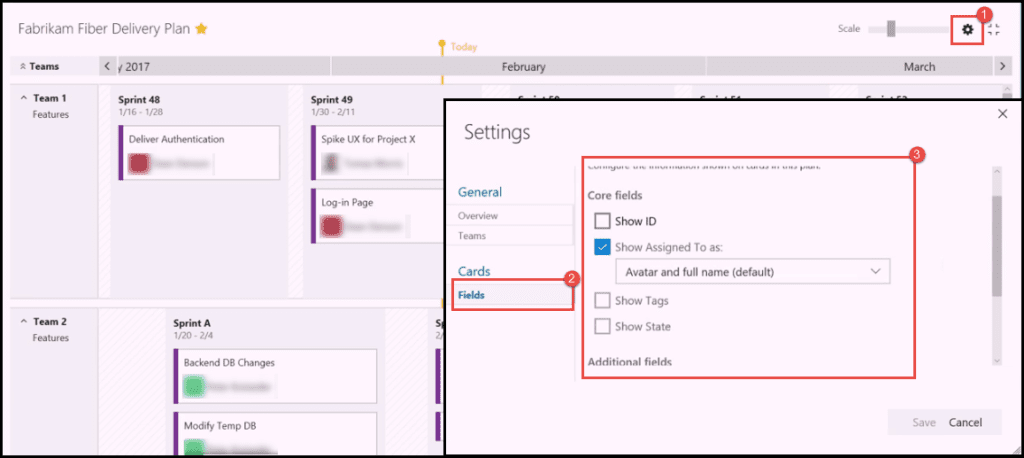
Besides that, the view of the card on the board can be easily modified to show the information that we need for our team. For example in the view on the image above, we are just showing on the card, the title, and the assignee. If we would like to add more information on the card, we can do it simply by: 1- Clicking on Settings icon in the top left corner 2- When the new window appears, navigate to the left panel and click on Fields 3- On the right panel the fields customization options will appear, where we can choose that card will show also the State.Tags or other information.
You can see this video If you would like to find more information about how to get started with Release Management and its advantages. See how to create a build definition using CI/CD Tools for VSTS Extensions. (I will be using Package Extension and Publish Artifact tasks), and also using DevOps-VSTS-POC trigger in order to enable CI. All of that in order to be able to publish, share, install and query versions. You will see how to create release definition. Choose an artifact and configure source for the artifact and default version. See how to create different environments or clone the existing one, in my case I am going to create QA. Preproduction and Production environment, each with one phrase and one task. See also how to configure Publish Extension task for each environment. See an end-to-end continuous delivery pipeline using VSTS extension with Build and Release Management.
Gaps Identification & Field Criteria Filtering
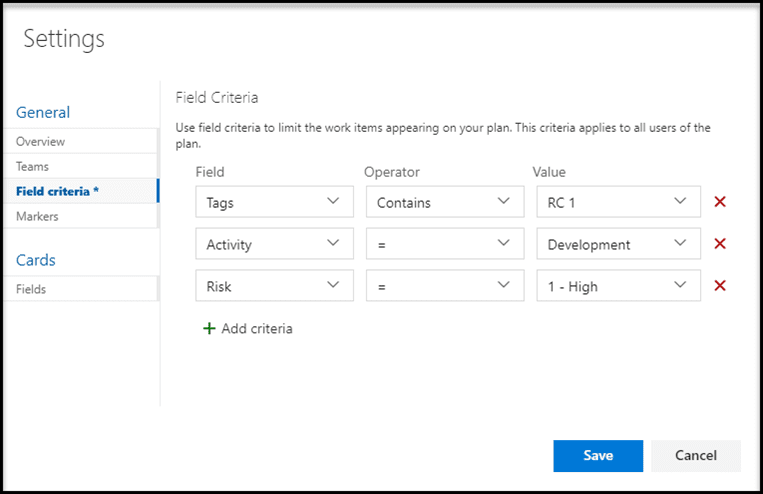
Delivery Plans extension allows you to find gaps for each team, if all teams are collapsed. You'll have a quick view of all scheduled work.++ Also Summary views support identifying gaps in the forecast. Team members can customize their view based on backlog levels and specific field(s) criteria. The activities in Delivery Plans extension are also filterable so you can control what you see.++ You have the following ways to apply filtration:
- After installing the extension from Visual Studio Marketplace ! You'll have an option (as a part of setup page) to apply filtration by field criteria.
- At any time, you can open your delivery plans extension settings, and apply field criteria as in the screenshot below.
Highlighter
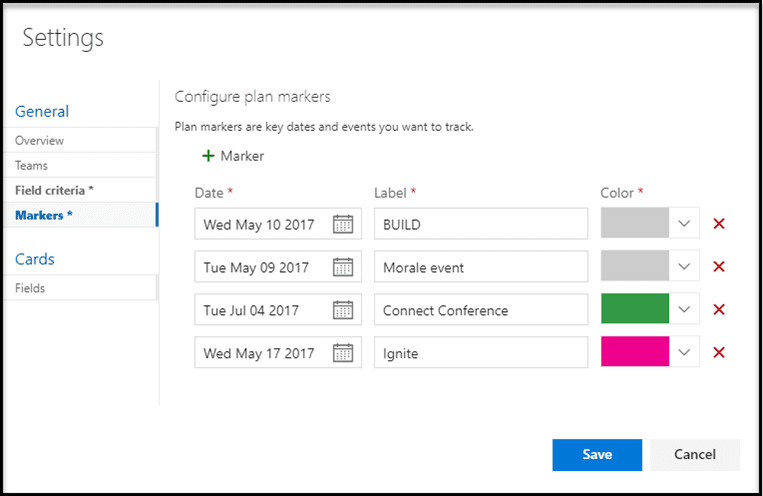
Sometimes, you might need to highlight some dates for different reasons, maybe this date is related to a soon delivery. Maybe another one is related to an important meeting. Delivery Plans extension allows you to highlight dates, all you need to do is to open the settings. Click on "Markers" and you'll have the option to highlight any date.
If you would like to know more about the best practices for DevOps, Continuous Integration and Continuous Delivery, you can have a look at the following post: Configure CI (Continuous Integration) and CD (Continuous Delivery Pipeline).
Conclusion
As the concept of distributed systems & solution expands every day, managing several teams working on the same big project is a challenging thing, however the tools we're using is evolving too, the Delivery Plans Extension for VSTS uses the power of visualization to make it easy to manage more than one team in way that is as much easy as managing a single team. Read More

