Introduction
TFS Team Project Manager can help you automate different tasks across Team Projects in Team Foundation Server. It can help you to manage build definitions, build process templates, work item configurations, source control, security and to view activity in Team Build, Source Control and Work Item Tracking. In this post I’m going to describe step by step process how to configure the new features with TFS Project Manager.
You can see this video, if you would like to find more information about my personal experience of the migration Team Foundation Server to Visual Studio Team Services using Database Import Service or TFS Migrator tool provided by Visual Studio Team. Going through all six phases of the migration, following the migration guide provided by Microsoft as a walkthrough. You will see how to get started with the migration process and which prerequisites should be completed. The most important prerequisite is that you must have Azure Active Directory in order to use TFS Migrator tool. See more about the two different process models supported by VSTS: Inherited and Hosted XML. See which decisions you should make and how to validate them, for example which customizations you should keep and which one to remove. To prepare the first collection dacpac, first you should prepare Azure Storage Container, create dacpac file and afterwards upload it. To prepare the second collection Azure VM, you should install SQL Server, backup the DB from the collection and upload it to the Azure storage container. See first how to import (dry - run) and how to change the configuration afterwards in order to import (production).
The post Upgrade to TFS 2018 Has Been Done in Production describes a full upgrade and migration from TFS2015 to TFS2018 and describes the improvements over the old TFS 2015.
Step 1: Defining process template
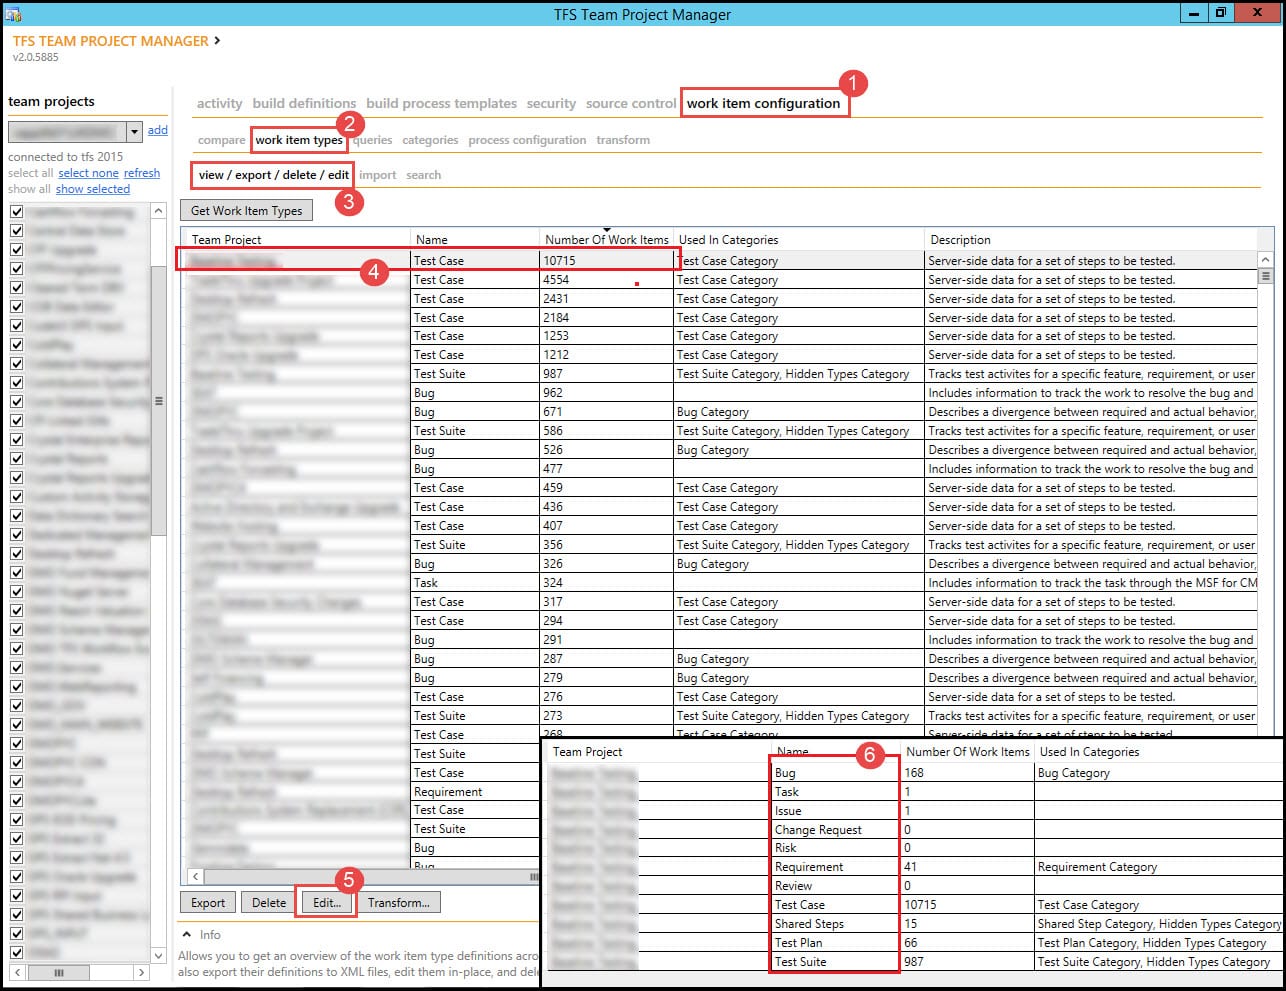
In this first step I’m going to choose the project which has many work items. 1. In TFS Team Project Manager click on Work item configuration. 2. In row below click on Work item types. 3. In next row click on view / export / delete / edit options. 4. From the list choose Team Project. 5. Click on Edit button. 6. From the work item types, I know that the process template is CMMI.
For the cases demanding high fidelity migration for work-items, the post TFS 2017 Migration To VSTS with VSTS Sync Migrator describes the migration without any limitations for migrating links, attachments or work items.
You can see this video, if you would like to find more information about step by step installation and configuring process of the TFS 2017 Update 1. See which deployment type to select, deployment scenario (Basic and Advanced), how to setup the Application Tier Web Services, Search configuration settings, Reporting Services settings. Also, do not forget to install and configure the Oracle component. See the overview of Team Foundation Server Administrator Console and how to create new Team project.
Step 2: Download process template in Visual Studio
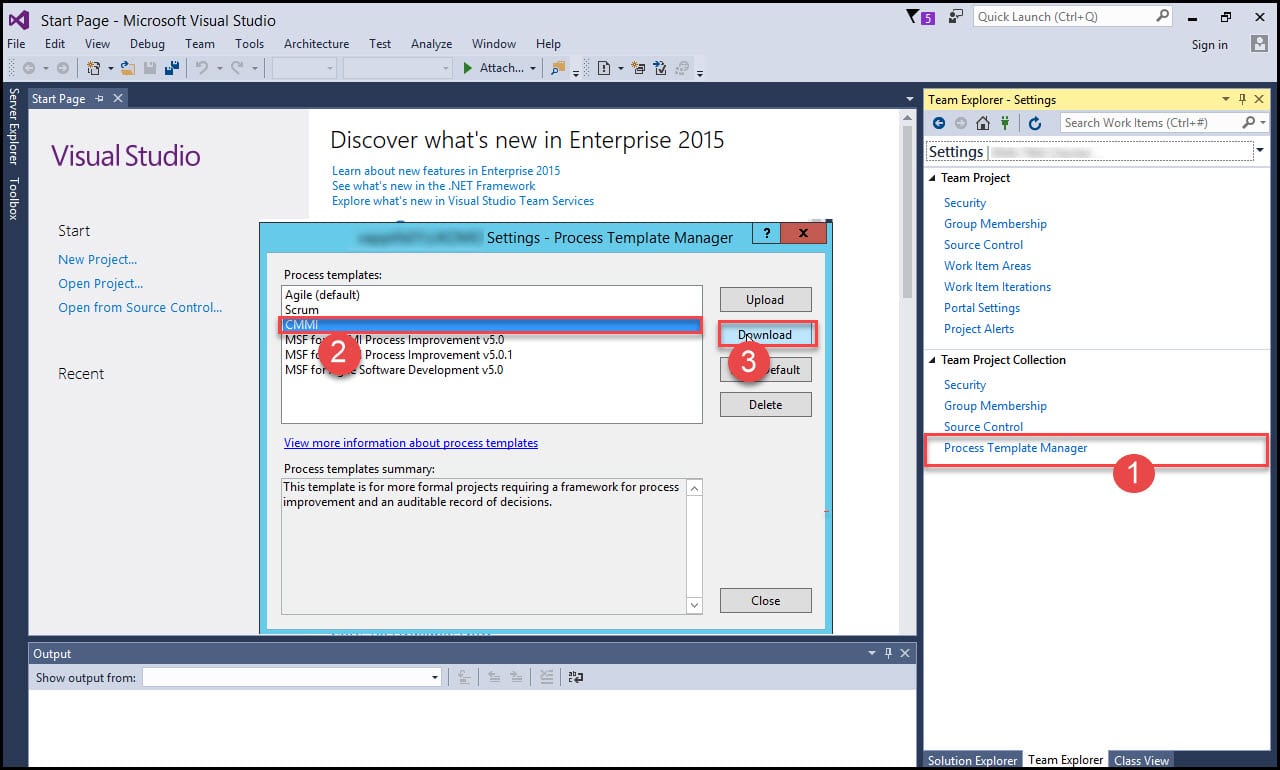
You will need to download the same process template in Visual Studio, but with using new version for TFS2015. 1. Open Visual Studio and in Settings tab, click on Process Template Manager. 2. In new window click on process template CMMI. 3. Click on Download button to start with download process.
If your migration process only requires migrating the work items, with no need to migrate links & relations between them, you can consider using the TFS Integration Platform, which is less complicated than the VSTS Sync Migrator. For more information about this tool, visit TFS 2017 Migration To VSTS with TFS Integration Platform.
You can see this video, if you would like to find more information about how to stop the SharePoint services on a SharePoint machine and how to stop the IIS via the Command Line (cmd), we will open services using run then stop SharePoint Administration, SharePoint Search Host Controller, SharePoint Server Search, SharePoint Timer Services, SharePoint Tracing Service, SharePoint User Code Host, SharePoint VSS Writer; then we run command line as administrator the use iisreset /stop.
Step 3: Export all work item types definitions
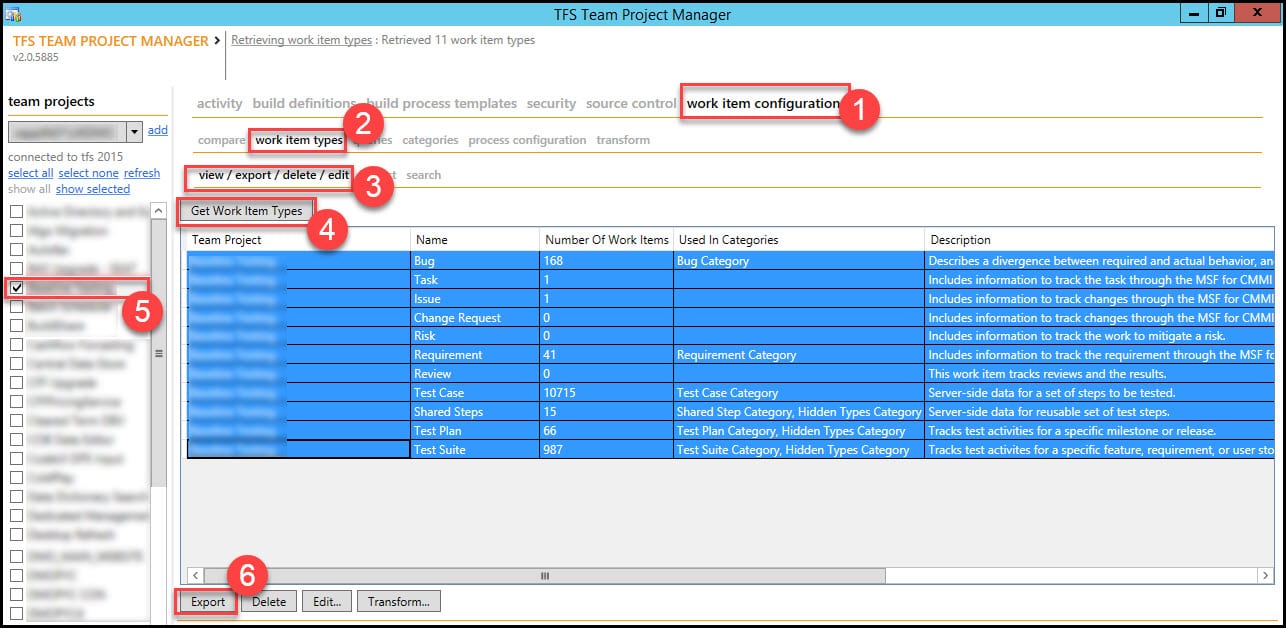
In case of any error, I would highly recommend to export all work item types definitions so you can roll back in case of any problems. 1. Navigate back to TFS Team Project Manager and click on Work item configuration. 2. In row below click on Work item types. 3. In next row click on view / export / delete / edit options. 4. Click on Get Work Item Types. 5. In the column on the left side mark checkbox for right Team Project. 6. Click on Export to export the selection.
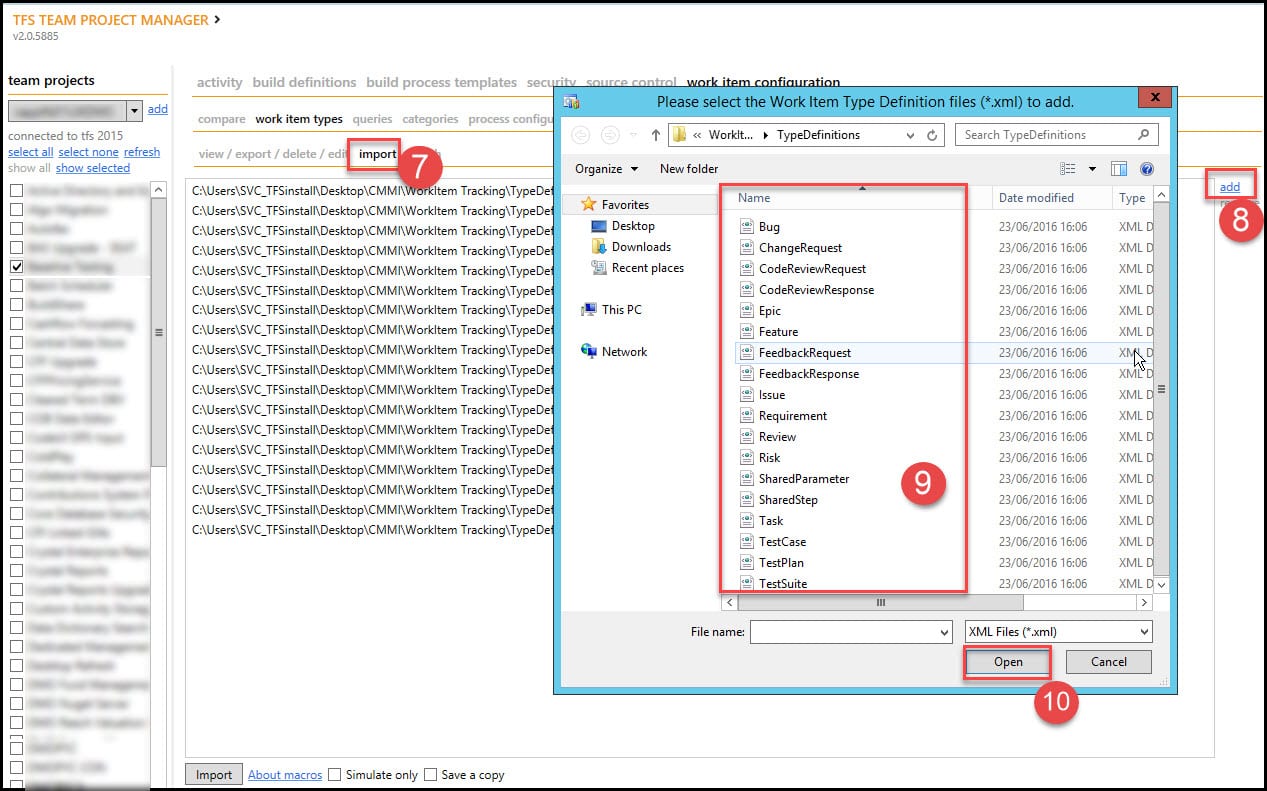
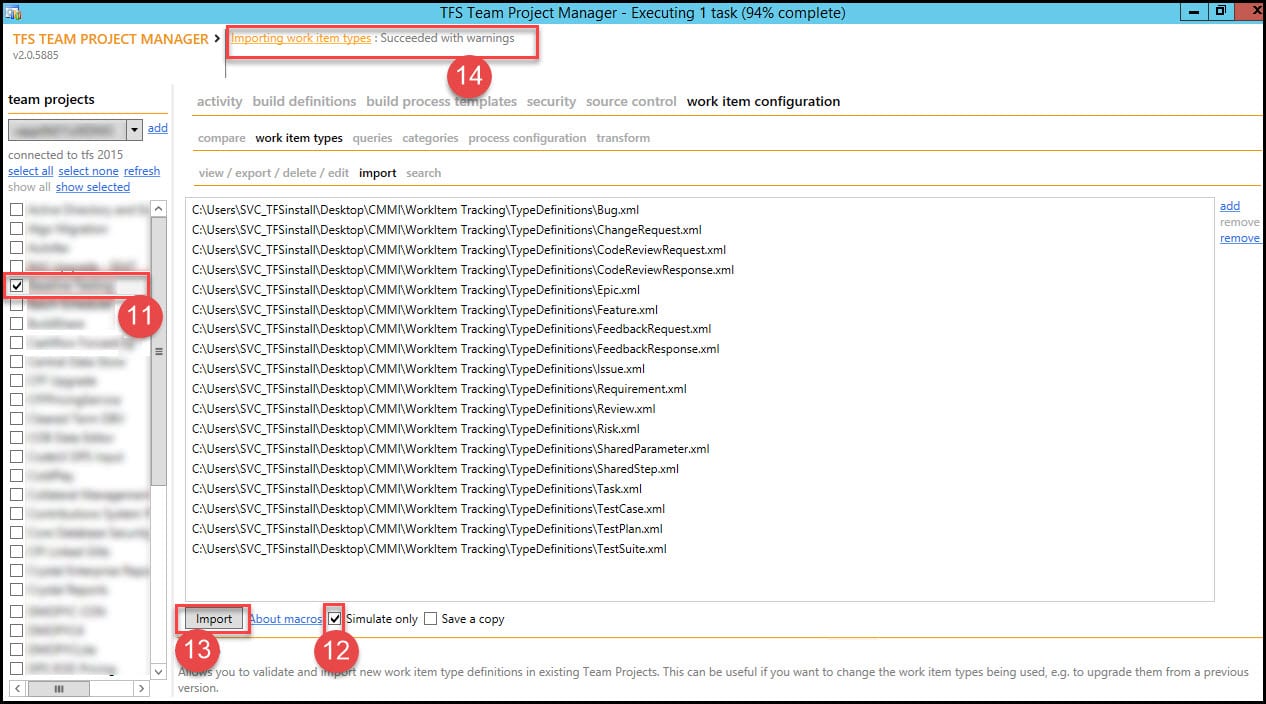
- In order to add the new types of definitions downloaded from the new version of the process template, click on Import button. 8. On the right side click on Add button. 9. In new window all types of definitions will be listed, click on selected type. 10. Click on Open button to open it.
- Select the target project and make sure you select simulate only then click import and make sure there is no error. 12. Click in check box for Simulate only to remove simulate. 13. Click import button to implement real import. 14. Make sure that there is no error.
If you would like to learn more about different tools and ways for Team Foundation Server to Visual Studio Team Services migration, - have a look at the quick guide about real stories for migrating Team Foundation Server to Visual Studio Team Services. The guide describes some of the real migration scenarios and explains how to use different tools for several cases.
You can see this video, if you would like to find more information about walkthrough about installation of SQL Server 2016 for TFS 2017. See which options to use during the installation, for example use the Microsoft Update to check for updates. Also, see which features to install in the Feature Selection step (Database Engine Services, Analysis Services, Reporting Services). You will need to set the startup type to be Automatic for all SQL Server Services.
Step 4: Configure new features in VSTS
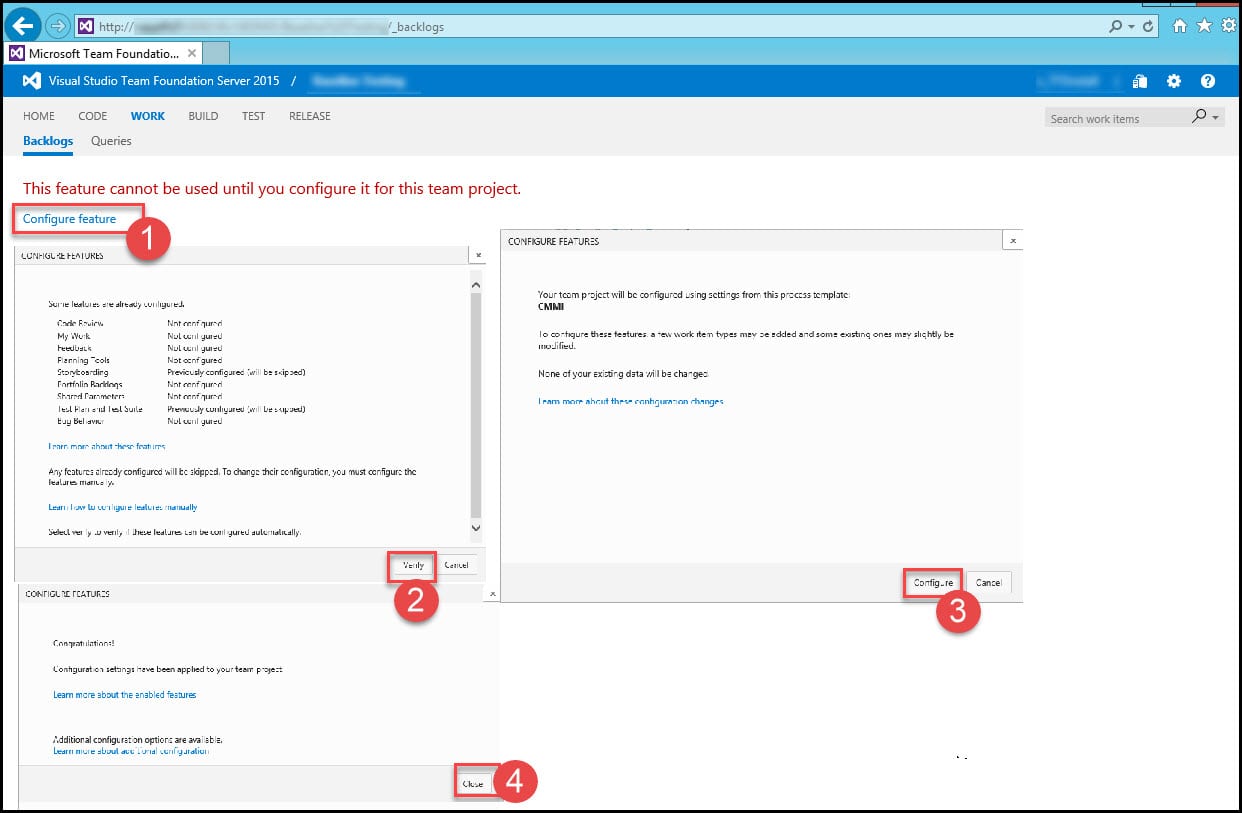
Now you will have to configure all new features and in order to do that, you’ll need to open Team Web Access for the project. 1. Open Team Web Access for the project and click on Configure feature. 2. Click on Verify button to confirm the configuration. 3. In new window click on Configure button to confirm the start of project configuration. 4. In new window for Configuration features, click on Close button.
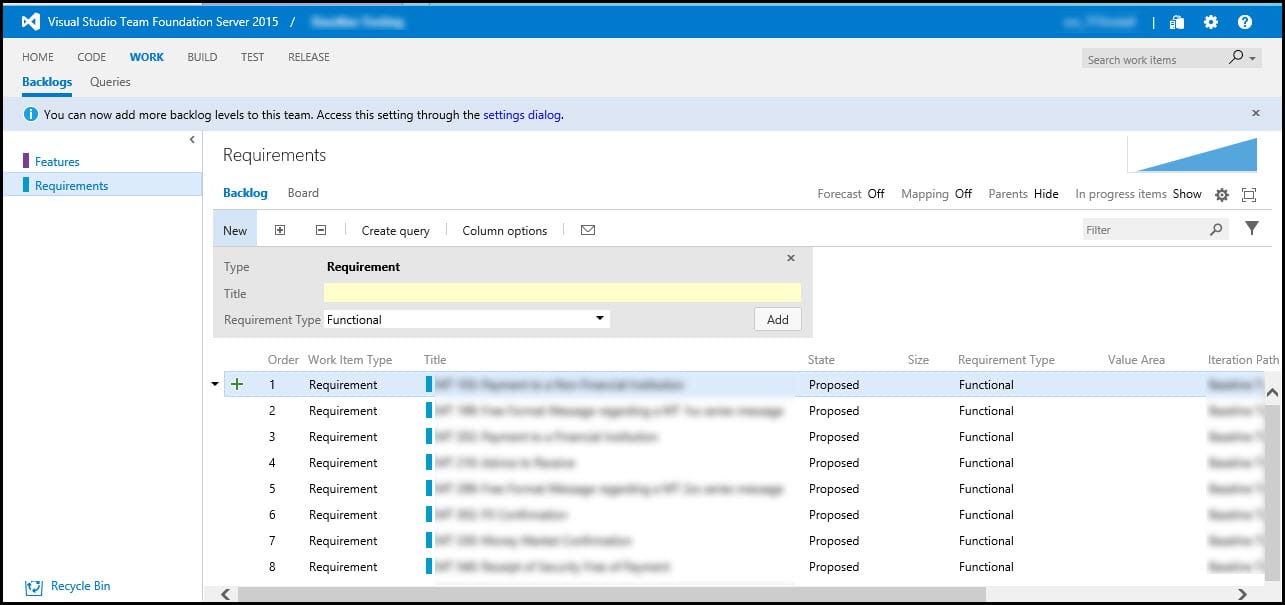
- Refresh the page and make sure that everything is okay.
Conclusion
TFS Team Project Manager is completely free to use and it has some really great features. It works with any version of TFS, including VSTS, but for the best user experience I would recommend using the latest versions.
To learn more about Agile Software Testing, have a look at the quick guide about Agile Software Testing. This guide presents the basic idea behind Agile methodology and its connection to software testing. It describes the structural idea of Agile and explains the importance of adaptation to changes in the fast-paced software development world.
If you would like to know more about Azure deployments, have a look at the post How to deploy to Azure using Team Services Release Management. The post describes how Azure deployments are made easy by using Visual Studio Team Services (VSTS) Release Management. You will see a step-by-step tutorial on how to configure and deploy to Azure in Release Management, and, moreover, how to configure an end-to-end pipeline for deploying applications on Azure.

