Introduction
In one of my previous posts Quick overview of Azure DevTest Labs I've explained what is Azure DevTest and main functionalities. In that post I've also mentioned a little about VM policies. Developers can easily set lots of different for example the policy for number of Virtual Machines per each Lab user, which VM sizes are allowed for VM creation, policy for Automate Shutdown of Virtual Machines and so on. Each policy also has a possibility to configure the threshold for it and to set alerts. By configuring and setting policies you can minimize your cost and reduce the waste.
Step 1: Allowed VM sizes policy
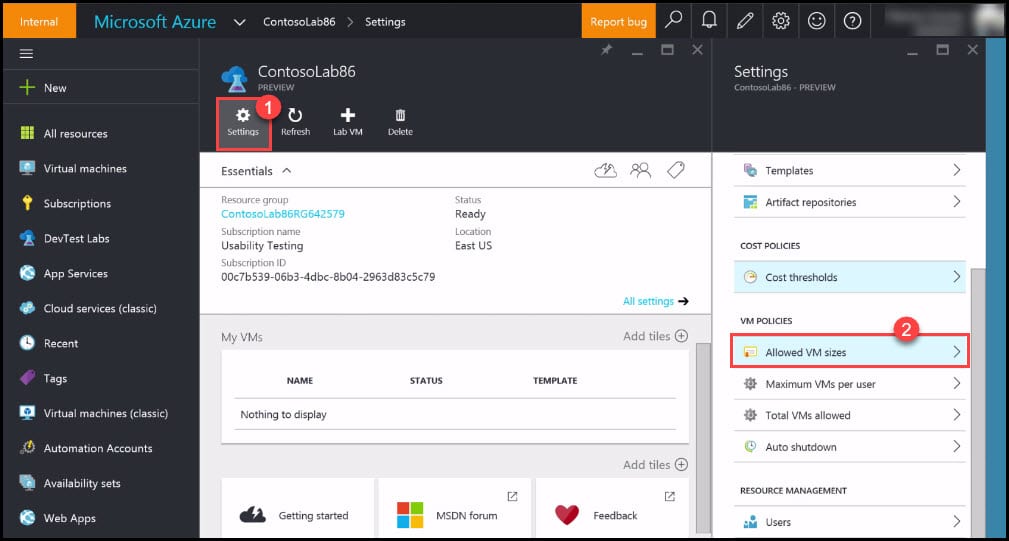
You can find all VM policies by going to settings in your account. Cost of Virtual Machine running is also connected to its size and all information about pricing for different sizes are available on Microsoft Azure's Virtual Machines Pricing list, which is available on: https://azure.microsoft.com/en-us/pricing/details/virtual-machines/#Windows. Prices differ for Windows and Linux users; however, all information is accessible on upper link. Of course the bigger size of the Virtual Machine we choose, the higher will be the cost. 1. Click on Settings button. 2. On the right side new column with all settings data will show up, from the list go to VM policies and click on policy Allowed VM sizes.
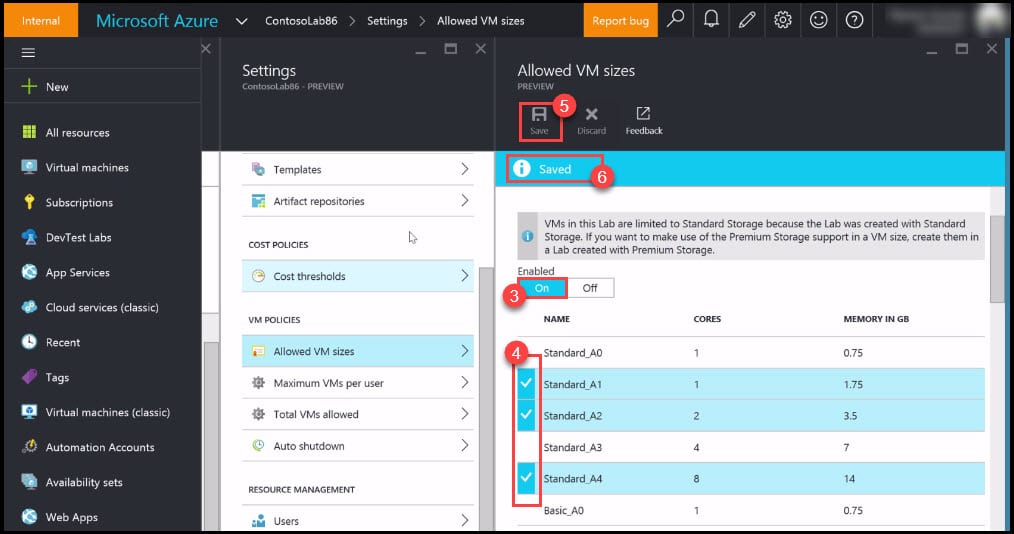
- First click on Enable button, so that all options will be available for selection. 4. From the list of all VM sizes, choose only the ones that should be allowed to use. You can do that by clicking in the square on the left size of the Virtual Machine size name. When you will choose the sizes, the chosen ones will be colored in blue color. 5. Click on Save button to save selection. 6. You will see that Policy has been saved.
If you would like to learn more about different tools and ways for Team Foundation Server to Visual Studio Team Services migration, - have a look at the quick guide about real stories for migrating Team Foundation Server to Visual Studio Team Services. The guide describes some of the real migration scenarios and explains how to use different tools for several cases.
Step 2: Maximum VM's per user
The number of Virtual Machines that are linked to one user is directly connected to the cost of Virtual Machine in Microsoft Azure. In case that user tries to create a new VM, after the user limit has been reached, the error message will occur to the user, which will indicate that new VM cannot be created. 1. Navigate back to VM policies tab and click on Maximum VMs per user policy. 2. Click on Enable button, so that the typing window will be available. 3. Type the number of VM's allowed per user. 4. Click on Save button. 5. You will see that Policy has been saved.
The post Upgrade to TFS 2018 Has Been Done in Production describes a full upgrade and migration from TFS2015 to TFS2018 and describes the improvements over the old TFS 2015.
Step 3: Total VM's allowed
The final cost also depends on the total Virtual Machines in your Lab. In order to control that cost, you can set the maximum number of Virtual Machines that are allowed to be used in your Lab. 1. Navigate back to VM policies tab and click on Total VM's allowed. 2. Click on Enable button, so that the typing window will be available. 3. Type the number of VM's allowed in Lab. 4. Click on Save button. 5. You will see that Policy has been saved.
Step 4: Auto Shutdown policy
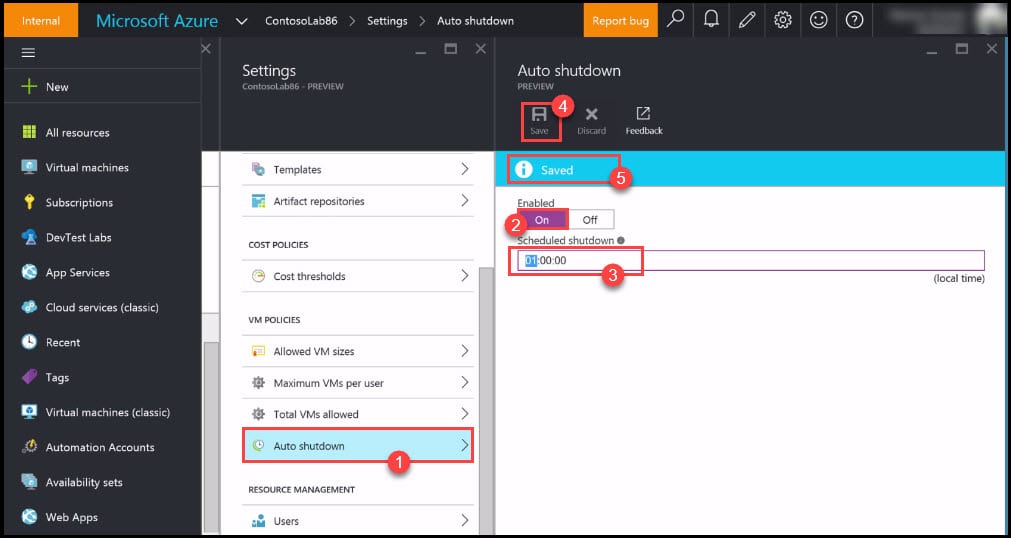
The final cost highly depends also on the working hours of all running Virtual Machines. This cost can be much lower with usage of Automate Shutdown for all Virtual Machines. This would mean that all Virtual Machines would be running only when this is really required. For example, if you don't use all Virtual Machines at night, you can stop them at that time. This policy will automatically apply Automate Shutdown for all Virtual Machines. 1. Navigate back to VM policies tab and click on Auto shutdown. 2. Click on Enable button, so that the window with hours will be available. 3. Choose the time when the Virtual Machine should stop. 4. Click on Save button. 5. You will see that Policy has been saved.
Conclusion
By setting policies for your needs, you can highly reduce the cost of Virtual Machine running. In one of previous post Microsoft Azure - Scheduled VM Shutdown with Azure Automation it is already described how the usage of Virtual Machines with high configuration can be very expensive and how can you reduce the cost of Virtual Machines by reducing its working hours with Automated Shutdown. If you didn't already consider creating Automate Shutdown with Azure, you should definitely do that in DevTest Labs.
You can see this video, if you would like to find more information about how to generate unit tests and calculate the code coverage on the local machine, and how to perform the same process with VSTS and the Build on the cloud. You will see how to add your existing projects to VSTS, how to use Console.Read() function to prevent your app from closing, how to add a new project and create a hand-coded unit test in that project, and finally, how to generate unit tests with IntelliTest, which scans the code and suggests you all the possible unit testing cases. You will see the comparison of the Code Coverage of the hand-coded test with the generated unit test, the latter providing 100% Code Coverage.


