
Introduction
This post will demonstrate how Azure deployments are made easy by using Visual Studio Team Services (VSTS) Release Management. You will see a step-by-step tutorial on how to configure and deploy to Azure in Release Management, and moreover, how to configure an end-to-end pipeline for deploying applications on Azure.
If you would like to learn more about using different environments during the realization of a software system, have a look at the post Azure DevTest Labs Updates. Azure DevTest Labs is a service provided by Microsoft Azure which provides functionality for managing environments that contain Azure Virtual Machines. The post mentioned above describes both the core capabilities of DevTest Labs and the new features of the service (as of February 2018).
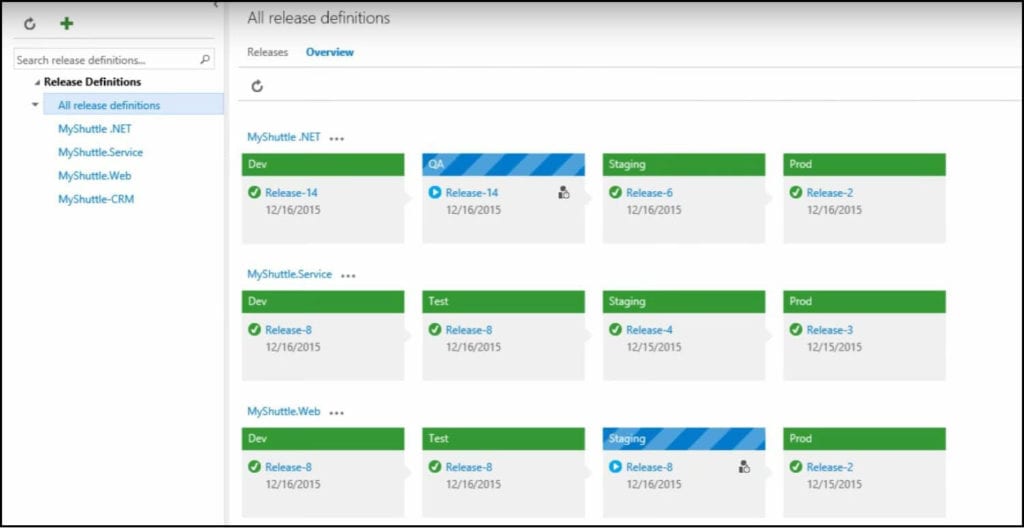
Release Management (RM) is a DevOps feature set in both Team Foundation Services (TFS) and VSTS. The figure below demonstrates an example of the VSTS Release Management portal interface.
RM allows you to set up continuous delivery all the way from code check-ins to production through various test environments. This tutorial will show you how to get started easily using all the built-in templates and the tasks that are available in Build and Release, get connected to Azure with a single click, and configure continuous delivery to Azure.
You can see this video if you would like to find more information about how to get started with Release Management and its advantages. See how to create a build definition using CI/CD Tools for VSTS Extensions (I will be using Package Extension and Publish Artifact tasks), and also using DevOps-VSTS-POC trigger in order to enable CI, all of that in order to be able to publish, share, install and query versions.
You will see how to create a release definition, choose an artifact and configure the source for the artifact and default version. See how to create different environments or clone the existing one. In my case, I am going to create QA, Preproduction, and Production environments, each with one phase and one task. See also how to configure the Publish Extension task for each environment. See an end-to-end continuous delivery pipeline using VSTS extension with Build and Release Management.
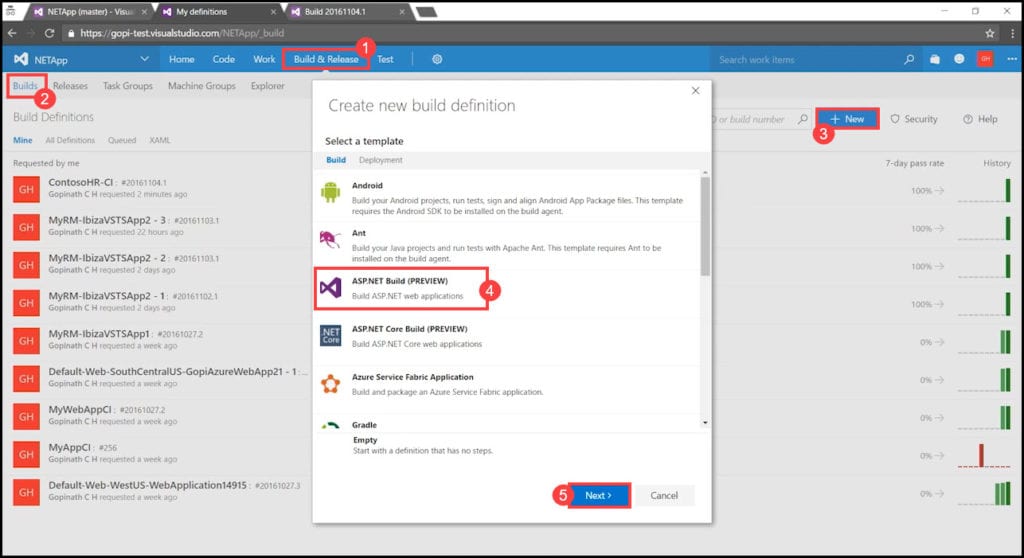
Step 1: Create a new Build definition
VSTS is a Microsoft-provided cloud infrastructure with an integrated set of services allowing you to plan, build, and ship software across a variety of platforms, without having to install or configure a single server. Now you will see how to create a Build definition template that you will deploy to Azure in the next steps.
- In your VSTS portal go to the Build & Release tab.
- In the Build & Release tab, choose Builds from the ribbon.
- Create a new Build definition by clicking on +New.
- From the appeared list of templates for various applications, choose your application type. We will be using a .NET web application.
- Click on Next.
If you would like to learn more about using the Build Variables in VSTS and Release Management, have a look at the following post: VSTS Build variables and Echo. The post describes how to see the output at any point in time while automating a process, through setting variables and displaying them during the build.
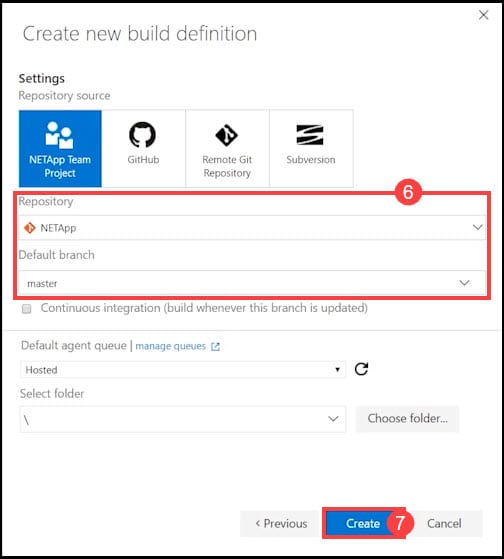
- Pick the Code Repository and the Branch for your Build definition.
- Click on Create.
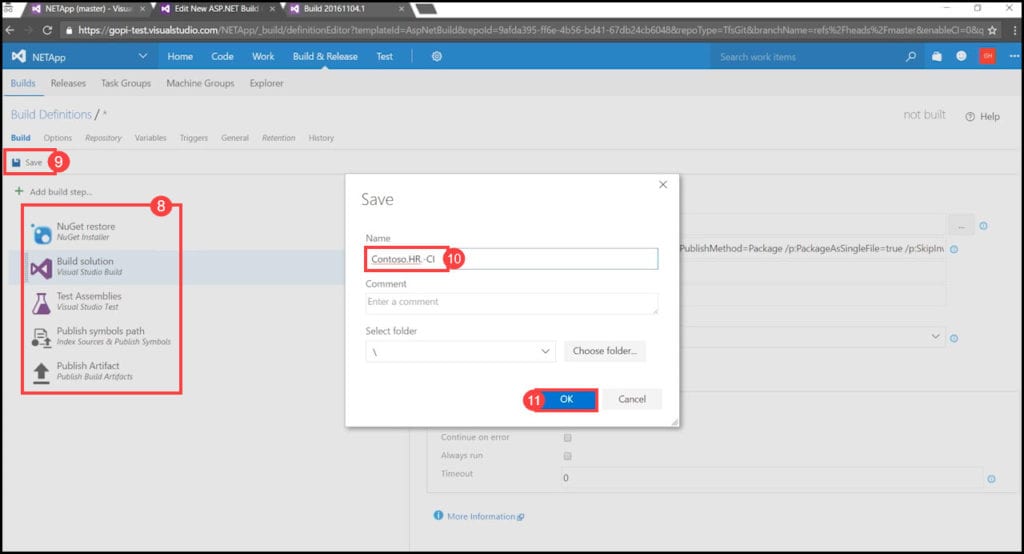
- As soon as you create the template, all the tasks with already pre-set parameters will be created by default. You don’t need to change a single value - the build packages automatically create the web packages needed to deploy.
- Click on Save.
- Name your Build definition.
- Click OK.
- Your Build definition is ready.
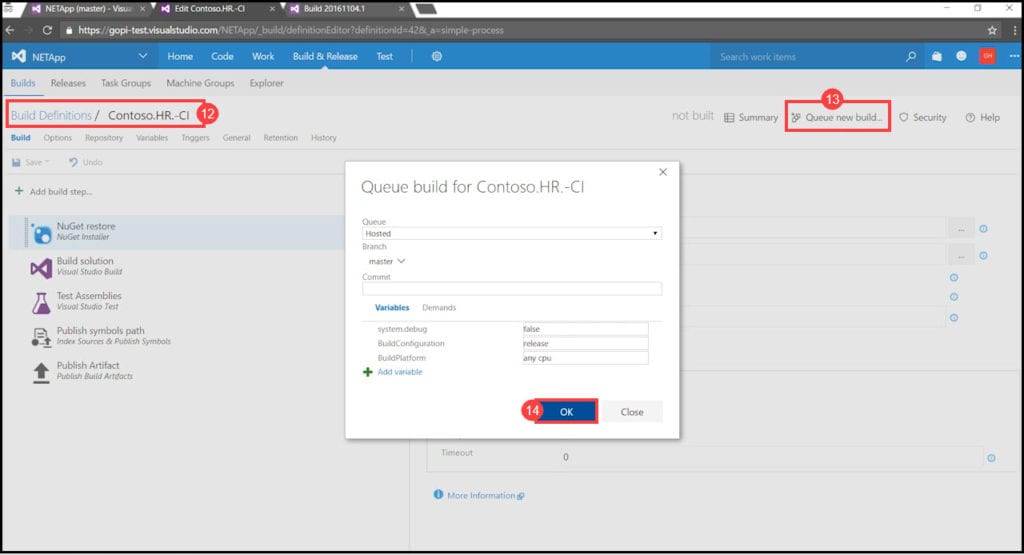
- Create a Build from the new Build definition by pressing Queue new build.
- Press OK.
You can see this video, if you would like to find more information about an end-to-end Continuous Integration and Continuous Delivery Pipeline using VSTS extension with build and release management with VSTS. Learn how to create a Git repo, push the code, go to the build, and start creating a build definition. Add two tasks in the build definition; Package Extension and Publish Artifact (first install CI/CD Tools for VSTS Extensions). How to create a new release definition, configure the artifact and create (in my case) three environments: QA, Preproduction, and Production, each with one phase and one task.
Use the Publish Extension release task in order to configure VSTS marketplace connection and set different Publisher IDs for each environment. Also, see how to enable/disable Pre-deployment approvals for Release Management. Enable continuous integration, make any change (I have changed the current build number), and commit the change, which should trigger the build automatically. After the build is done, see how to trigger the release.
Step 2: Create a Release definition
After the Build is successfully created, you will need to create a Release for it.
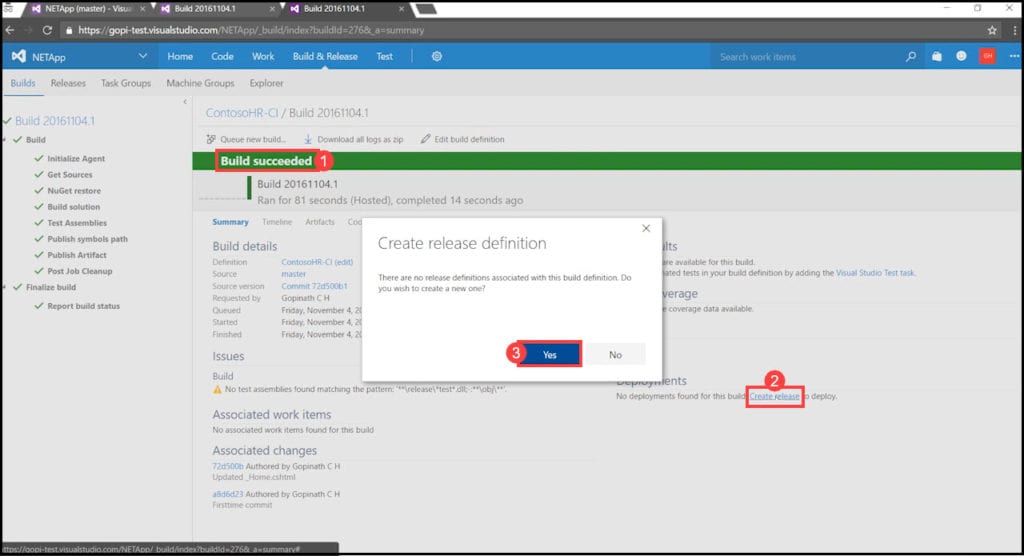
- When the Build is created you will be automatically redirected to the Build summary page, where you can see the Build successful indication on top of the page.
- From the Build summary page, click on Create release.
- Click Yes.
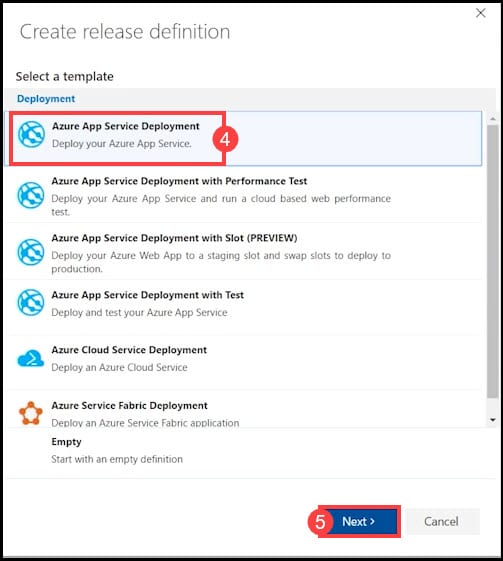
- Choose an appropriate template from the appeared set of templates. In this case, we will use App Service Deployment.
- Click on Next.
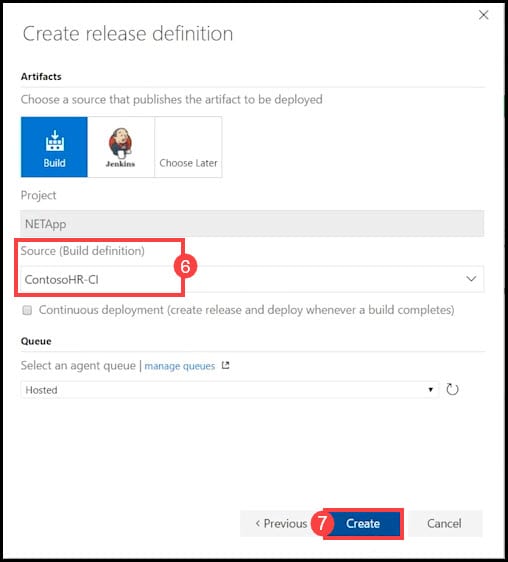
- The Source will be figured out automatically.
- Click on Create.
You can see this video if you would like to find more information about a walkthrough introducing Release Management and Build Automation using TFS 2017/2015. Step by step about the whole process, starting from creating the project, checking in the code in the source control, creating a build definition and triggering the build, and also creating a release pipeline. Learn how to properly configure the build steps, including Copy Files and Publish Build Artifacts. See how to create a new release definition, add environments, and link to build definition. See how to add tasks to the release definition, like Windows Machine File Copy, and configure it properly.
Step 3: Create an Azure Subscription {#3-create-an-azure-subscription}
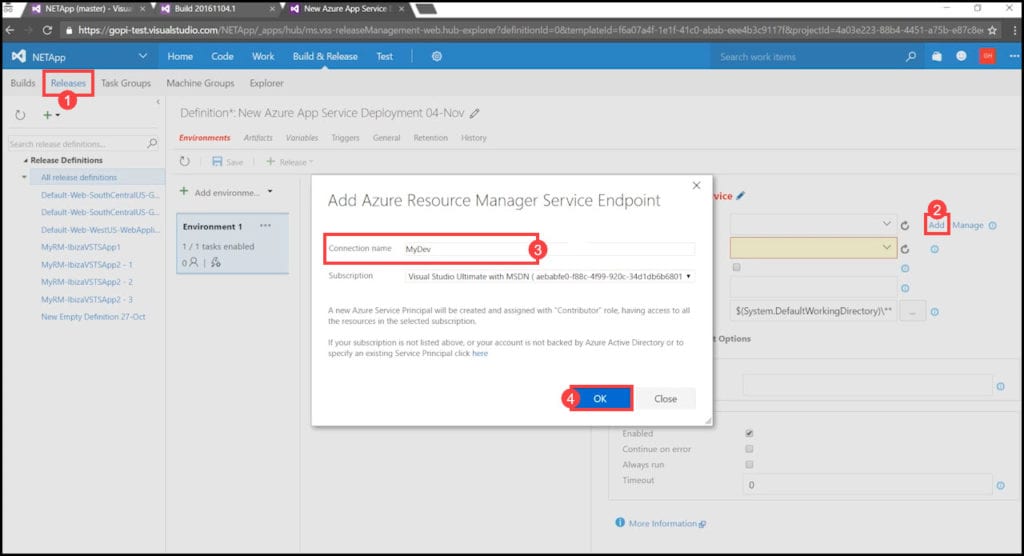
The deployment task will be created by default. Now, you need to create an endpoint subscription - the end point you want to deploy to.
- You will be automatically redirected to the Releases tab of your VSTS portal.
- Click on Add in the Deploy Azure App Service area to create a new subscription. Based on the logged-in user, the system will automatically figure out the available subscriptions on Azure.
- Name your subscription.
- Click OK.
The end point is now created and you can continue with the task.
Step 4: Deploy an application
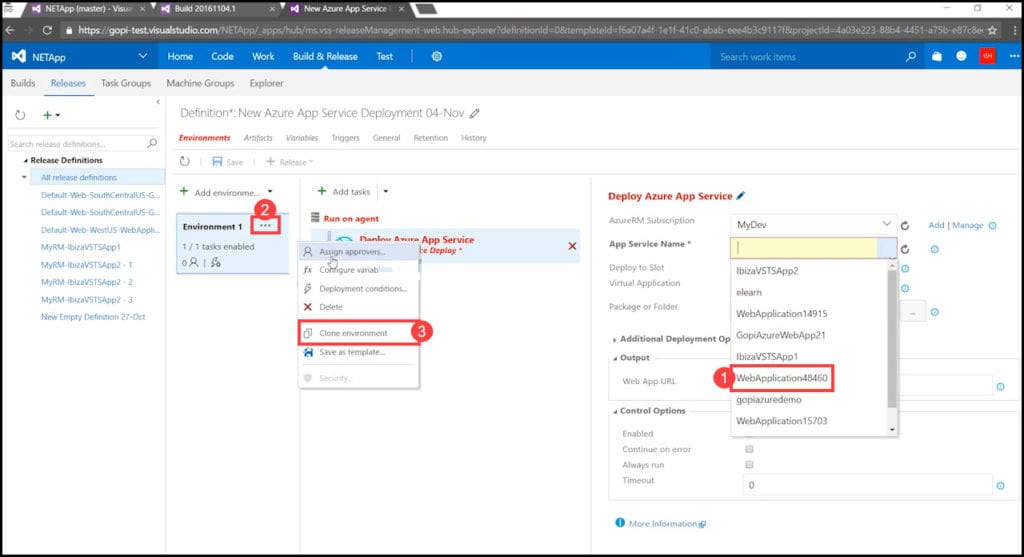
All the applications from your Azure subscription will be available for deployment. In this tutorial, we will simply choose an available application from the list; however, there are Additional Deployment Options available for advanced users. The application can be configured as a Web Deploy, additional SetParameters File can be set up, and the application can even be taken offline. For the simple scenario described in this tutorial, these additional parameters are not required.
- Pick a web application from the App Service Name drop-down list. With this setting, you are 100% ready to deploy.
- Now you need to create a new production environment. In this case, we will simply Clone an environment. Click on the ellipsis (…) symbol next to your existing Environment (<Environment 1> in our case).
- Click on Clone environment. This will be your production environment.
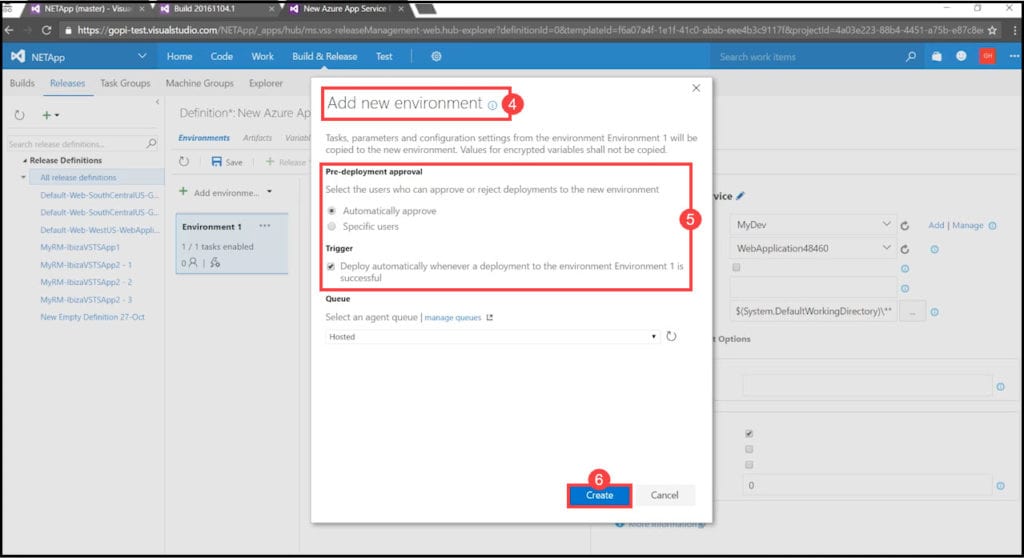
- An Add new environment window will automatically open.
- You can choose the desired parameters for the Pre-deployment approval and Trigger. In this case, we will keep the default settings.
- Click on Create.
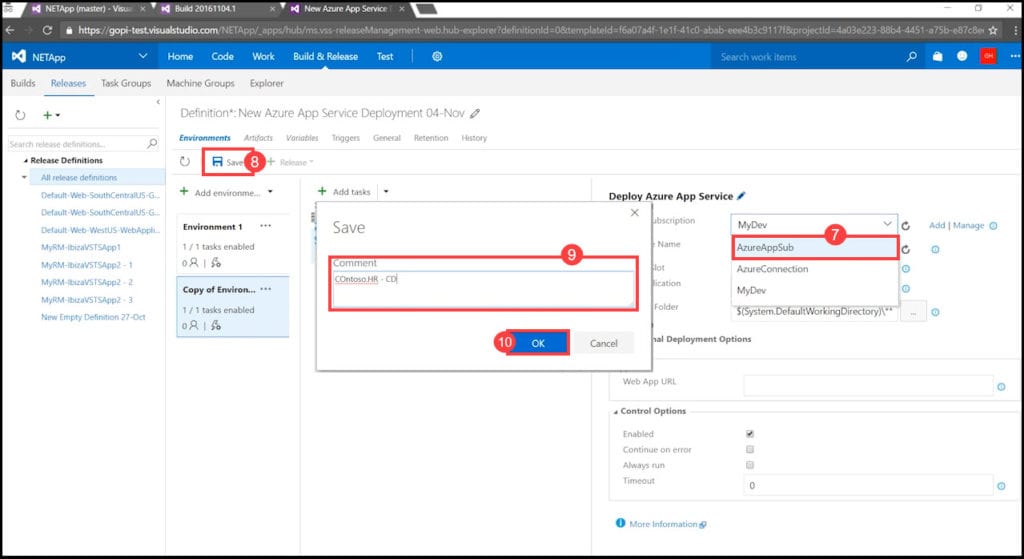
- In the Deploy Azure App Service section, choose a subscription that you want to use for your production from the Azure RM subscriptions dropdown list. In this case, we will choose <AzureAppSub>.
- Click on Save.
- Enter a Comment providing some information about the application.
- Click OK.
The deployment process is now finished. Visual Studio RM has the best DevOps deployment experience for Azure. It provides with a single click Azure connection to deploy to Azure. Furthermore, you can deploy applications to Azure using the Visual Studio Team Services Release Management portal, and you can configure the continuous delivery from the Azure portal as well.
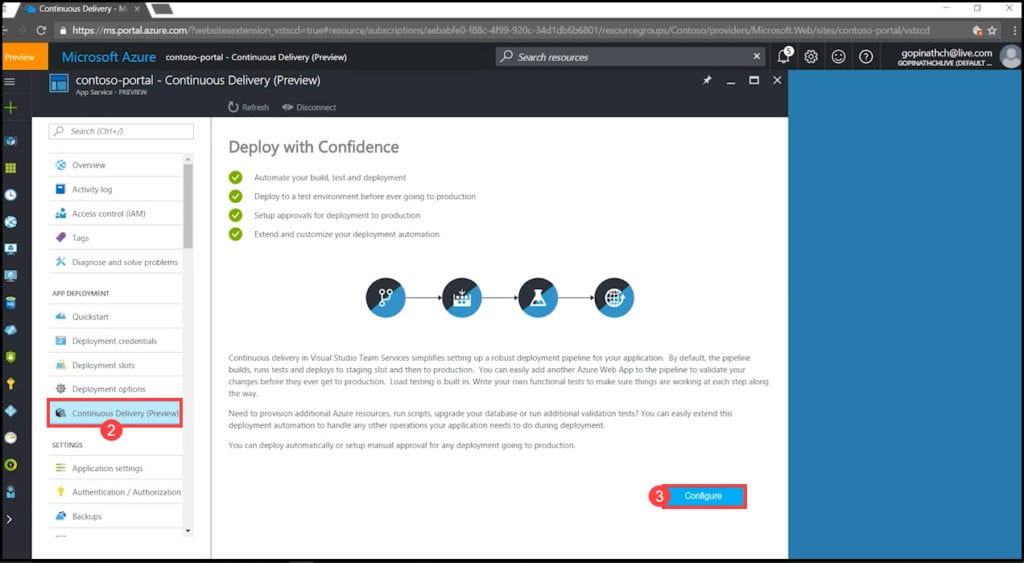
Step 5: Configure continuous delivery from the Azure portal
Continuous delivery provides you with an automated way of building, testing, and deploying to Azure. If needed, you can also configure manual approvals; therefore, continuous delivery essentially allows you to deploy with confidence.
If you would like to learn more about Microsoft Dynamics development, including the overview of the Microsoft Dynamics CRM itself, installing Microsoft Dynamics 2016 on Azure VM, how to upgrade to Dynamics 365, how to develop Dynamics CRM plugin, how to debug Microsoft Dynamics CRM project, create and run unit tests using FakeXRMEasy and Microsoft Fakes, JavaScript and front-end unit tests as well code quality using JSHint, Also, how to create and run UI and how to integrate all the practices as part of the CI/CD (Continuous Integration and Continuous Delivery), have a look at this post.
- In the Azure portal your newly created application is already available. Open this application (in our case, the application is called <Contoso portal>).
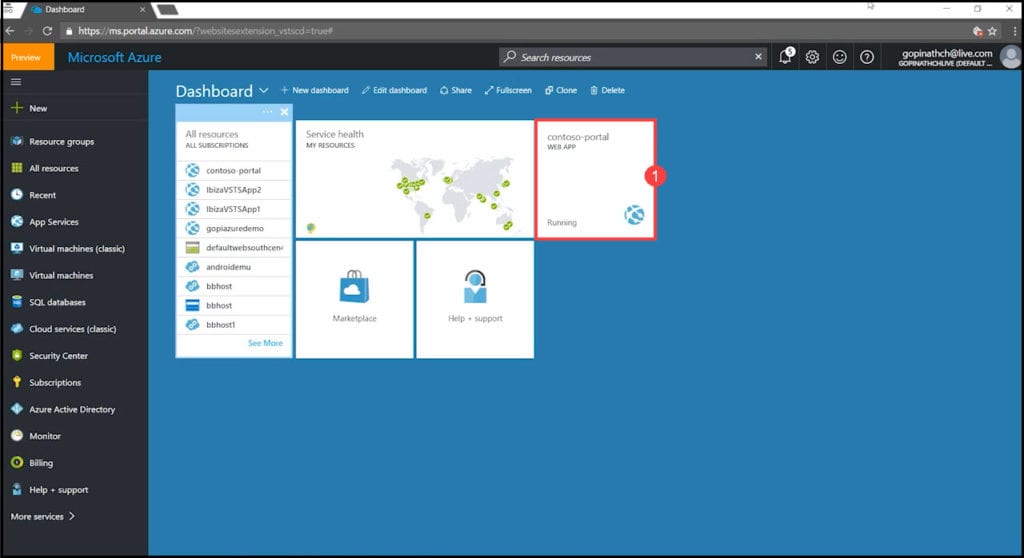
- You will see a new item in the portal called Continuous delivery. Click on it. Using this item you can configure continuous delivery for every Azure web application.
- Click Continue.
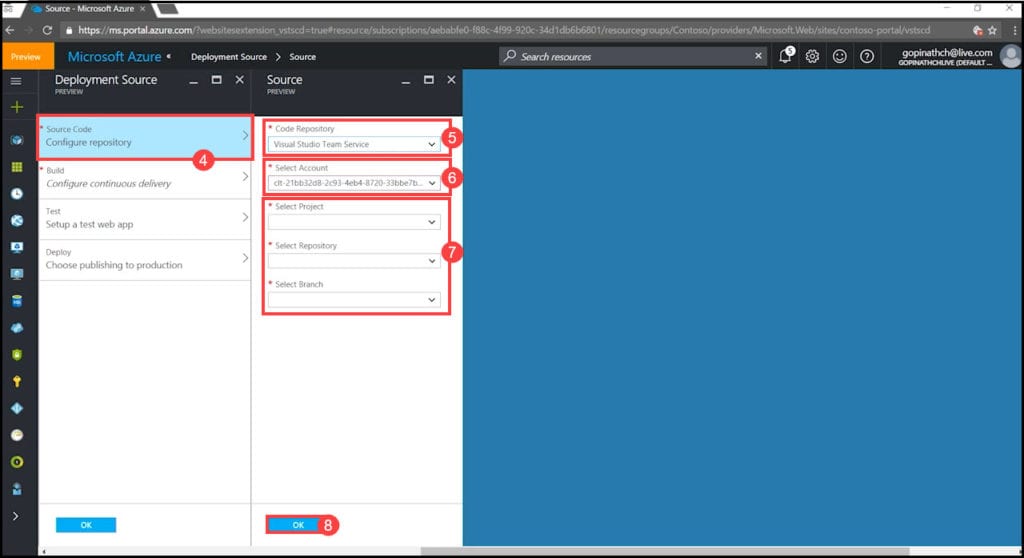
- The first step of configuring continuous delivery is to provide the source parameters where the Source Code is available. Click on Source Code to configure the repository.
- There is support for Visual Studio Team Services and GitHub. For this demo, we will choose Visual Studio Team Services.
- As soon as you choose VSTS, based on the logged-in identity, Azure will automatically show you all the accounts associated with your identity. Choose the Account where your source code is available; you will not be prompted to enter any username or password.
- Choose the Project, the Repository, and the Branch from the automatically created lists.
- Click OK. The source code is now configured.
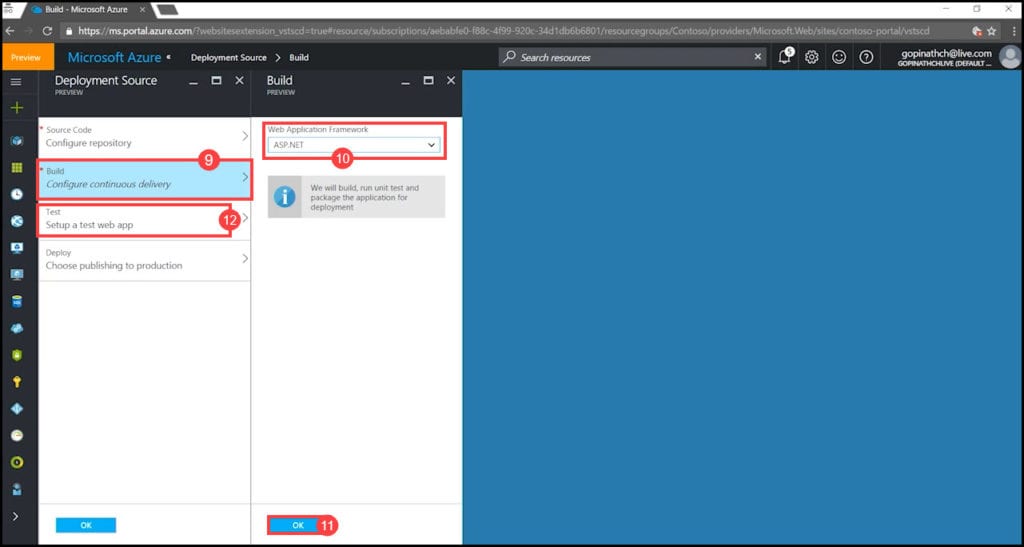
- Set up the application framework type used to generate the Build. Click on Build.
- Choose the Web Application Framework. In our case, it is a .NET application.
- Click OK.
- If needed, you can configure the Test environment, allowing you to add all the load testing targeting this application. For this tutorial, we will skip this step.
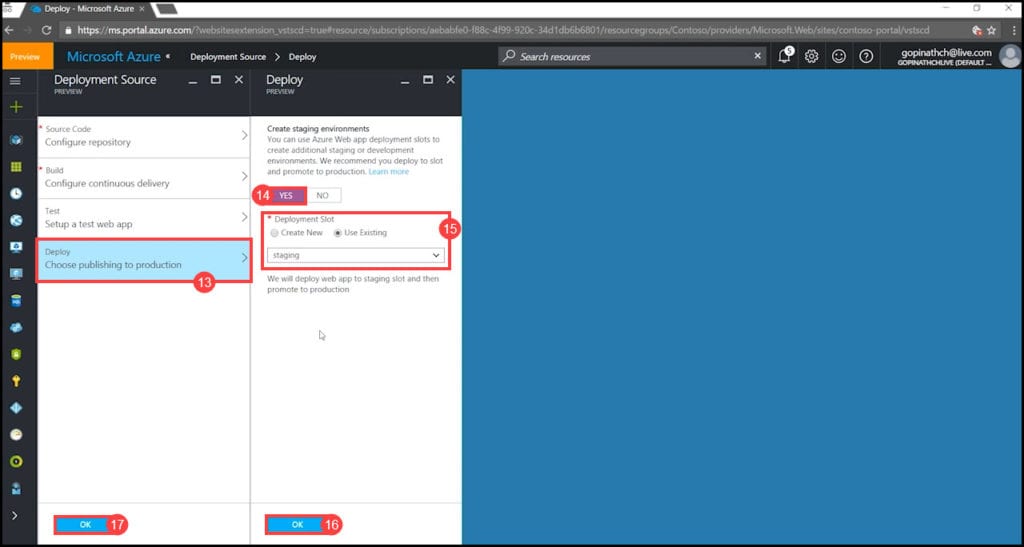
- The last step for continuous delivery configuration is publishing to production. We always recommend using Slots: deploying the application first to the Slot, and then swapping it to production. Click on Deploy to configure publishing to production.
- Create a Staging Environment by pressing Yes under Create staging environments.
- Within the environment, you can use an already created Deployment Slot, or even create a new Slot. For this tutorial, we will use an existing <staging> Slot.
- Click OK.
- Click OK in the Deployment Source section of the screen.
You can see this video, if you would like to find more information about the new tools and enhancements for Continuous Delivery (CD) and DevOps with Visual Studio 2017. See how to download and initiate the Continuous Delivery Tools for Visual Studio extension, create a new team project on VSTS, or connect to an existing project. Clone a project to a local Git repository, create a simple web application, and finally configure the CD extension, allowing you to create a Build definition, run that Build, trigger a Release, and complete app deployment to the cloud. The process of making changes to the CD and DevOps pipeline is also demonstrated, as well as managing Build failures with the help of the described extension.
Step 6: Check the results
Your Build definition and your Release definition are now completely configured for doing automated deployments to your Azure web application.
- Once the deployment is configured completely, you can see the Build definitions, Release definitions, and Release details.
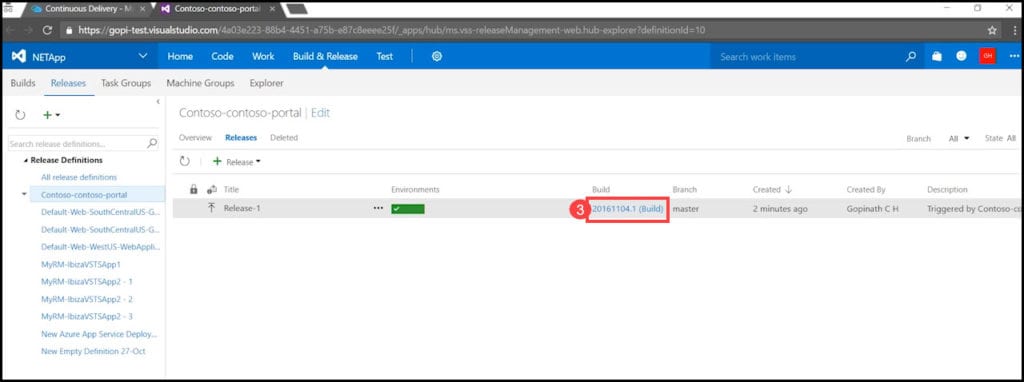
- We will check the result of configuring the Release definition. Click on Release definitions.
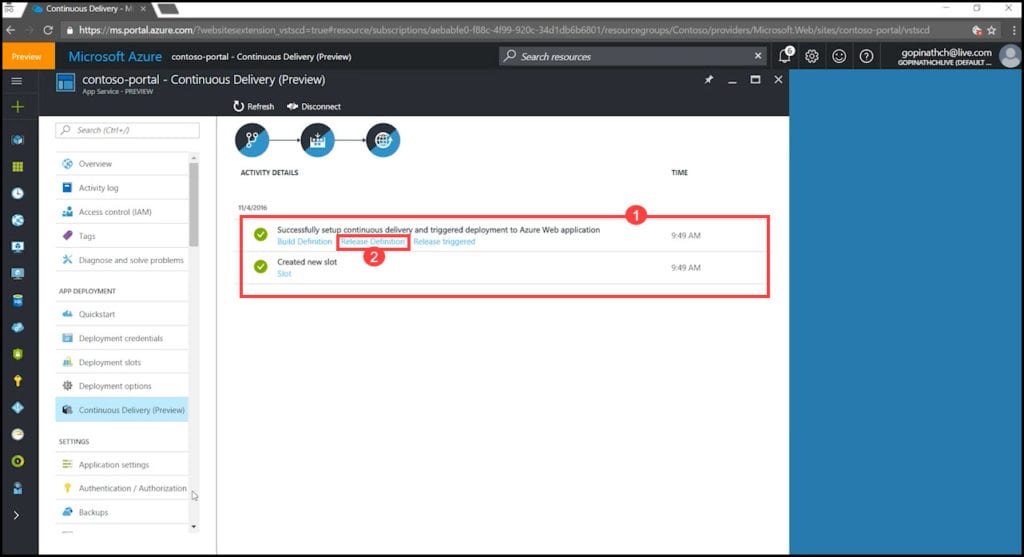
- A new tab will open with the Release definition that just got created based on the performed configuration. The Build link is available, where you can see the Build, the code, and the work items that got added.
Conclusion
This tutorial has demonstrated how to configure and deploy to Azure in Release Management, and how to configure an end-to-end pipeline for deploying applications on Azure. Visual Studio Team Services have the best Integration Story for DevOps deployment between Azure and Release Management. If you have not used Release Management, you can give it a try for free by creating a Visual Studio Team Services account.