
Recently, I worked with Microsoft Azure to provide better solutions using Visual Studio 2015 and Team Foundation Server 2015 and Visual Studio Online. Here I will just share my experience about that through a new series which introduce different and random features for Microsoft Azure.
How to Upload a Virtual Machine to the Cloud in Microsoft Azure
Introduction
1: Check-out the Container created in the Storage
2: Install Azure-PowerShell
3: Upload .Vhd File
4: Check-out uploaded .Vhd File in the Container
5: Create a Disk from a VHD
6: Create a New Virtual Machine using From Gallery Method
7: Connect to Windows Azure Virtual Machine
Conclusion
Introduction
This post will describe how to create and manage a virtual machine (VM) in Microsoft Azure. You will see step by step how to upload your local virtual machine to Microsoft Azure Cloud and create a fully functional virtual machine on the cloud.
f you would like to learn more about using different environments during the realization of a software system, have a look at the post Azure DevTest Labs Updates. Azure DevTest Labs is a service provided by Microsoft Azure which provides functionality for managing environments that contain Azure Virtual Machines. The post mentioned above describes both the core capabilities of DevTest Labs and the new features of the service (as of February 2018).
Step 1: Check-out the Container created in the Storage
In order to upload the Virtual Machine, you need to have a container inside the storage. If you don't have that already, you would need to create one.
- From the navigation pane, click on Storage.
- Click on the storage created <vmsmra> inside which you have created the container.
- Click on the container created for your uploaded VHDs <uploadedvhds>.

You can see this video if you would like to see how to create a Windows virtual machine on Azure. I will use a Windows 10 machine, connect remotely to it using remote desktop, install Docker for Windows in Linux mode, verify the Docker installation, fix errors, pull the docker hello-world image from Docker Hub, run a container from it, pull a SQL Express image, and nginx, run multiple containers from the same images, and verify it.
Step 2: Install Azure-PowerShell
You would need a machine to upload .vhd file. In this case, we will use Azure PowerShell. If you don't have Azure PowerShell, you will need to download it.
- Use the direct link to download the .msi file for Azure-PowerShell: Download. Note: You can also download it from GitHub.
- Click on the downloaded .msi file to install Azure-PowerShell.
- Click on the License Agreement check box.
- Click on Install.
 to upload vhd file")
If you would like to know more about Azure deployments, have a look at the post How to deploy to Azure using Team Services Release Management. The post describes how Azure deployments are made easy by using Visual Studio Team Services (VSTS) Release Management. You will see a step-by-step tutorial on how to configure and deploy to Azure in Release Management, and how to configure an end-to-end pipeline for deploying applications on Azure.
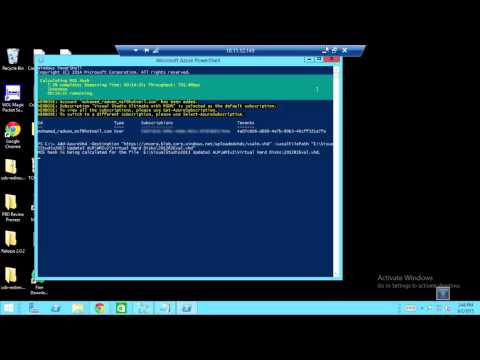
Step 3: Upload .Vhd File
When you upload .vhd file, you can place it anywhere within your blob storage.
- Run Microsoft Azure PowerShell.
- The PowerShell console will open up. Type
**Add-AzureAccount**and press enter. Note: Type**help azure**to get all the cmdlets. - You will be prompted to sign in to your Microsoft account. Type your email address and password then press enter.

You can see this video if you would like to find more information about how to create a Linux machine on Azure. We will select an Ubuntu server, remote connect to it using Git Bash and PuTTY, and test our connection using the sudo command.
- Type a command with the following syntax and press enter:
**Add-AzureVhd -Destination <url> -LocalFilePath <FileInfo>**Where:- Add-AzureVhd cmdlet allows you to upload on-premises virtual hard disks (in .vhd file format) to a blob storage account as fixed virtual hard disks.
- **-Destination
** specifies the URL of a blob in Blob Storage. The parameter supports SAS URL, although patching scenarios destination cannot be an SAS URL. - **-LocalFilePath
** specifies the path to the local .vhd file.
In our case, we will type:
**Add-AzureVhd -Destination https://vmsmra.blob.core.windows.net/uploadedvhds/vsalm.vhd -LocalFilePath "E:VisualStudio2013 Update3 ALMWMIv2Virtual Hard Disks2012R2Eval.vhd"**
")
If you would like to know more about this new developer service available on the Azure platform, you can have a look at the following post: More about Azure DevTest Labs. If you prefer a more concise description of the same feature, have a look at Quick overview of Azure DevTest Labs.
- It would calculate MD5 Hash, detect empty blocks, and then upload the vhd file. The total elapsed time can be around 1.5 hours, depending on your internet speed and the size of the VHD.
")
If you would like to learn more about using the Build Variables in VSTS and Release Management, have a look at the following post: VSTS Build variables and Echo. The post describes how to see the output at any point of time while automating a process, through setting variables and displaying them during the build.
Step 4: Check-out uploaded .Vhd File in the Container
The uploaded .vhd file would be saved in the designated container inside the storage.
- From the navigation pane, click on Storage.
- Click on the storage <vmsmra>.
- Click on the container <uploadedvhds> to view uploaded VHDs.
- You can now view your uploaded vhd <vsalm.vhd>.

You can see this video if you would like to find more information about the story behind containers and what drives the need for them. We will understand why companies moved from traditional solution architecture to Microservices and how containers are the perfect solution for running them. We will clear some definitions, tools, and keywords related to this ecosystem. We will understand the difference between VM, Container, and Hyper-V Container, and why we would prefer container over VM. We will also understand the difference between container and image, the lifecycle of creating a new image, adding more layers to the base image, and pushing that to a container images registry on the cloud, then pulling that from the registry to anywhere to have a new container. We will understand different technologies and services around containers, like Docker, Docker Swarm, Kubernetes, Azure Container Services (ACS), and Azure Container Registry. We will see how to create a Linux machine on Azure, remote connect to it using Git Bash and PuTTY, how to install Docker, display all the images that exist on the machine, pull new images from Docker Hub, run and stop containers, and display running containers. We will also see the same steps on Windows with Docker.
Step 5: Create a Disk from a VHD
After you transfer the .vhd file from your local machine to the container in Microsoft Azure, you must create a disk.
- From the Azure classic portal, under All Items, click on Virtual Machines.
- Under Virtual Machines, click on Disks.
- From the command bar at the bottom of the Portal screen, click on Create.
- A pop-up window <Create a disk from a VHD> will be displayed. In the Name field, type a unique disk name. In this case, we have named it VSALMDisk.
- In the VHD URL field, click on the folder icon.

If you are interested in developing a Visual Studio Team Service extension, and you would like to know and follow the best practices for DevOps, Continuous Integration, and Continuous Delivery, have a look at the following post: Develop VSTS Extension and Configure CI (Continuous Integration) and CD (Continuous Delivery Pipeline).
- Browse to the container location. Click on vmsmra.
- From the containers within vmsmra, click on uploadedvhds.
- Click on the uploaded vhd <vsalm.vhd>.
- Click on Open.
")
You can see this video if you would like to find more information about an introduction and overview of a series of videos about Microsoft Dynamics development, including the overview of the Microsoft Dynamics CRM itself, installing Microsoft Dynamics 2016 on Azure VM and how to upgrade to Dynamics 365, how to develop Dynamics CRM plugin, how to debug Microsoft Dynamics CRM project, create and run unit tests using FakeXRMEasy and Microsoft Fakes, JavaScript and front-end unit tests, as well as code quality using JSHint, also how to create and run UI, and how to integrate all the practices as part of the CI/CD (Continuous Integration and Continuous Delivery).
- Click on The VHD contains an operating system check box. Note: In Operating System Family, select your OS. In this case, we will select Windows.
- Click on the checkmark.
")
- After a few minutes, it will show a notification that the disk has been successfully created.
- You can then see the disk created <VSALMDisk> in the list of disks.
")
You can find more information about DevOps in the following post: DevOps: The Three Stage Conversation - People, Process, Products which describes the basic principles of DevOps. This post will be especially helpful to those for whom DevOps is still a new concept. If you prefer a deeper view on this topic, have a look at the following guide: Quick guide about Basic Principles of DevOps, which presents an overview of the DevOps process and practices, describing “the big picture,” while still maintaining a high level of detail.
Step 6: Create a New Virtual Machine using From Gallery Method
The Microsoft Azure Portal provides two basic methods to create a new virtual machine: Quick Create and From Gallery. In this case, we will use the From Gallery Method.
- Under Virtual Machines, click on Instances.
- From the command bar at the bottom of the Portal screen, click on New.
- A pop-up window will open up. Under Virtual Machine options, click on From Gallery.

- On the Choose an Image page, click on My Disks.
- Click on the disk you created <VSALMDisk>.
- Click on the proceed arrow icon.

You can see this video if you would like to find more information about how to install Microsoft Dynamics CRM 365 on Azure VM. Presented installation using SQL 2014 and SQL 2016, on several versions of Windows Server (Windows Server 2012, Windows Server 2012 R2, and Windows Server 2016). Installing Domain Controller, explained all possible issues, which you may face during the installation, like incompatible Domain Controller Windows Server 2012 with SQL Server on the same machine, Windows Search Service is not started automatically, installing Dynamics CRM reporting extension, which was needed to create an additional Dynamics Organization and many other notes.
- On the first Virtual Machine Configuration page, specify the name for the virtual machine in the Virtual Machine Name field. In this case, we have used VSALM-mra. Note: In the Tier field, make sure Standard is selected.
- Under the Size field, select D2 (2 cores, 7 GB memory).
- Click on the proceed arrow icon.

- On the second Virtual Machine Configuration page, set the following virtual machine attributes:
- Cloud Service - This is a cloud service container for virtual machines that you create. You can create a new cloud service container for a single virtual machine or place multiple virtual machines in the same cloud service for load balancing.
- Cloud Service DNS Name - This is the global DNS name that is used to contact the virtual machine.
- Region/Affinity Group/Virtual Network - This is the Region where you want the virtual machine resources to be physically deployed. The Affinity Group attribute allows Azure to keep all services in a group physically close. The Virtual Network attribute allows you to define the network to connect to the virtual machine.
- Availability Set - This is used to define a group of virtual machines that are deployed across fault and update domains.
- Endpoints - These are the communication ports through which the virtual machine can be contacted.
- Click on the proceed arrow icon.
")
In some of the posts, you can find high-level descriptions of Agile principles and the usage of some Agile tools and Agile methodology.
- On the third Virtual Machine Configuration page, set the following virtual machine attributes:
- VM Agent - The VM Agent installs extensions that enhance the interaction with the virtual machine. This option cannot be disabled when installing a Linux image. For Windows data disks and Linux images and disks, a version of the VM agent that supports extensions must already be installed in the operating system.
- Configuration Extensions - These are extensions that enhance the management of the virtual machine, including the execution of custom scripts.
- Security Extensions - These are extensions that enhance the security of the virtual machine, such as antivirus support.
- Click on the checkmark.

- You can see near the command bar at the bottom left of the Portal screen, the Virtual Machine being created. It will first create the virtual machine, provision the virtual machine, and then install extensions in the virtual machine.
- After a few minutes, it will show a notification that the virtual machine has been successfully started.
- You can then see the new virtual machine created <VSALM-mra> in the list of VM Instances.
")
this video if you would like to find more information about my personal experience of the migration Team Foundation Server to Visual Studio Team Services using Database Import Service or TFS Migrator tool provided by Visual Studio Team. Going through all six phases of the migration, following the migration guide provided by Microsoft as a walkthrough. You will see how to get started with the migration process and which prerequisites should be completed. The most important prerequisite is that you must have Azure Active Directory in order to use TFS Migrator tool. See more about the two different process models supported by VSTS, Inherited and Hosted XML. See which decisions you should make and how to validate them, for example, which customizations you should keep and which one to remove. To prepare the first collection dacpac, first you should prepare Azure Storage Container, create a dacpac file and afterwards upload it. To prepare the second collection Azure VM, you should install SQL Server, backup the DB from the collection and upload it to the Azure storage container. See first how to import (dry - run) and how to change the configuration afterwards in order to import (production).
Step 7: Connect to Windows Azure Virtual Machine
In the Azure classic portal, you use the Connect button to start a Remote Desktop session and log on to a Windows VM.
- From the navigation pane, click on Virtual Machines.
- Under Virtual Machines, click on the name of the virtual machine <VSALM-mra>.
- From the command bar at the bottom of the Portal screen, click on Connect.
- Click on OK. It creates and downloads a Remote Desktop Protocol file (.rdp file).

The post Upgrade to TFS 2018 Has Been Done in Production describes a full upgrade and migration from TFS2015 to TFS2018 and describes the improvements over the old TFS 2015.
- Open the downloaded .rdp file from your local machine.
- In the Windows Security window, type the credentials for an account on the virtual machine.
- Click on OK.
")
- You can now access the machine of Brian Keller that you uploaded in Windows Azure.

You can see this video if you would like to find more information about how to get started with Release Management and its advantages. See how to create a build definition using CI/CD Tools for VSTS Extensions (I will be using Package Extension and Publish Artifact tasks), and also using DevOps-VSTS-POC trigger in order to enable CI. All of that is in order to be able to publish, share, install and query versions. You will see how to create a release definition, choose an artifact and configure the source for the artifact and default version. See how to create different environments or clone the existing one. In my case, I am going to create QA, Preproduction, and Production environments, each with one phase and one task. See also how to configure the Publish Extension task for each environment. See an end-to-end continuous delivery pipeline using VSTS extension with Build and Release Management.
Conclusion
The Microsoft Azure Portal provides multiple, simple methods to create and manage virtual machines in the Microsoft public cloud. Using the Quick Create method, you can quickly create new virtual machines and go back later to set more configuration options. Using the From Gallery method, you can fully customize the virtual machine configuration before it is deployed into the physical region as a standalone or load-balanced service.
Microsoft Azure virtual machines scale in processor memory and storage, allowing you to create virtual machines with a large number of cores and memory, and data disks up to 1 TB in size. As an added benefit, you can easily move a virtual machine created in Microsoft Azure to Hyper-V and back since both use the same virtualized hardware and VHD format. This allows you to quickly reconfigure services on-premise or redeploy to the public cloud to adjust to changing business conditions.
In one of the old posts TFS 2015 Agile Project Management, you can read more about new Agile Project Management features in TFS 2015, which provide better support for aligning across teams while giving autonomy to individual teams; you can use the same structure with VSTS/TFS2018.