
Microsoft System Center 2012 is one of the perfect tools that integrate and work with ALM to provide a very powerful ALM environment in different areas. For example, SCOM (System Center Operation Manager) integrates with TFS in the DevOps scenario to support integration between Development and Operation, among many other scenarios. I will start to show some of these wonderful integrations, beginning with how to install System Center 2012 Configuration Manager SP1 (SCCM 2012 SP1) with MS SQL Server 2012 SP1 on Windows Server 2012.
Sections
- Examine the environment
- Add required Windows Roles and Features for Windows Server 2012
- Create a System Management Container on the DC machine
- Extend the Active Directory Schema on the SCCM machine
- Install SQL Server 2012 SP1 on Windows Server 2012
- Download and install Assessment and Deployment Kit
- Install System Center Configuration Manager 2012 SP1
The following is a step-by-step video for this post.
Examine the environment
In this scenario, I have 3 machines: Domain Controller (DC08.com), SCCM (SCCM-2012), and one client with Windows 8 (SCCM-Client-Win8). Of course, the SCCM-2012 and SCCM-Client-Win8 are joined to the domain.

Add required Windows Roles and Features for Windows Server 2012
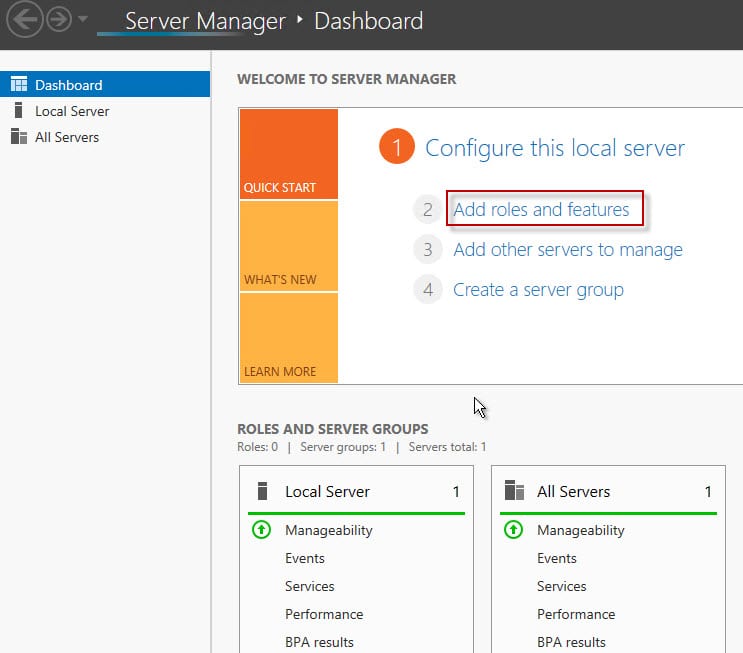
Open the Server Manager and click on Add roles and features.
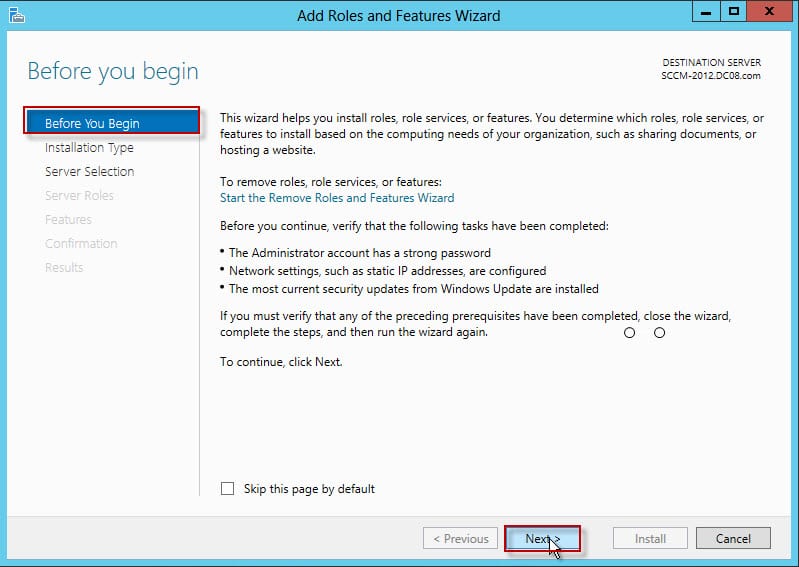
Click next until you reach Server Roles.
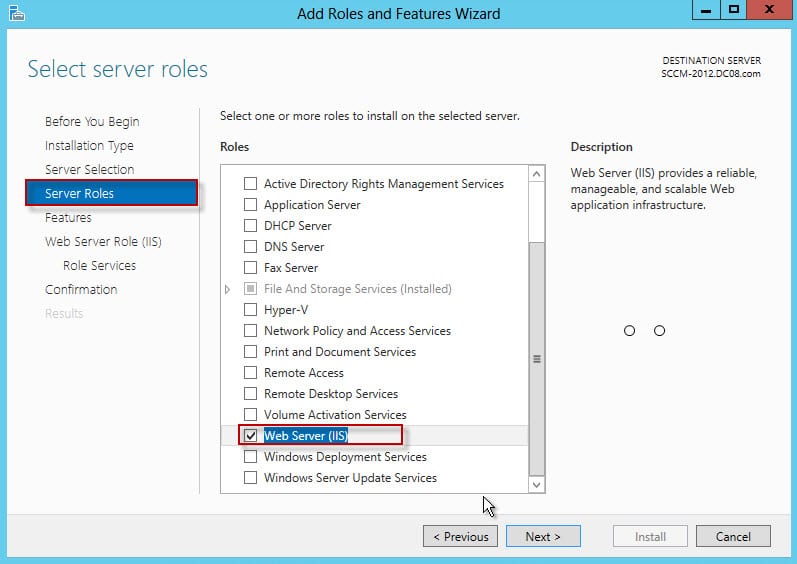
In the Server Roles, choose Web Server (IIS), add the required features, and then click Next.

Select .NET Framework 3.5 and ensure 4.5 is also selected. After that, select BITS and add the required features, then scroll down.


Add Remote Differential Compression.

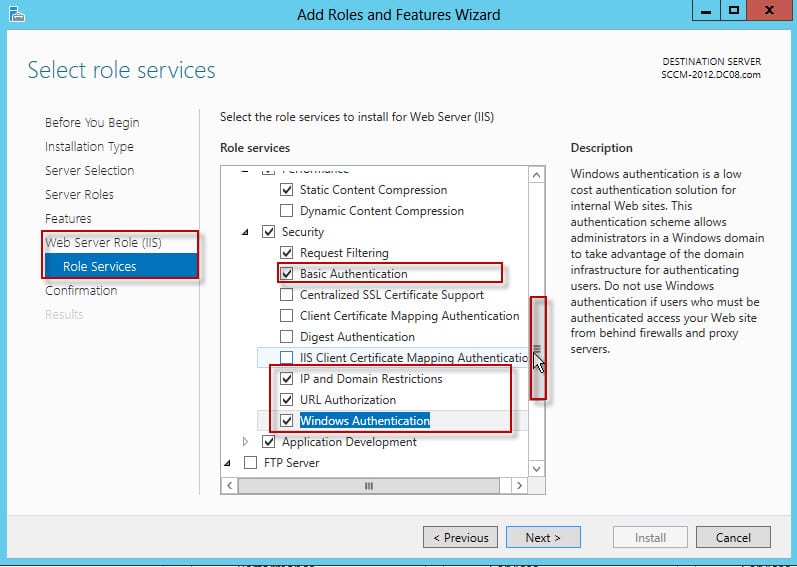
In Security, choose Basic Authentication, IP and Domain Restrictions, URL Authorization, and Windows Authentication.
Add ASP, ASP.NET 3.5, ASP.NET 4.5, and any other required features, then scroll down.

Add IIS 6 WMI Compatibility, IIS Management Scripts and Tools, Management Service and click Next.

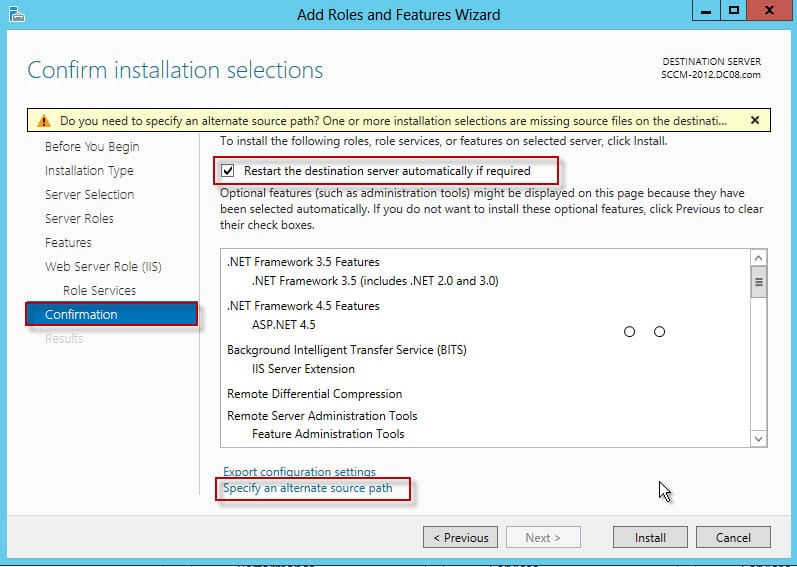
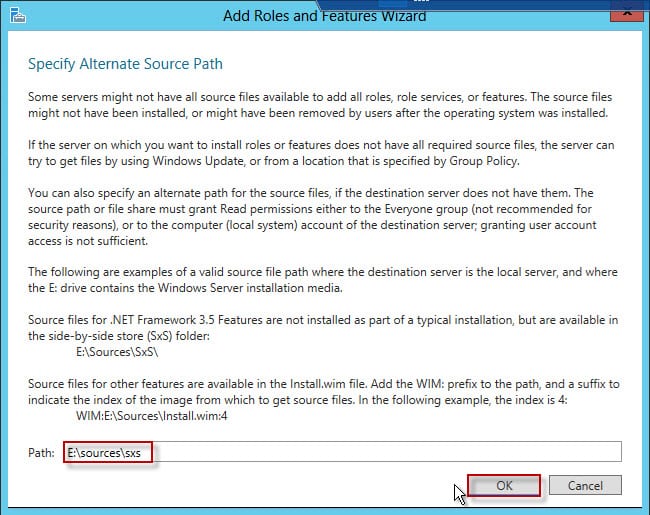
Select Restart the destination and then click on Specify an alternate source path.
Insert the Windows Server 2012 DVD into the machine, put its drive letter followed by :\Sources\sxs, and click OK.
After the installation is complete, click on Close.

Create a System Management Container on the DC machine
Connect to the Domain Controller machine using Remote Desktop.

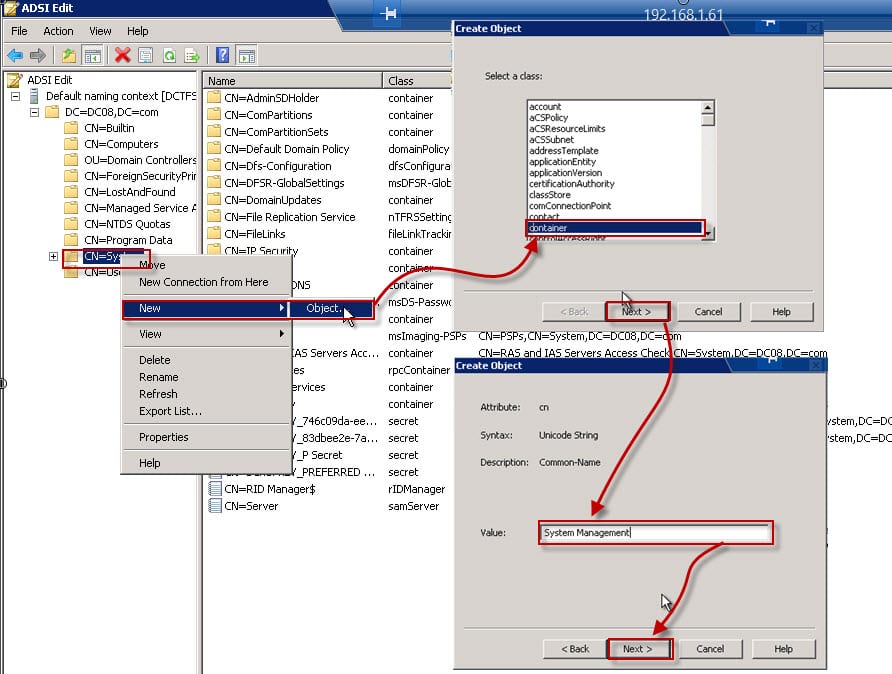
From the run type ADSIedit.msc to open the ADSI, click connect to, and accept the default.

Navigate to System and create a new container with the exact spelling and case: “System Management”.
Open the Active Directory Users and Computers and from the View menu click on Advanced Features.

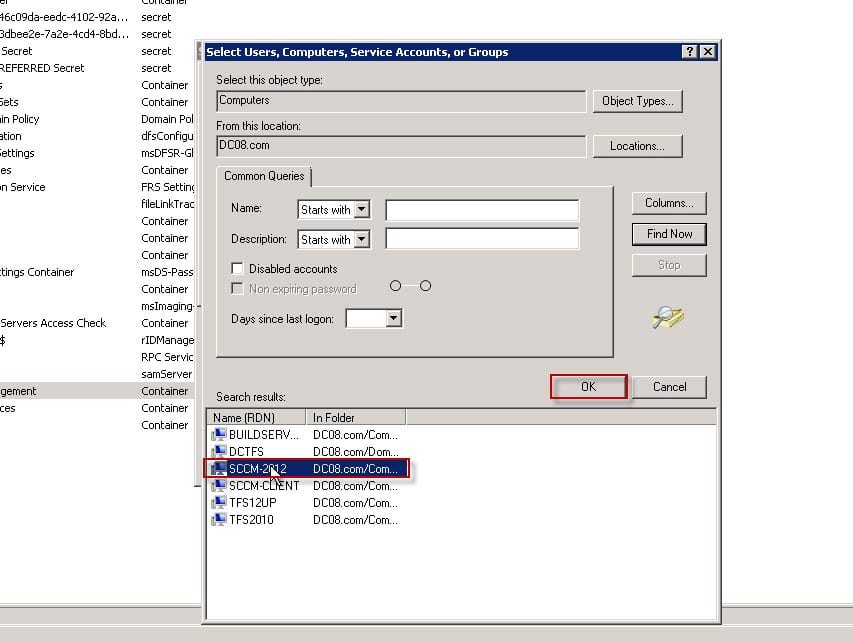
Navigate to “System Management” and add the SCCM machine to it.
Give the SCCM machine full control permission and click Advanced.
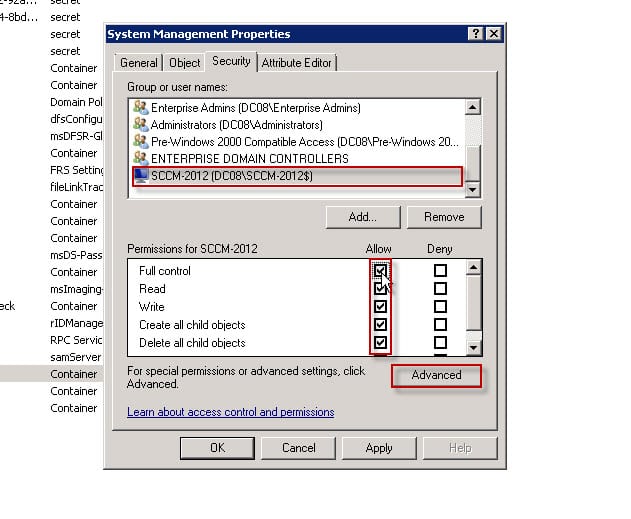
Select the SCCM machine and click Edit.

Change the apply to “This object and all descendant objects” and choose Apply this permission.

Close the Active Directory remote desktop, we will not use it again for now.

Extend the Active Directory Schema on the SCCM machine
Insert the SCCM DVD into your DVD and navigate to SMSSETUP\BIN\X64. Double-click on extadsch.

Navigate to the C drive and open the created file ExtADSch.txt.

Make sure that it successfully extends the schema.

Install SQL Server 2012 SP1 on Windows Server 2012
Insert or mount the SQL Server 2012 DVD into your DVD drive and click on New SQL Server stand-alone installation.

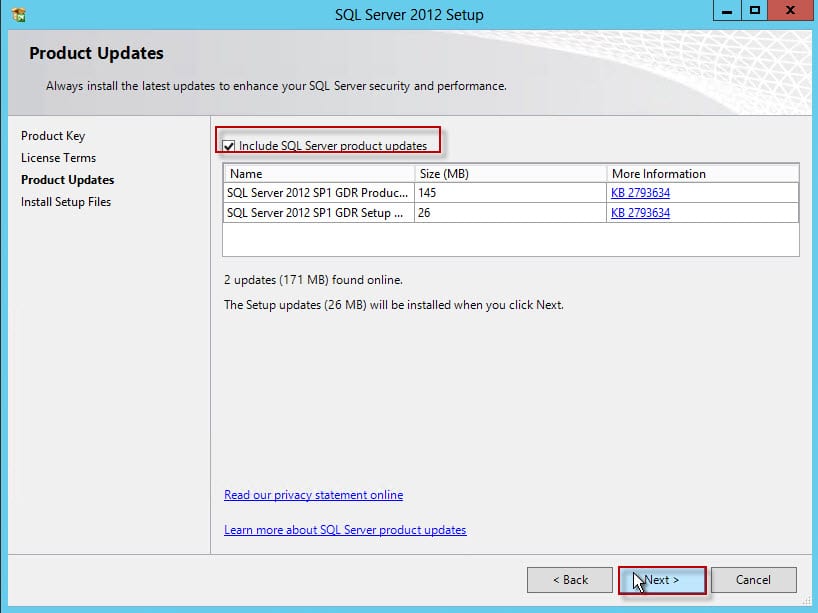
It’s better to include the update and then click Next.
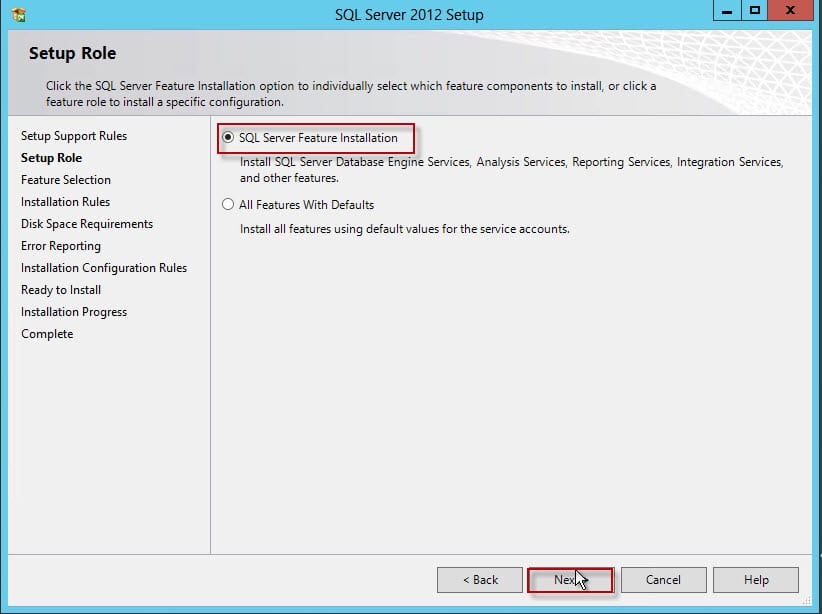
Select SQL Server Feature Installation.
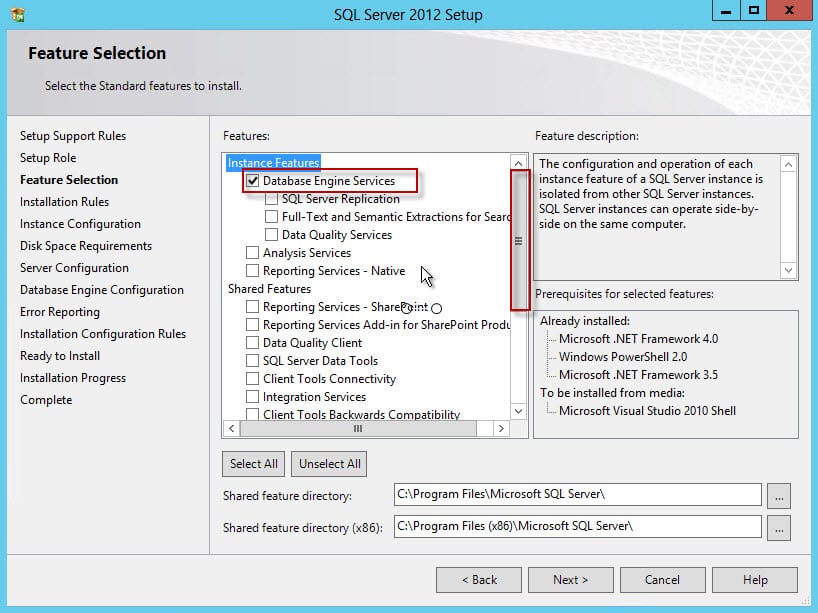
Select Database Engine Services and scroll down.
Select Client Tools Connectivity, Management Tools Basic, Management Tools Complete, and click Next.

Make all services automatic and assign Network Services for SQL Server Database Engine.
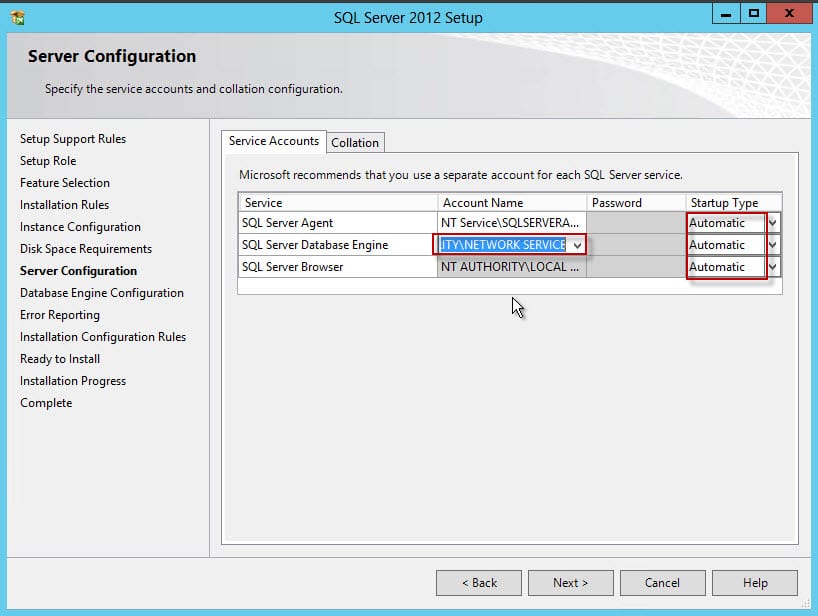
Review the Collation and make sure it’s “latin1_general_ci_as”, then click Next.

Add the current user that will be used to install SCCM 2012, click next until the installation completes.

After installation completes, open SQL Server Management Studio and click on the instance name and choose Properties. Choose Memory, enter 4000 as Minimum and Maximum server memory. It’s recommended to be 8000.

Download and install Assessment and Deployment Kit
Download the Assessment and Deployment Kit. For download, click here and then click on adksetup.

Only select Deployment Tools, Windows Preinstallation Environment (Windows PE), User State Migration Tools, and then click Install.


Install System Center Configuration Manager 2012 SP1
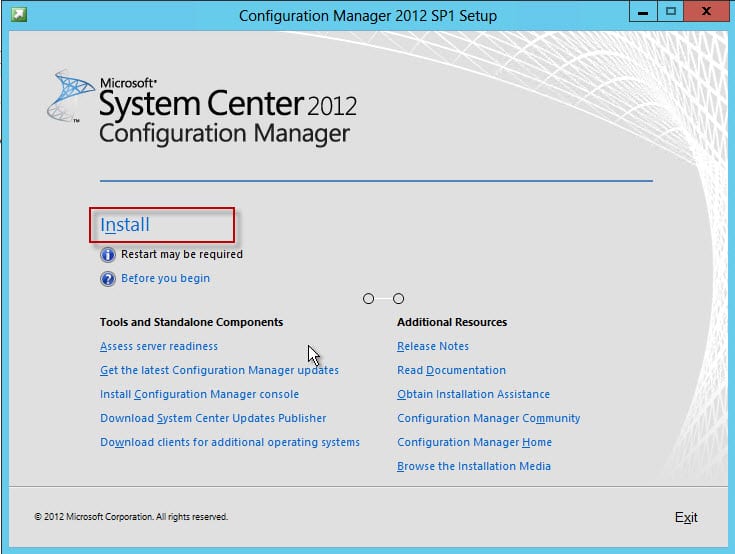
Insert the media of System Center Configuration Manager SP1 (SCCM 2012) into your machine and click Install.
Select Install a Configuration Manager primary site and then click Next. For more understanding about why we choose this option and the other options, see the video for this post.

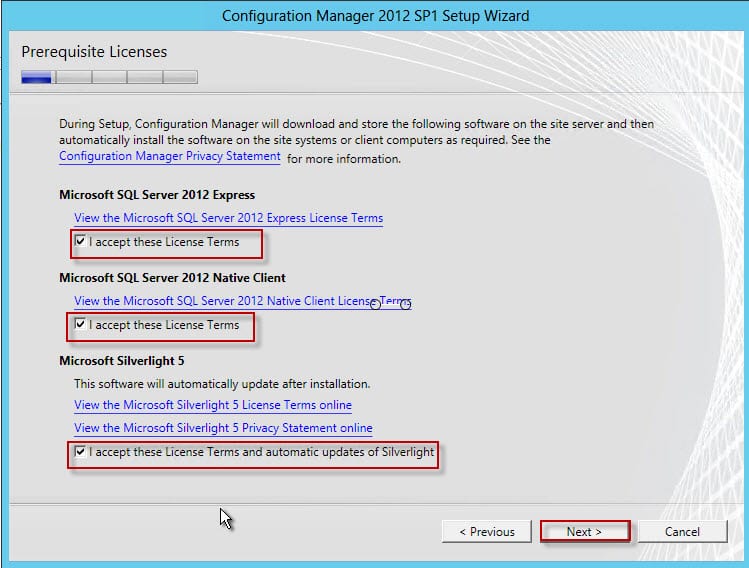
Select and accept all license terms and conditions.
Browse and choose the path to download the needed files for installation.
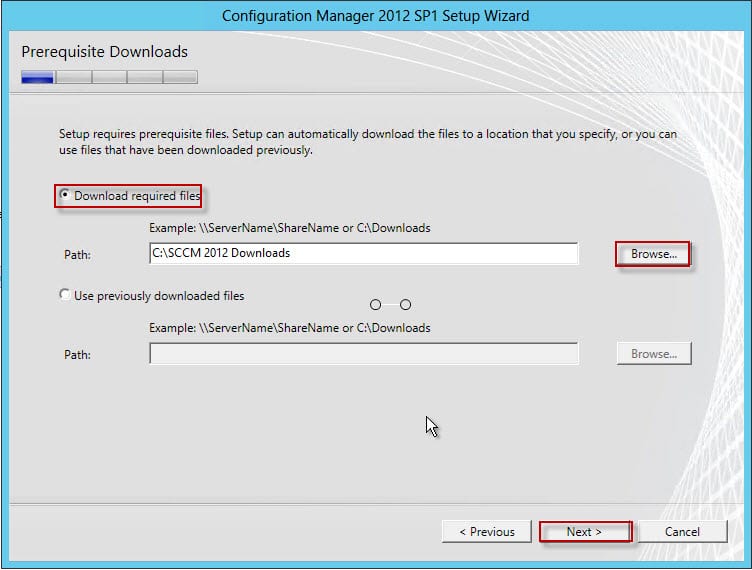
After the download completes, click Next.
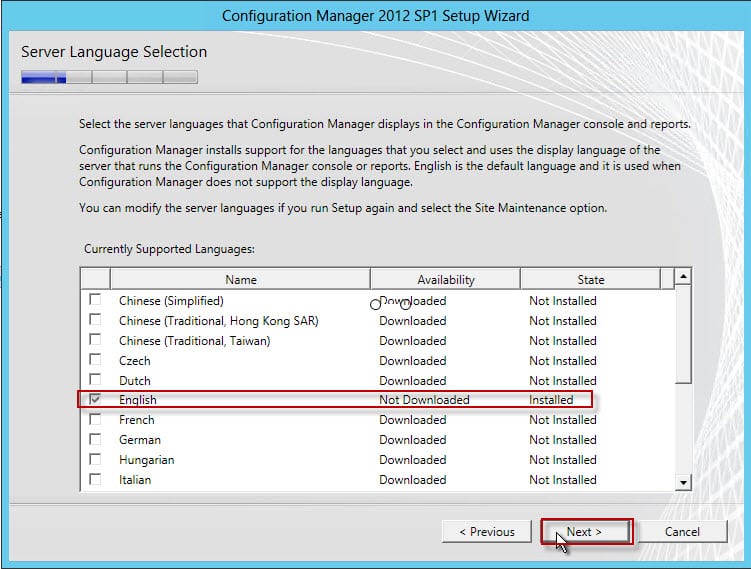
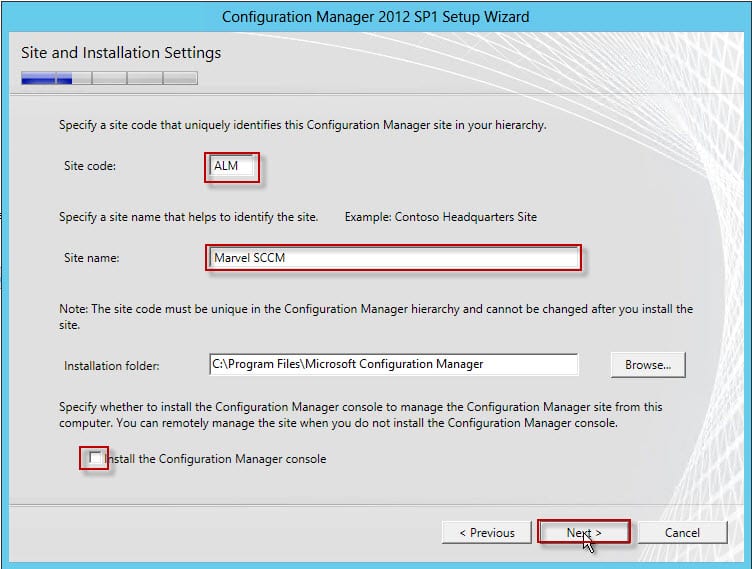
Type a code for the site and the site name. Deselect the installation of Management Console; we will install it later.
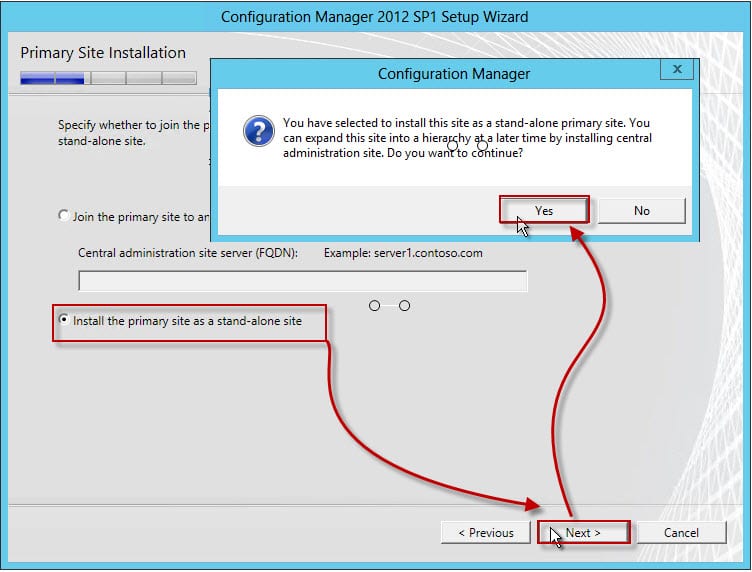
Select Install the primary site as stand-alone site.
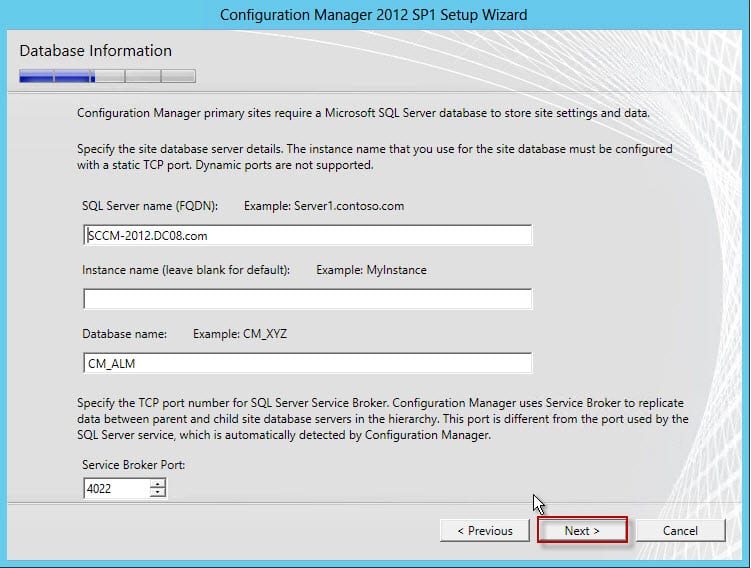
Enter the SQL Server name here. We will leave the default since SCCM will be installed on the same machine with SQL Server.
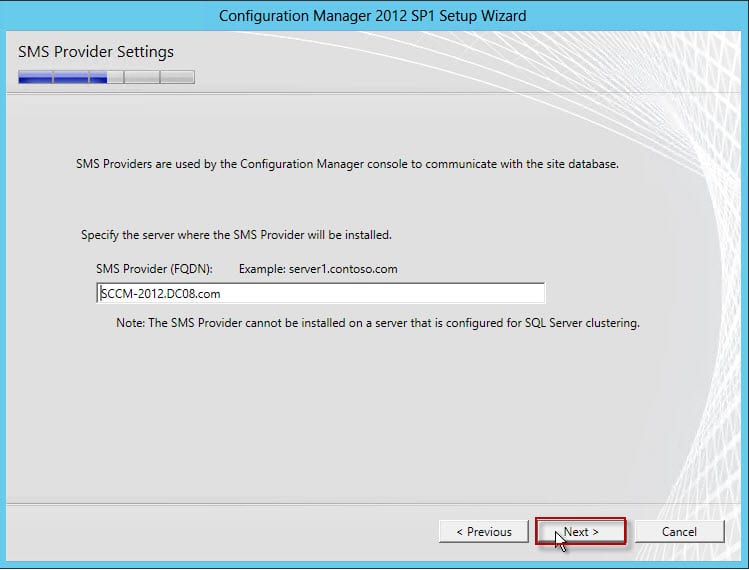
We choose where to install the SMS provider; we will leave the default on the same machine.
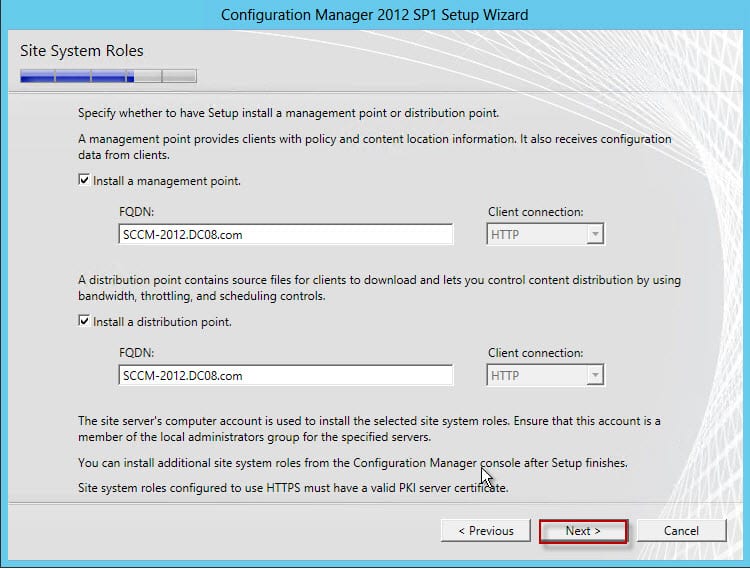
Select Configure the communication method on each site system role.

Leave the default to install management point and the distribution point and click Next.
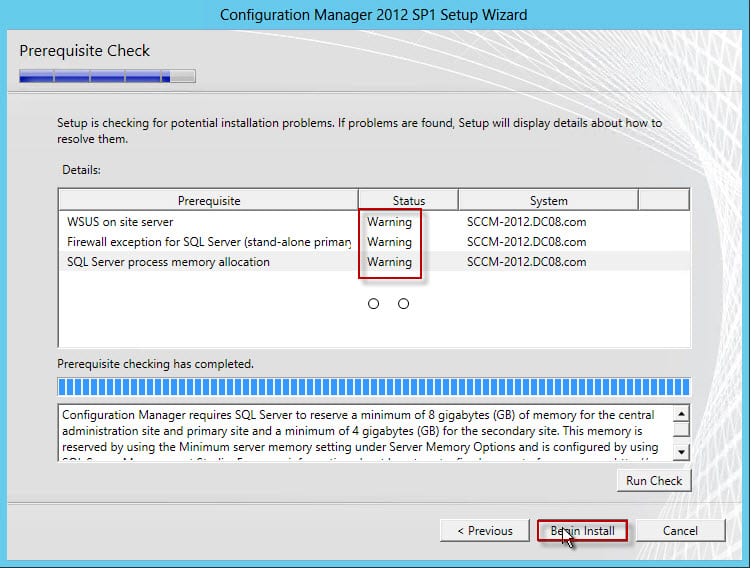
The prerequisite check runs and shows some warnings. We can install WSUS later and it’s OK for the other warnings. Click Begin Install.
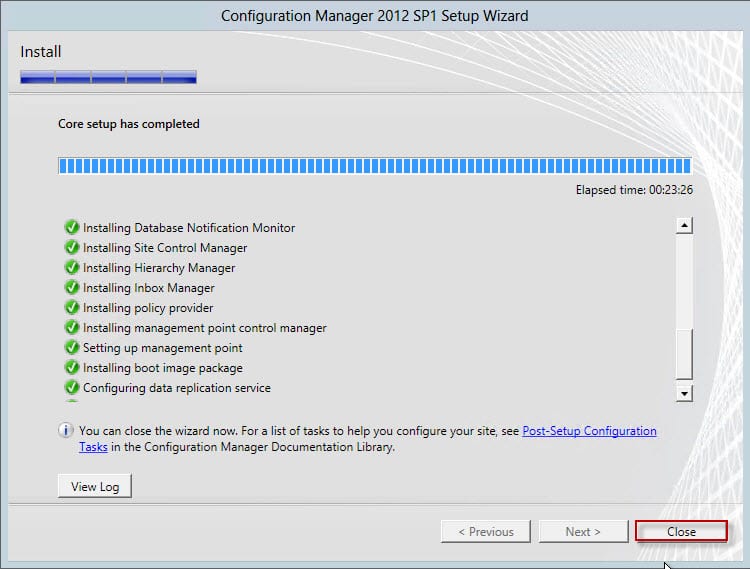
The installation starts and we review it until complete.
Click on Install Configuration Manager console.


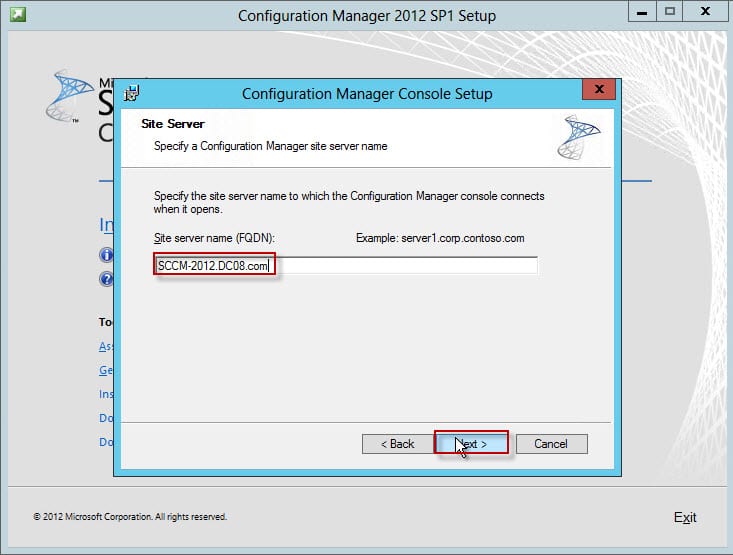
Type the name of the server that has SCCM; in our case, it’s the same machine, but of course, we can install this console on any machine, even on a desktop machine.

Now the System Center Configuration Manager Console will open and it’s ready to use :-)
