
Introduction
Azure DevTest Labs is a new developer service available on the Azure platform that provides a cloud service solution for creating and using Dev and Test lab environments. There are some issues with doing Dev and Test environments on premises: it can take a long time to get an infrastructure, the cost is significant, and so is the time and effort in creating a production-like environment. A lot of organizations are moving towards the cloud for Dev & Test environments; this is because the environment can be procured quickly, it has a lower cost, can be scaled as necessary, and the developers can start working directly with the production-like environment. To do this with Azure, Microsoft provides Azure DevTest Labs. The lab is actually an additional construct in Azure, where particular Azure features can be subset for the Dev and Test teams to work in. Azure’s services can be selected based on exactly what the client and project requires, templates can be created and reused, and quotas and policies can be set for the lab. Azure DevTest Labs was offered as a beta-trial for users in late 2015, and is now openly available for usage as both a free trial and as a paid service. Like with Azure’s standard service, containers are supported in DevTest Labs as well.
Read about basic guidelines that you need to consider when building a product backlog in the following post, Requirements (Epic, Feature, User Story), Task Size and Estimation in Agile and Scrum, and also about its maintaining and refinement of product backlog in Key tips for Maintaining good product backlog in Agile and Scrum.
In one of the old posts TFS 2015 Agile Project Management, you can read more about new Agile Project Management features in TFS 2015, which provide better support for aligning across teams while giving autonomy to individual teams; you can use the same structure with VSTS/TFS2018.
VM Selection
From the main lab panel, you can directly select a virtual machine (VM) that you would like to work with. You can either choose from the VMs currently assigned to you or select an available VM from the lab that isn't currently assigned to a team member.
Quotas
The first thing that can be set for the lab is quotas. In the quota settings, you can set a monthly budget, the maximum amount of VMs per user, and the maximum allowable VMs for the lab. For the budget, there is a usage chart that displays how much has already been spent, when it was spent, how much of the budget is remaining, and a projected out-of-budget date based on the usage history.

If you are in a situation where you need to integrate two backlogs, read the step-by-step post about Two Backlog Integration in which I provide a detailed description of the integration between Trello and VSTS using Zapier.
You can see this video if you would like to find more information about the new tools and enhancements for Continuous Delivery (CD) and DevOps with Visual Studio 2017. See how to download and initiate the Continuous Delivery Tools for Visual Studio extension. Create a new team project on VSTS or connect to an existing project. Clone a project to a local Git repository, create a simple web application, and finally configure the CD extension. The process of making changes to the CD and DevOps pipeline is also demonstrated, as well as managing Build failures with the help of the described extension.
Creating VMs
If you'd like to create your own VM rather than using one of the available ones that are already set up, you can do that as well. You can select a template for the new VM and provide it with relevant details such as name, login, size, and artifacts to install. The user interface can be easy to use if set up right. But it may require a team member to initially set up quotas, policies, and templates for your lab so that they can be reused as many times as needed.
You can see this video if you would like to find more information about Visual Studio Code, which is part of the Visual Studio family. The marketplace for the supported extensions is demonstrated, as well as the process of installing, disabling, and reloading the extensions, and starting a new project - a new console application - and debugging this new project.
There are many VSTS extensions designed to make the work process easier. One of them is the Delivery Plans extension providing a better cross-team visibility. Read more about it in my post Delivery Plans Extension for VSTS and learn how to manage more than one team in a much easier way.
Artifacts
Artifacts are components and tools that you have associated with your lab. From the artifacts tab, additional components can be added to the VM such as MS Office to customize what you want included in your Dev and Test lab. Likewise, parameters can be set for the installation of the artifacts. Adding a new artifact is relatively straightforward:
- In the first field, you will be required to input an Artifact Name.
- Type the Artifact Description.
- Browse or upload the Script. The script is the most critical field, as it needs to actually install the desired component. For specific install instructions, the parameters can be set accordingly. Once the script is written and the artifact is created, though, it can be reused by the teams for as many VM setups as needed.
- Choose the right Parameters, such as Name, Default Value, Type, and mark the checkbox if this parameter is required or not.

If you would like to know more about the best practices for DevOps, Continuous Integration, and Continuous Delivery, you can have a look at the following post: Configure CI (Continuous Integration) and CD (Continuous Delivery Pipeline).
In order to ensure Continuous Integration, we need to use proper deploying strategies. Read more about deploying with Feature Branches and Feature Toggle in the following post; Deploy from Branches with and without Feature Toggle.
Templates
The templates are exactly as they sound - a formatted set of standardized features, and are very useful when the teams need to run identical VMs.
- A template contains a base image (OS); with a template, you'll want it to install the most volatile components into the OS image, and then install the other, less-volatile components as needed.
- You'll also have to select a VM size as the standard for that specific template.
- In artifacts, you can select the artifacts that you want associated with the template and the OS.

Scheduled Shutdowns
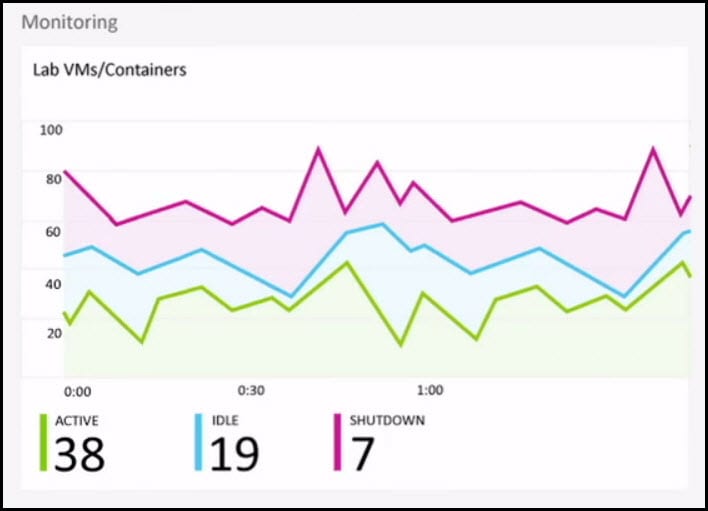
When you're ready to create the new VM, there is an option to opt out of a scheduled shutdown for the VM. This is something to consider when running multiple VMs and test environments, because some may need to be continuously running to handle information, while others may not. Policies can be set for both idle shutdowns and scheduled shutdowns. So if a VM is not being actively used for a given amount of time, it will shut down and save operating costs. The same can be set so that at a certain time, the VM will always shut down. If this is done, you'll need to set a restart time as well or manually restart it. It should be noted that you will lose memory state after a shutdown, so plan the Dev and Test team should plan accordingly. VM statuses can also be monitored through DevTest Lab, showing how many are active, idle, and shutdown at given times. This can be reviewed to see if policies or usages should be adjusted for operational efficiency, amongst other uses.
If you would like to know more about this new developer service available on the Azure platform, you can have a look at the following post; More about Azure DevTest Labs. If you prefer a more concise description of the same feature, have a look at Quick overview of Azure DevTest Labs.
You can see this video if you would like to find more information about how to install all the required software for the Codeflyers first release, how to run that release on your machine, how to install SQL server express edition and its service pack as well as SQL Management Studio, how to choose the correct authentication mode for SQL server and the appropriate features, how to install Visual Studio (Community Edition) and to choose the appropriate features for the installation. The process of getting the project from GitHub and starting working on that project is demonstrated. Downloading the source code, re-building the application, and publishing the database is described. During the process, important differences between Visual Studio Community Edition and Enterprise Edition are discussed. How to add data connection and run the application. How to create a fork on GitHub for a repository on your account allowing you to make the changes locally and upload the comments to that repository.
Securing the Lab
In the lab, you have user roles. User roles are assigned to team members who are just using the lab, and all other privileges of the lab's subscription are removed. This means that they will need to go through the lab itself to create VMs and follow policies. You can modify their permissions as appropriate for your situation, to allow for things like creating VMs from outside the lab on the subscription.
VSO & TFS Integration
From Visual Studio Buildand VS Release Management, Azure DevTest Lab can be integrated with VS Build and VS Release Management. Directly from VS Build and VS Release Management, you can use the command lines and actions on VSOand TFSto invoke environment building in the lab with templates while still applying all of the policies.
Conclusion
Azure DevTest Labs is a subset of Azure services particularly designed for Developers and Testers and their unique team needs. The templates provide methods of being able to quickly set up the environment if needed for testing with a simple click and choose system and are very versatile in their manageability with their quotas and policies. Another benefit to DevTest Labs is that once an artifact, template, and/or VM is created and saved, it remains in Azure as a resource management file and can be shared with other teams as desired.
If you would like to start using Visual Studio for developing, read the details about its installation, launching, and creating a new project in my post Get Started Developing with Visual Studio. If you prefer to use Mac, see how it looks in Visual Studio for Mac post.
You can see this video, if you would like to find more information about how to use VSTS to manage some tasks for a small team, how to use a sprint as a backlog sprint, how to add tasks and what the appropriate characteristics of a task should be, how to review and remove tasks as a product owner, how to create sprints, how to manage task priorities, how to edit Capacity for each sprint, how to assign tasks to team members, and how to assign tasks to different sprints.