Introduction
This post will describe how to sync a project between GitHub and Visual Studio Online (VSO). Visual Studio Online provides a set of cloud-powered collaboration tools that work with your existing IDE or editor, so your team can work effectively on software projects of all shapes and sizes. To implement synchronization, we used Git remote, which will enable connecting to a remote repo and then pulling from it and pushing to the other repo. Remote repositories are versions of your project that are hosted on the Internet or network somewhere. You can have several of them, each of which generally is either read-only or read/write for you. Collaborating with others involves managing these remote repositories and pushing and pulling data to and from them when you need to share work. Managing remote repositories includes knowing how to add remote repositories, remove remotes that are no longer valid, manage various remote branches and define them as being tracked or not, and more.
If you would like to start using Visual Studio for developing, read the details about its installation, launching, and creating a new project in my post Get Started Developing with Visual Studio. If you prefer to use Mac, see how it looks in Visual Studio for Mac post.
Step 1: Enabling Alternate Authentication Credentials for VSO Account
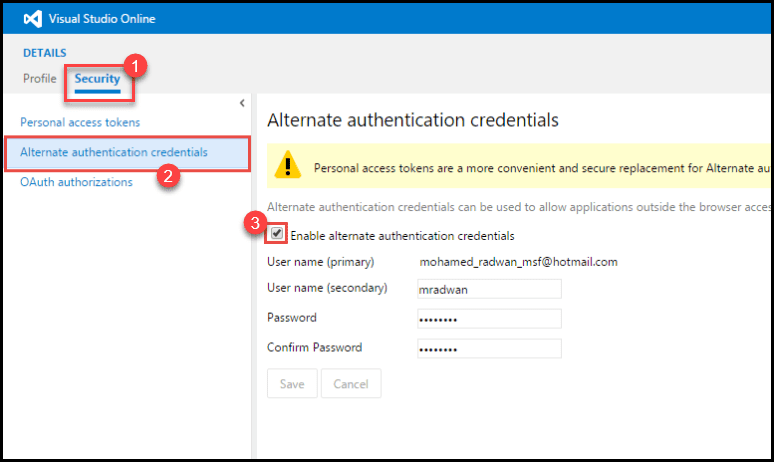
- In Visual Studio Online, navigate to your Account’s Security tab.
- You will see the list of all options, from which choose Alternate authentication credentials, which will allow access for other applications outside the browser.
- Mark the checkbox to Enable alternate authentication credentials.
You can see the following video, if you would like to find more information about how to install Visual Studio 2017 and point to some tricky components. See which Workloads need to be installed and which Individual Components need to be selected additionally. See how to install another Edition of Visual Studio and just put a different nickname in order to distinguish installed editions.
Step 2: Adding remote repo
To see which remote servers you have configured, you can run the <git remote> command. It lists the short names of each remote handle you’ve specified. To add a remote repo, you will need to open your local repo with Visual Studio 2015, which is connected to your VSO.
- Open the command line to that local repo and type:
\<git remote add github https://github.com/Codeflyers/EC-GitHub\>
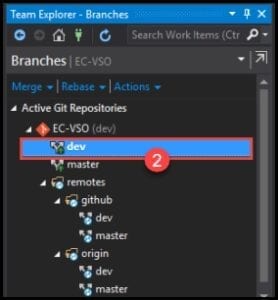
- Select the local branch by double-click (not from remotes) and make sure it’s bold.
- You can also use the command line instead of Visual Studio, just type <git checkout> and type the needed branch. If you look at Visual Studio, you will notice that it’s also bold.
[Video]{.ion-video}You can see this video, if you would like to find more information about how to import Git Repository from one VSTS account/project to another VSTS account/project using the Import feature. See how to import on the existing repository or create a new one. Also, see how to create a personal access token in order to be able to import the repository.
Step 3: Pull from the needed branch and Push to the Visual Studio Online
Use the <git pull> command to automatically fetch and then merge that remote branch into your current branch. This is usually used when your current branch is set up to track a remote branch.
- Type command <git pull github dev>.
- Now when the project is at a point that you want to share it, you have to push it upstream. Type command: <git push origin dev>.
If you would like to learn more about using the Build Variables in VSTS and Release Management, - have a look at the following post: VSTS Build variables and Echo. The post describes how to see the output at any point in time while automating a process, through setting variables and displaying them during the build.
Conclusion
When you push to a remote repository, you do not have to push all of your branches. You can choose to share just one of your branches, a few of them, or all of them. This option is very good for trying new ideas without worrying about having to plan how and when they are going to merge it in or share it with others. In our case, we will do that with each branch and to remove the remote repo by type, we will use the command <git remote remove github>. In addition, we will keep the remote repo to sync later. There is also the possibility to add the remote repo to VSO by typing: \<git remote add vsonline https://codeflyers.visualstudio.com/DefaultCollection/_git/EC-VSO/\>
You can see the following, if you would like to find more information about an end-to-end Continuous Integration and Continuous Delivery Pipeline using VSTS extension using build and release management with VSTS. Learn how to create a Git repo, push the code, go to the build and start creating a build definition. Afterwards, add two tasks in the build definition; Package Extension and Publish Artifact (first install CI/CD Tools for VSTS Extensions). How to create a new release definition, configure the artifact and create (in my case) three environments: QA, Preproduction, and Production, each of them with one phase and one task. Use the Publish Extension release task in order to configure the VSTS marketplace connection and set different Publisher ID for each environment. Also, see how to enable/disable Pre-deployment approvals for Release Management. Enable continuous integration, make any change (I have changed the current build number) and commit the change, which should trigger the build automatically. After the build is done see how to trigger the release.


