Introduction
Migrating TFS (On-Premise) to VSTS makes it a lot easier to work efficiently. There are a lot of benefits we can get, including:
- Global Availability.
- Immediate Access to updates as soon as they’re available.
- Higher Security.
- Easy Deployment to Azure.
Migrating TFS to VSTS can be done using several tools, Microsoft Excel, Microsoft Project or a Migration tool (which we will use).
Using Excel and/or Microsoft Project has limitations for images, attachments, history, and other things.
I’ll demonstrate another tool, which is TFS Integration Platform. Using TFS Integration Platform requires SQL Server 2012 first, as the tool is a little bit old. This tool migrates everything except the relations between work items. Note: This tool is [deprecated], but you can still use it at your own risk. Migration with TFS Integration Tool is very easy, but again, we have a limitation that relations between work items can’t be migrated. Before getting into the real work, you should have access to both TFS & VSTS with full administrative privileges. TFS Integration Platform is only helpful when you want only to migrate work items, with no need to migrate links & relations between them.
If you would like to learn more about my personal experience of the Migration Team Foundation Server to Visual Studio Team Services using Database Import Service or TFS Migrator, have a look at this post.
Understanding TFS Artifacts Association and Relations
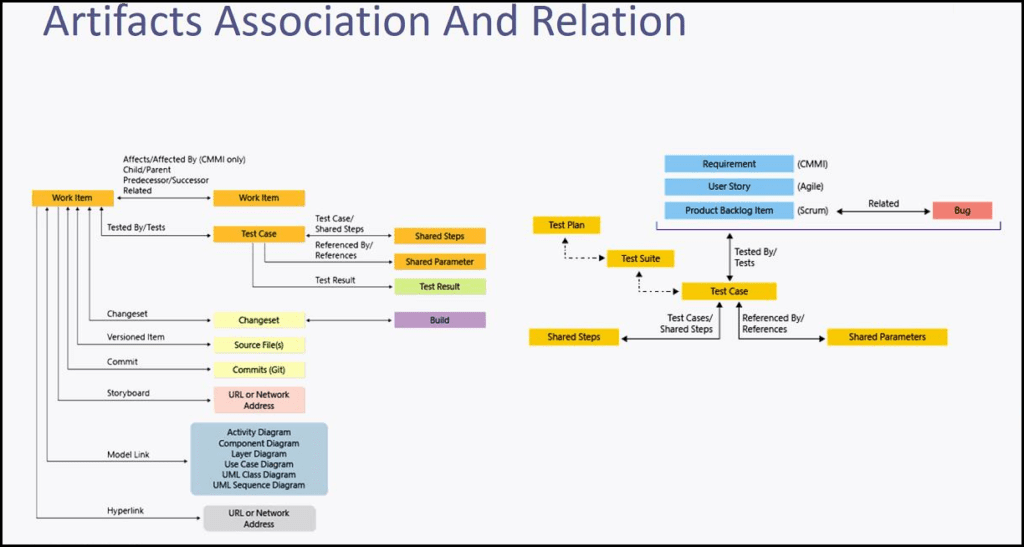
TFS doesn’t only provide work items or test cases. TFS is simply everything needed to manage work. The following diagram provides some general explanation for that:
It’s clearly shown that relations in TFS make the logic for work, therefore it’s very important to maintain the relations between work items, not only the work items themselves.
Step 1: Getting Environment Ready
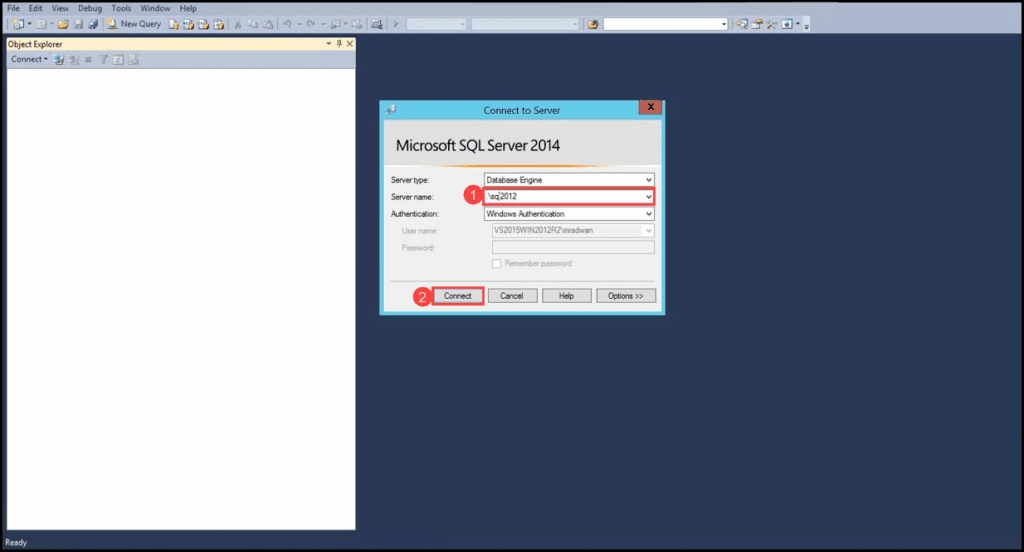
Before getting started, we will need to install Microsoft SQL Server 2012. Additional help for SQL Server 2012 installation is available here. Please note SQL Server 2012 is essential for compatibility, as the TFS Integration tool is deprecated and is not supported for newer versions. So, make sure that you have connected to the SQL Server 2012. You can do this using a later version of SQL Server Management Studio.
- Make sure you’ve selected SQL Server 2012.
- Click on Connect.
Download & Install Visual Studio 2010 (Required to provide Object Model for the tool) and Visual Studio 2012 (Required to provide TFS Connectivity for the tool).
Download & Install TFS Integration Platform.
TFS Integration Platform must be installed after SQL Server 2012 and Visual Studio 2010 and Visual Studio 2012, otherwise it won’t work.
If you would like to learn more about different tools and ways for Team Foundation Server to Visual Studio Team Services migration, have a look at the quick guide about real stories for migrating Team Foundation Server to Visual Studio Team Services. The guide describes some real migration scenarios and explains how to use different tools for several cases.
Step 2: Migrate
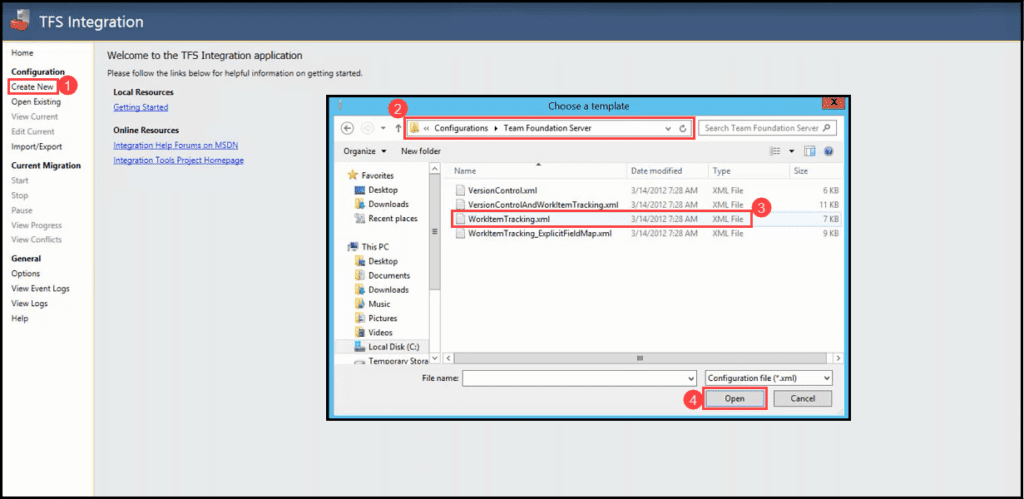
- Open TFS Integration Platform Tool and Click Create New
- Click on Team Foundation Server Folder
- Choose Migration Options, you can Migrate Source Control, Work Items or Both. I choose Work Items Only.
- Click Open
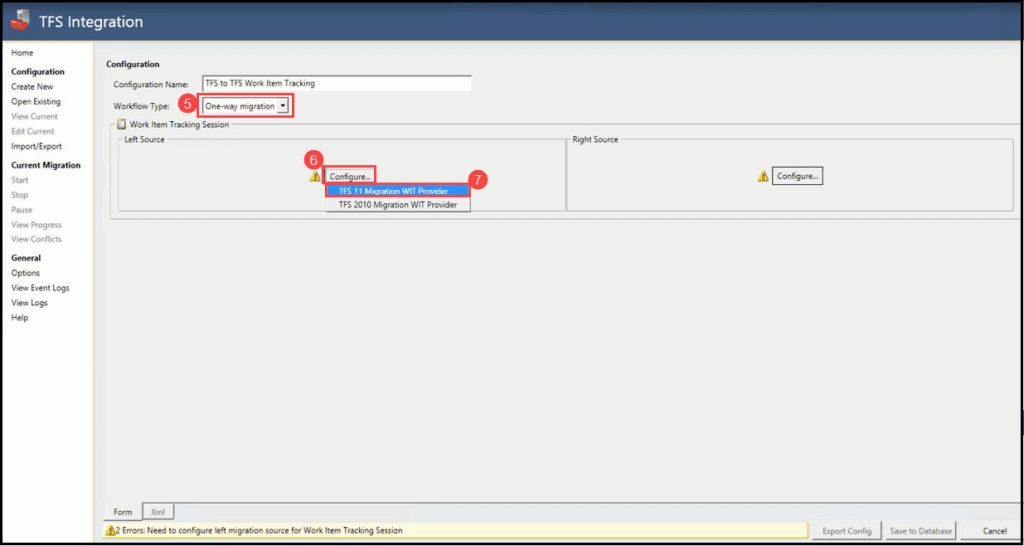
- As a workflow type, from the drop-down menu select One Way Migration
- Click on Configure
- In the drop-down menu, select TFS 11 Migration WIT Provider
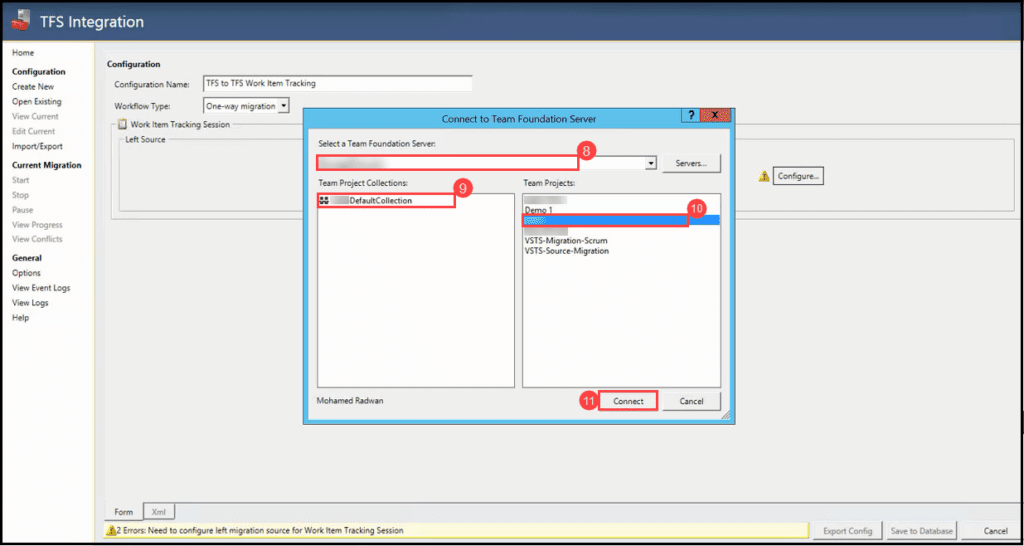
- Select the right TFS Server to connect to the original TFS.
- Under Team Project Collection, select the Team Project Collection which you want to use for this migration.
- Under Team Projects, navigate to the Team Project that you will use and click on it.
- Click on Connect to connect to TFS.
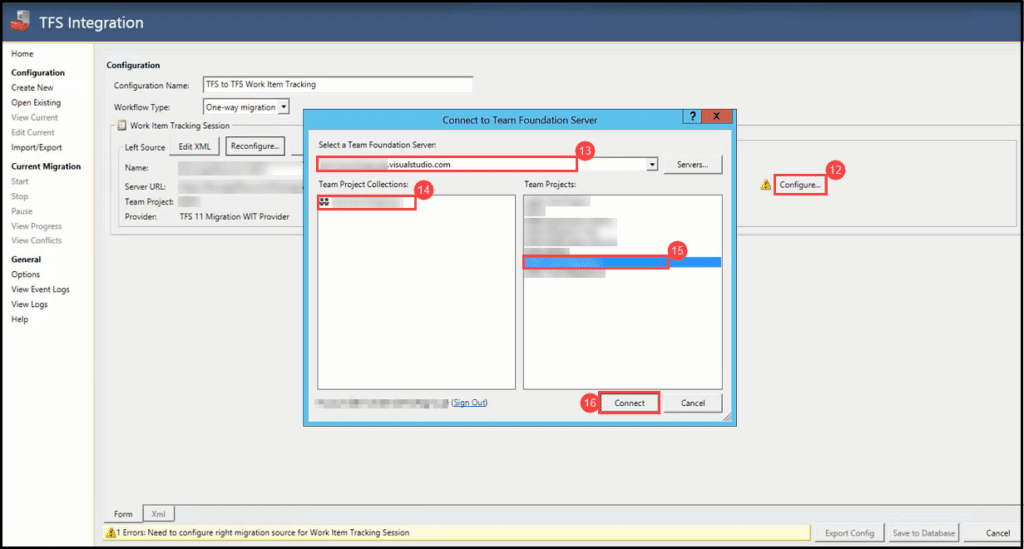
- Click on Configure to configure the targeted Source and select TFS 11 Migration WIT Provider again.
- Under the menu Select the Team Foundation Server to select the targeted VSTS to connect to it.
- Under Team Project Collection, select the Team Project Collection which you want to use for this migration.
- Under Team Projects, navigate to the Team Project that you will use and click on it.
- Click on Connect to connect to VSTS.
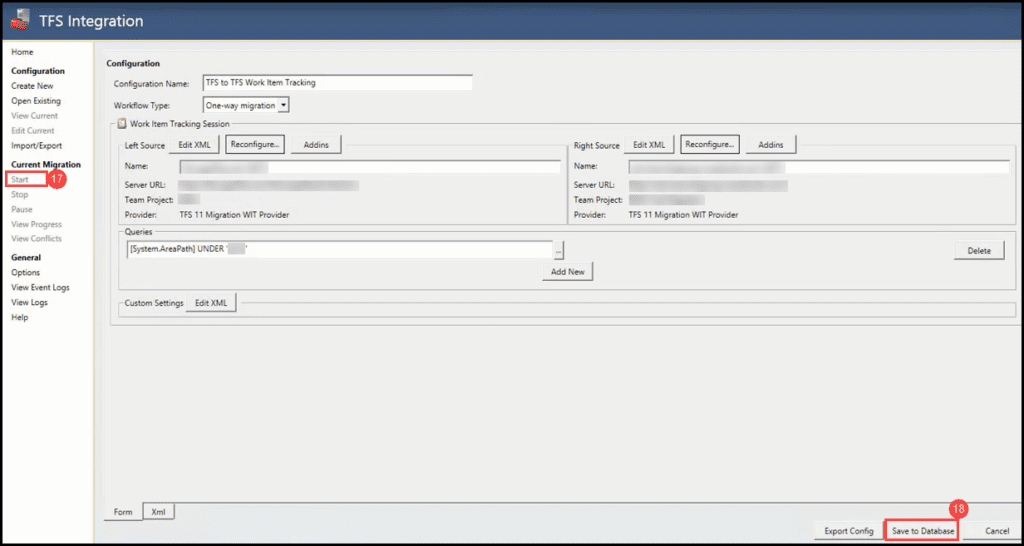
- Click Save to Database
- Click Start Migration
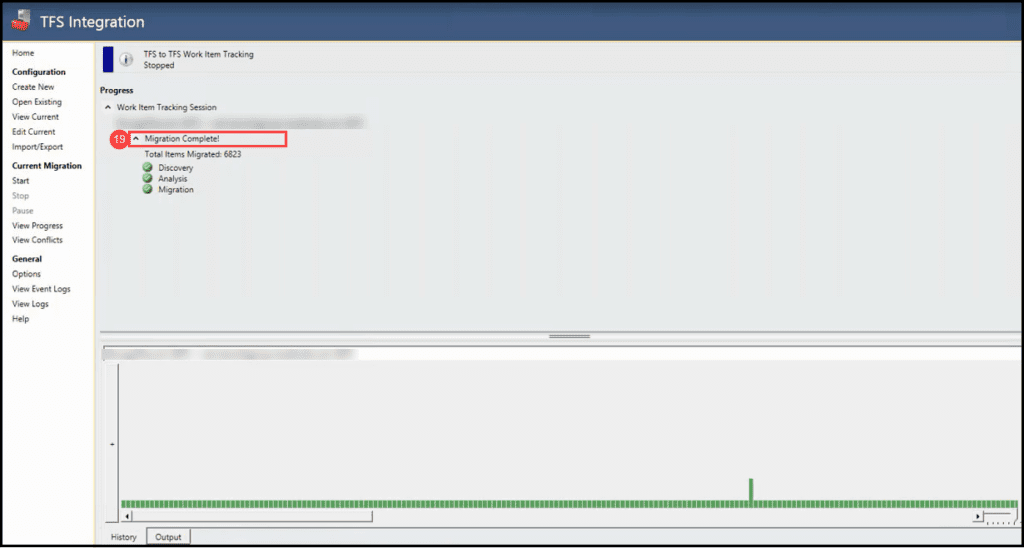
- Sit back and relax, Migration can take a few hours if you have thousands of work items. When the migration is finished, you’ll see the notification in the window of the TFS Integration tool.
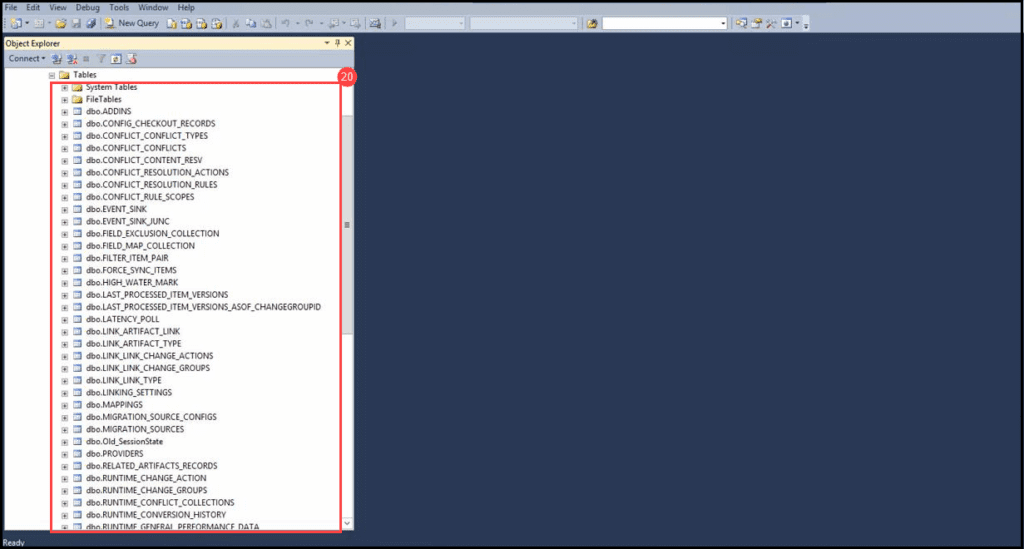
- Additional Note, here is how your SQL Server 2012 Database looks like for Migration
The post Upgrade to TFS 2018 Has Been Done in Production describes a full upgrade and migration from TFS2015 to TFS2018 and describes the improvements over the old TFS 2015.
Conclusion
The TFS Integration Platform Tool is a pretty straightforward tool to use for migrating items from TFS to VSTS. The tool enables the migration of everything, including the acceptance criteria, discussions, history, and attachments, but not the links between the work items. However, as already mentioned at the beginning of this post, the tool is deprecated, which means that no further development will be performed and there is no current support available for it. The previous documentation for the tool is currently still available on Codeplex. In my next post, I will describe a different tool, which can also be used for migration from TFS to VSTS. This tool, VSTS Sync Migrator was developed by fellow MVP Martin Hinshelwood.
You can see this video, if you would like to find more information about how to import a Git Repository

