
Introduction
In my previous post I’ve described the migration between TFS and VSTS, using the TFS Integration Platform. As described in that post, the tool is pretty simple and straightforward to use, but it doesn’t support the migration of all artifacts, such as links between the work items. Besides that, I think it’s worth mentioning again, that this migration tool is deprecated. If your migration demands high fidelity, then this tool would not be appropriate. For such cases, demanding high fidelity, VSTS Sync Migrator is an appropriate solution. This tool is very powerful and was developed by Martin Hinshelwood, who is a fellow ALM MVP. The tool’s strength comes from its coverage of all migration options. Migration with the VSTS Sync Migration Tool is a bit complicated, but it’s a powerful option as we don’t have limitations for migrating links, attachments, or work items.
If you would like to learn more about my personal experience of migrating Team Foundation Server to Visual Studio Team Services using the Database Import Service or TFS Migrator, the TFS Database Import Service, also known shorthand as the Import Service, provides a high-fidelity way to migrate collection databases from TFS to VSTS. Have a look at this post.
Step 1: Getting Environment Ready
Before starting the migration, make sure to have:
- TFS Process Template Editor extension for Visual Studio installed.
- Open The Process Editor Extension in Visual Studio.
- Download & Install VSTS Sync Migrator.
- Open Command Prompt or PowerShell.
- Navigate with CMD or PS to a new folder (Recommended).
- Run the command
vstssyncmigrator initto create a default configuration. - Open “vstsbulkeditor.json” file from the same directory.
Step 2: Preparing TFS
For the migration to succeed, we need to have an additional field in both TFS & VSTS for tracking purposes (this is essential for the tool to be able to link work items to each other).
- Open Visual Studio.
- Open the Tools Menu.
- Open the Process Editor Menu.
- Open Work Item Types.
- Click Open WIT From Server.
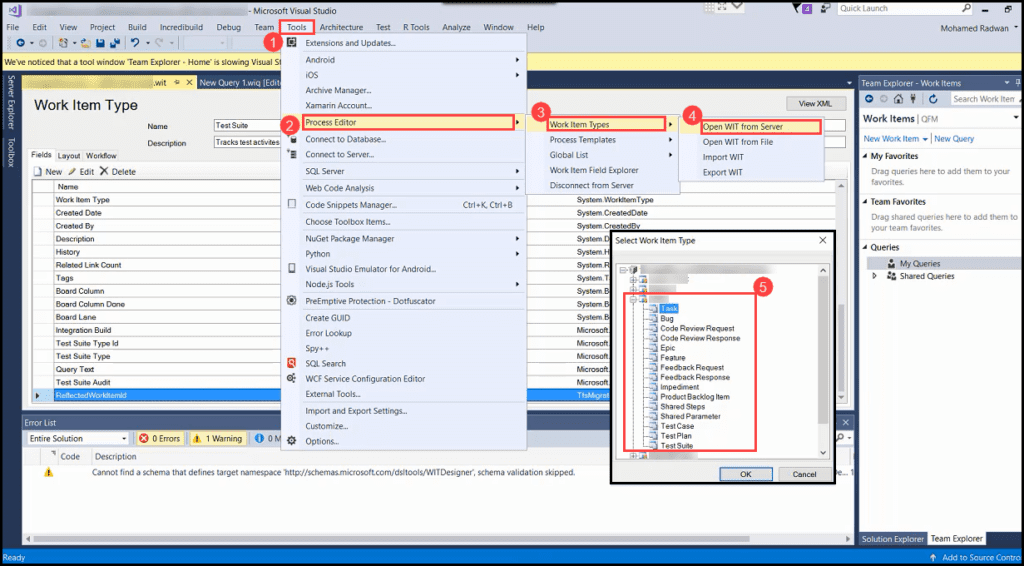
For each of the Work Item Types in your Project, do the following:
- Click On New.
- Set the Field Name to ReflectedWorkItemId.
- Make sure it’s of type String.
- Set the Reference Name to TfsMigrationTool.ReflectedWorkItemId.
- Click OK.
- The field is now added.
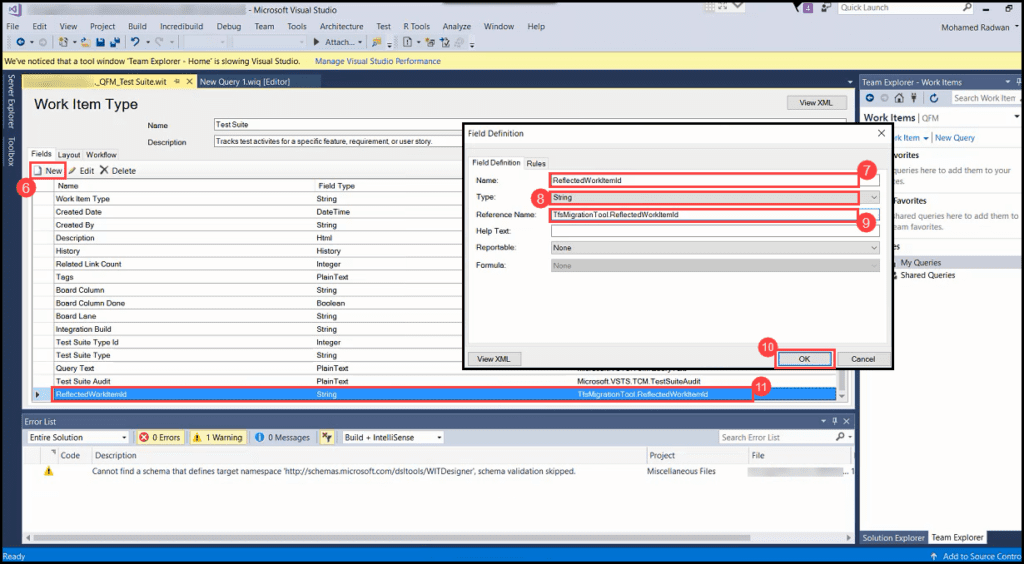
Important Note: Make sure to add the field to all Work Item Types.
[More Info]{.ion-info} The post Upgrade to TFS 2018 Has Been Done in Production describes a full upgrade and migration from TFS2015 to TFS2018 and describes the improvements over the old TFS 2015.
Step 3: Preparing VSTS
We need to also modify Work Items in VSTS to match with TFS, so the tool can complete the Migration Process.
- Open your VSTS Account Settings.
- Open Process Settings.
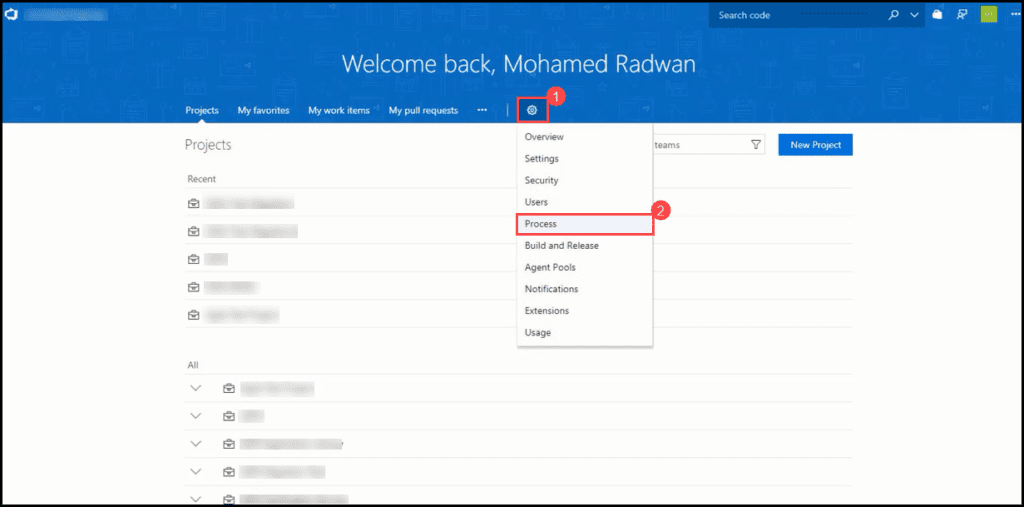
- Open Your Inherited Process Settings.
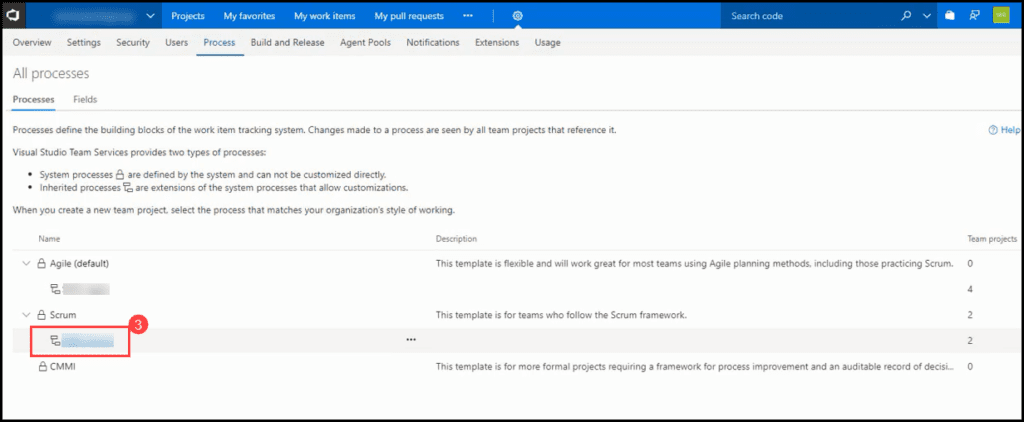
- For Each Work Item Type, open it and repeat the following steps:
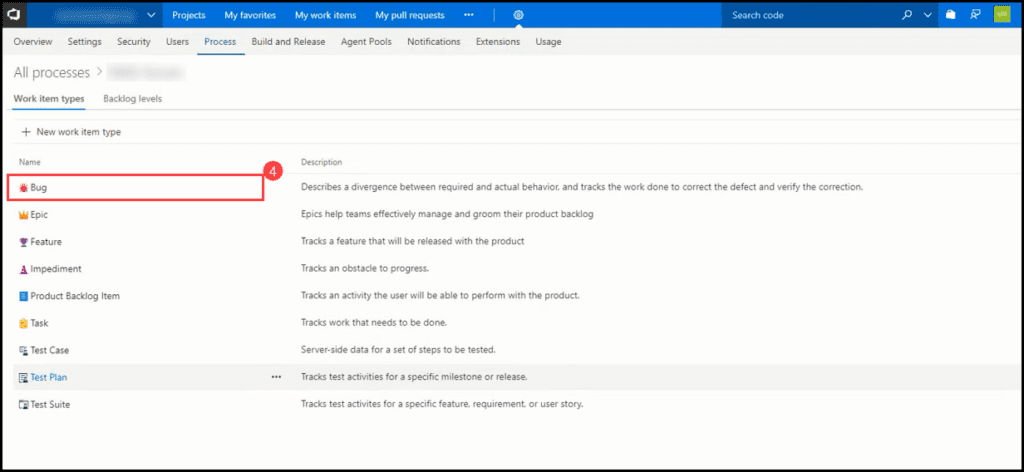
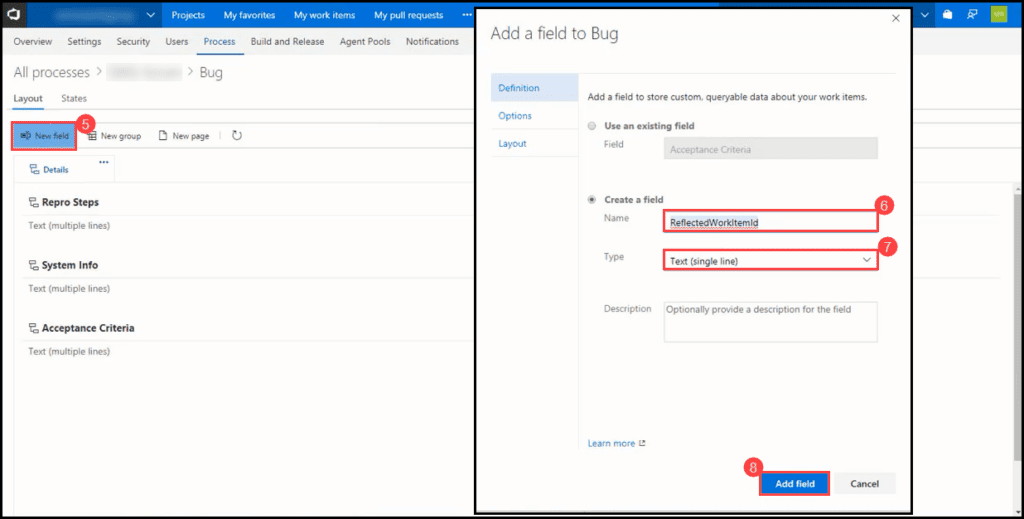
- Click Add New.
- In the New Field Dialog, set the New Field name to ReflectedWorkItemId.
- Make sure it’s of Type Text Single Line.
- Click Add Field.
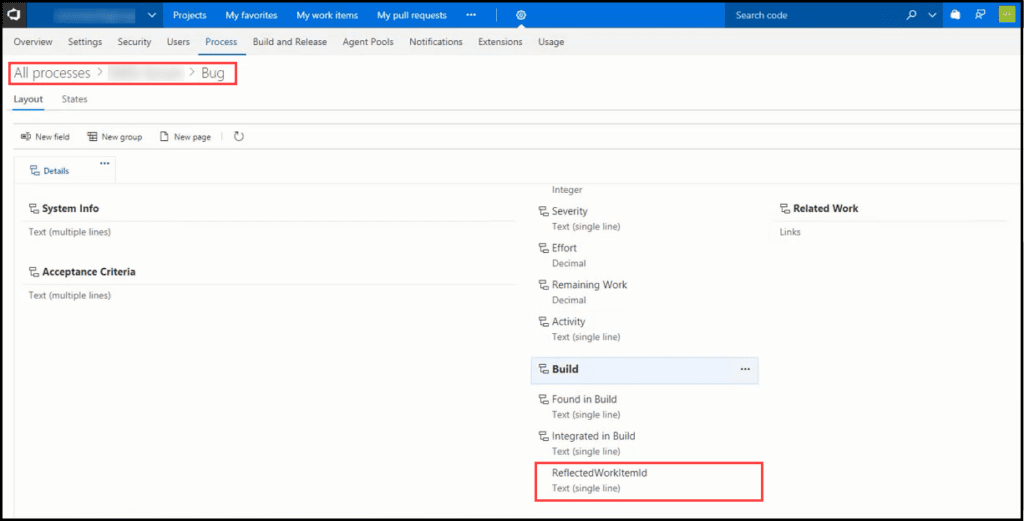
Make sure you have added the field to all Work Item Types. You can check Work Items (to make sure you have added the field) by going to your Inherited Process and checking the Work Item.
[Tip]{.ion-tip} If you would like to learn more about different tools and ways for Team Foundation Server to Visual Studio Team Services migration, have a look at the quick guide about real stories for migrating Team Foundation Server to Visual Studio Team Services. The guide describes some real migration scenarios and explains how to use different tools for several cases.
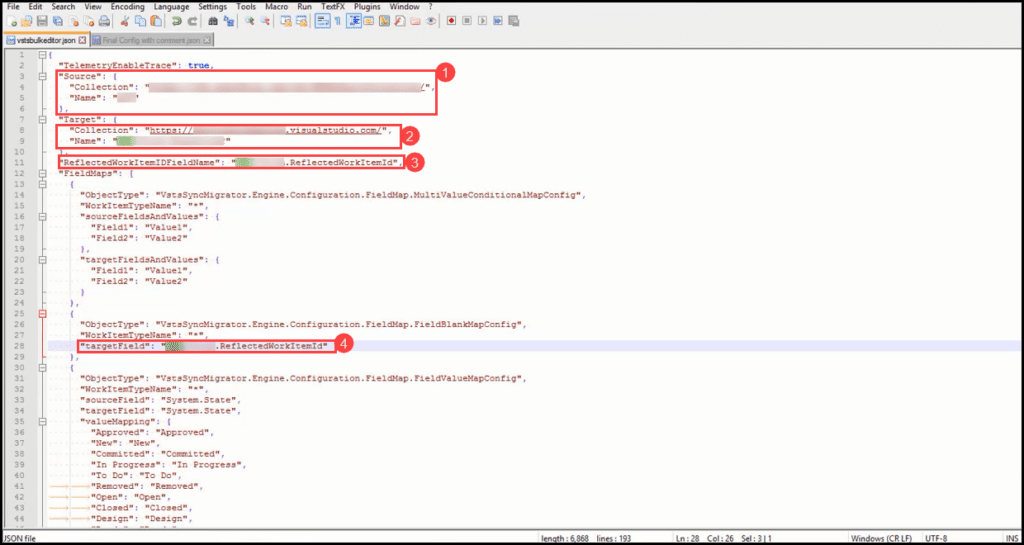
Step 4: Preparing JSON File
Do you remember the file we opened in Step 1.7? Let’s get back to this file to adjust a few things before starting the migration.
- In the source, we add information for the old TFS. We will add the URL for the old TFS under the Collection option and the old project name under the Name Option.
- In the target, we add information for VSTS. We will add the URL for the VSTS under the Collection option and the VSTS project name under the Name option.
- In the ReflectedWorkItemIdFieldName option, add the Name of your inherited Process followed by a period and “ReflectedWorkItemId”. It should look like this:
MyInheritedProcessName.ReflectedWorkItemId. - Put the same value from step 3 in the targetField Option.
- Optional: You can use the valueMapping to change states of work items being migrated. This can be helpful if you’re migrating between Scrum and Agile (or vice versa).
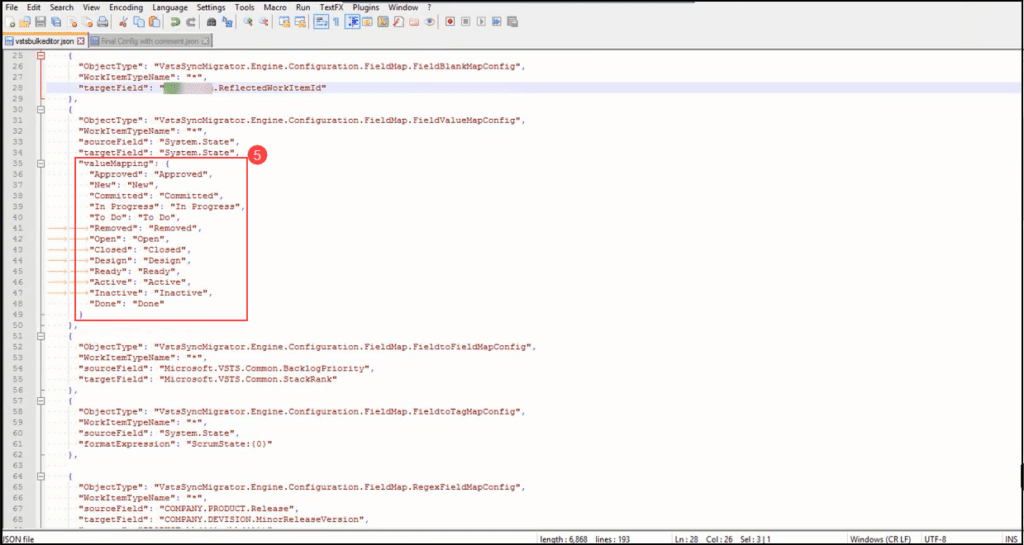
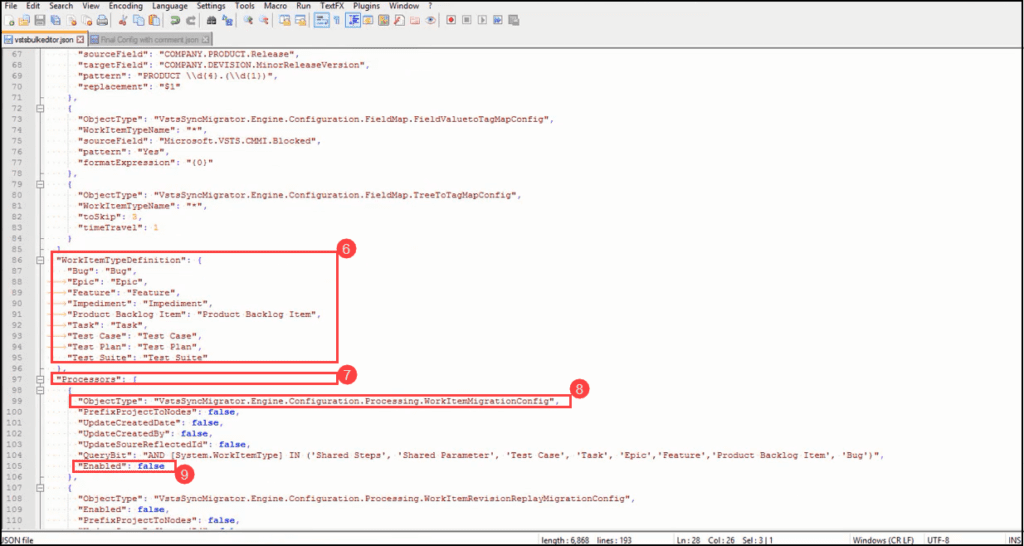
- Optional: WorkItemTypeDefinition is used to map Work Item Names. This should also be used if you’re migrating between Scrum and Agile.
- Processors are the control units for migration. Each processor controls the migration of a specific part of TFS. If you don’t have any processor enabled, the tool won’t work at all.
- Each processor has an ObjectType, which is the name for the Object being migrated.
- Each processor has an Enabled flag, which is either true or false. If it’s enabled (true) then this processor will be executed during migration.
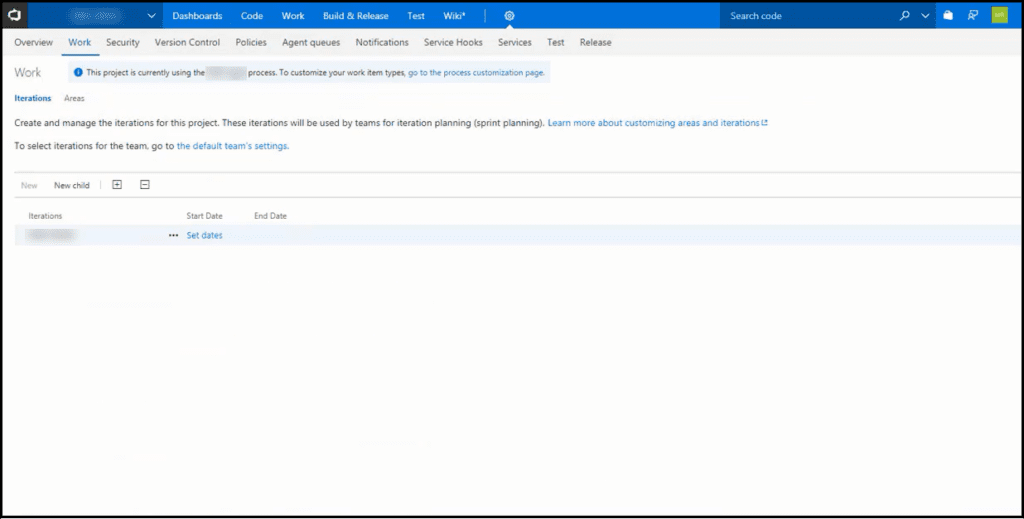
Step 5: Migrate Work Iterations
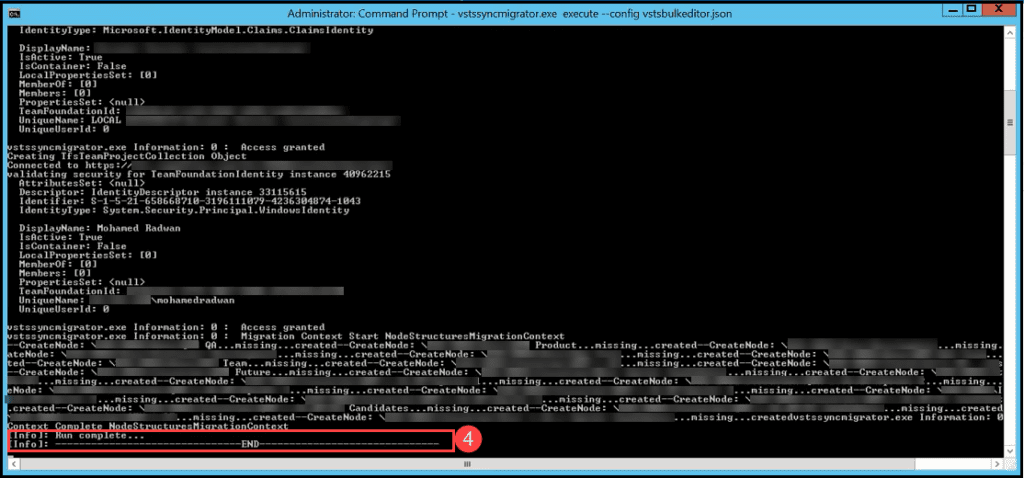
The first thing we should migrate is the work iterations. This is known in the file with Object Type VSTSSyncMigrator.Engine.Configuration.Processing.NodeStructureMigrationConfig. As we can see on VSTS, we have no iterations (except the parent node):
- To migrate iterations and their structure, let’s get back to the JSON file. Set the Enabled flag for the Object VSTSSyncMigrator.Engine.Configuration.Processing.NodeStructureMigrationConfig to true, otherwise the tool won’t run this part.

- Run the following command:
vstssyncmigrator.exe execute --config vstsbulkeditor.json.
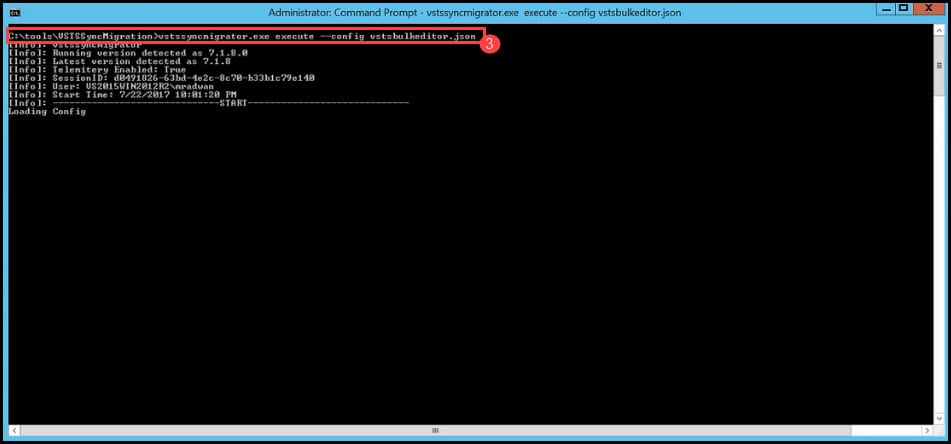
- This might take a minute or less. Once finished, you’ll see something like this:
If you would like to know more about Azure deployments, have a look at the post How to deploy to Azure using Team Services Release Management. The post describes how Azure deployments are made easy by using Visual Studio Team Services (VSTS) Release Management. You will see a step-by-step tutorial on how to configure and deploy to Azure in Release Management, and, moreover, how to configure an end-to-end pipeline for deploying applications on Azure.
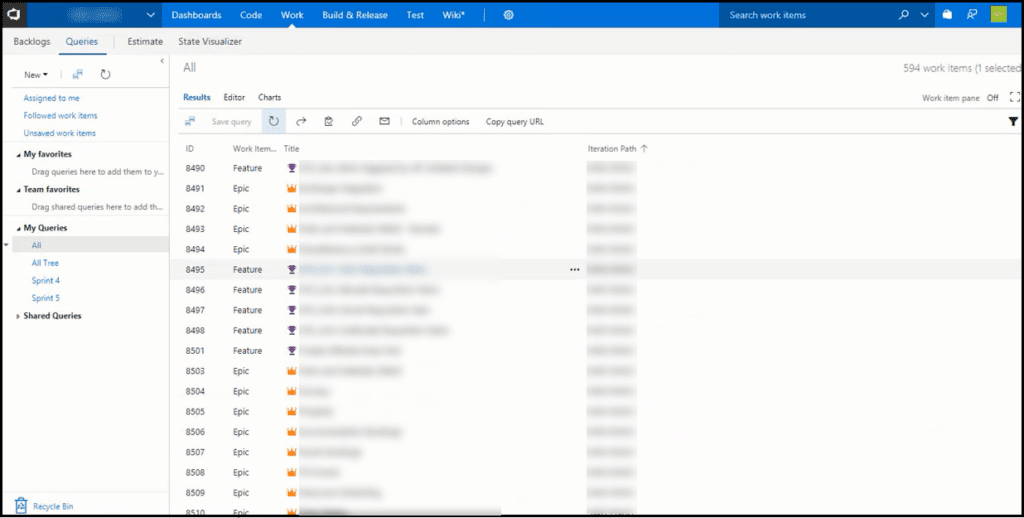
Step 6: Migrating Work Items
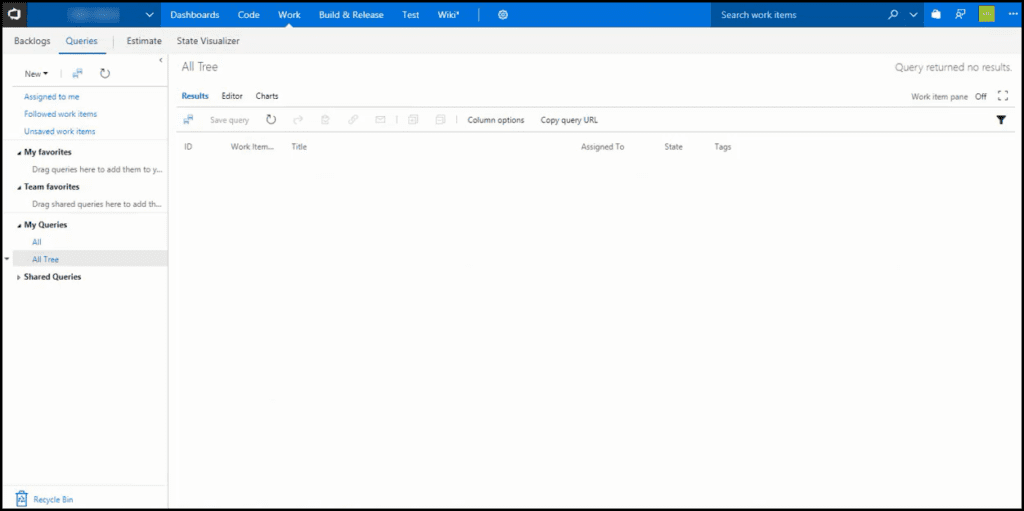
Now let’s move to migrating the work items themselves. Here is the VSTS before migrating any work items. Here is a query on the new VSTS (lists all items in tree view) which shows that we have nothing yet.
Now let’s start migrating work items:
- Open the file again and make sure to set the Object VSTSSyncMigrator.Engine.Configuration.Processing.NodeStructureMigrationConfig to false. This is very important.
- We have two options for migrating work items, as described below.
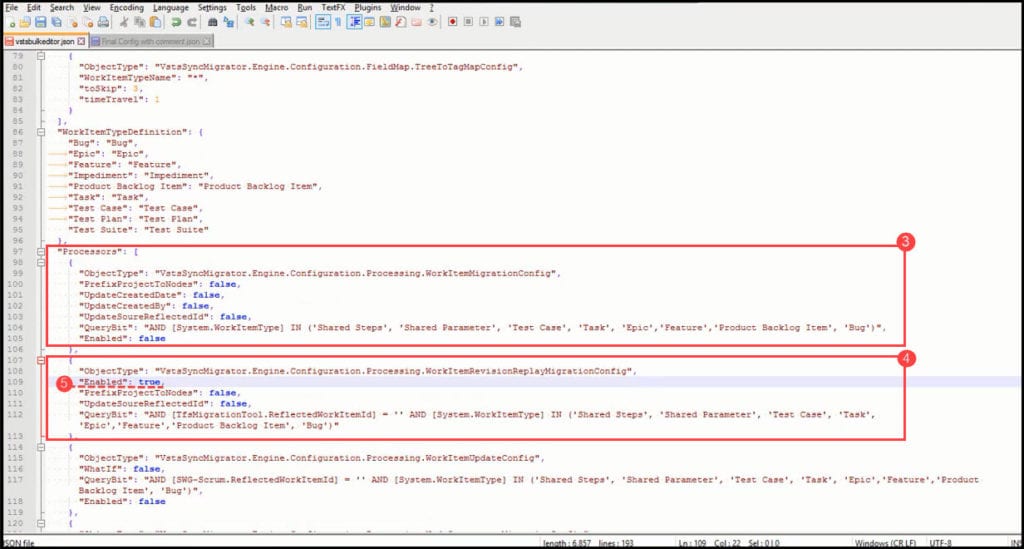
- The first option is to migrate work items with their recent state, which means that the history of work items will be lost (VSTSSyncMigrator.Engine.Configuration.Processing.WorkItemMigrationConfig).
- The second option is to migrate work items with their history (VSTSSyncMigrator.Engine.Configuration.Processing.WorkItemRevisionReplayMigrationConfig).
- I’ll choose migration with history, so we’ll set the Enabled flag for it to be true.
- Open the command prompt again and run the same command:
vstssyncmigrator.exe execute --config vstsbulkeditor.json.
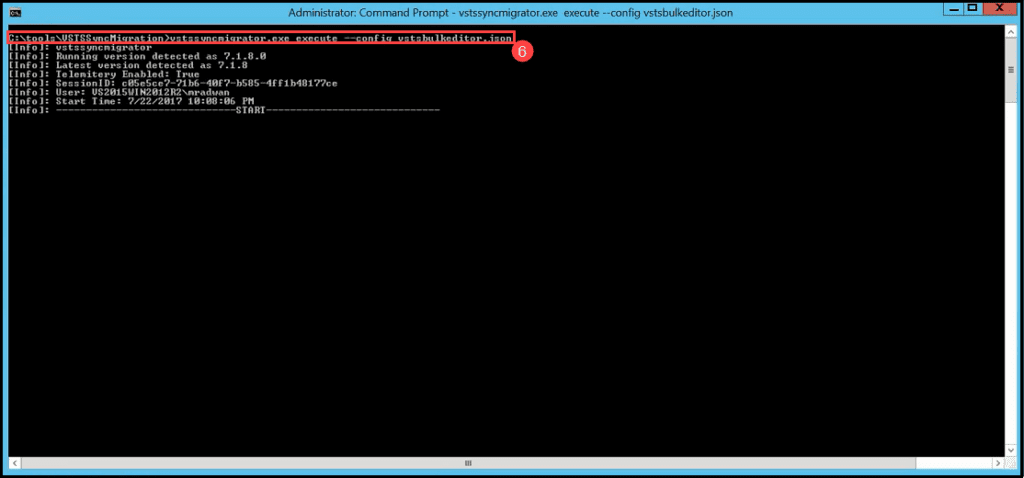
- The last step might take some time depending on how many work items there are. In my case, it took around 17 minutes.

Here is how VSTS looks after migration. Remember that so far we have only migrated Work Items, but with no links between them and no attachments.
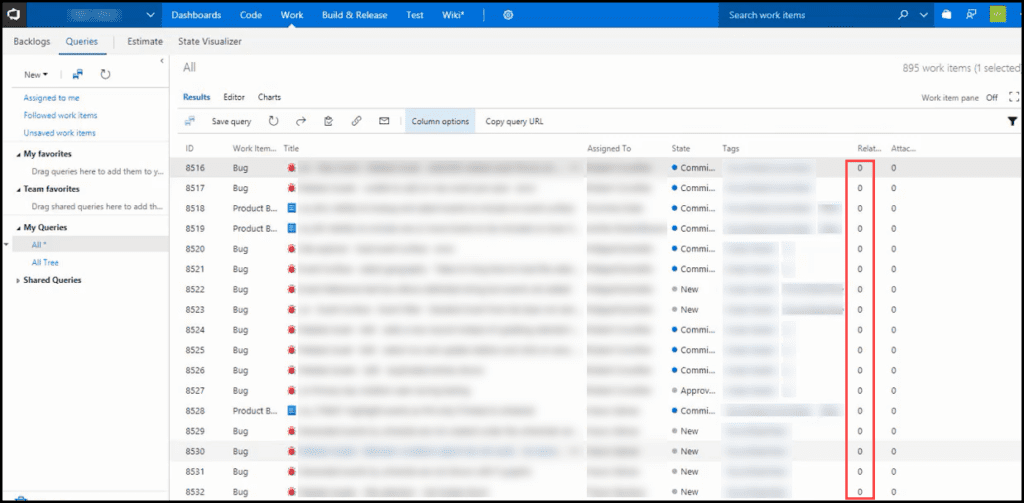
Step 7: Migrating Links between Work Items
Now it’s time to migrate the links between work items. I added one more column to demonstrate that, as we can see the links between work items count is zero.
So let’s get back to the file:
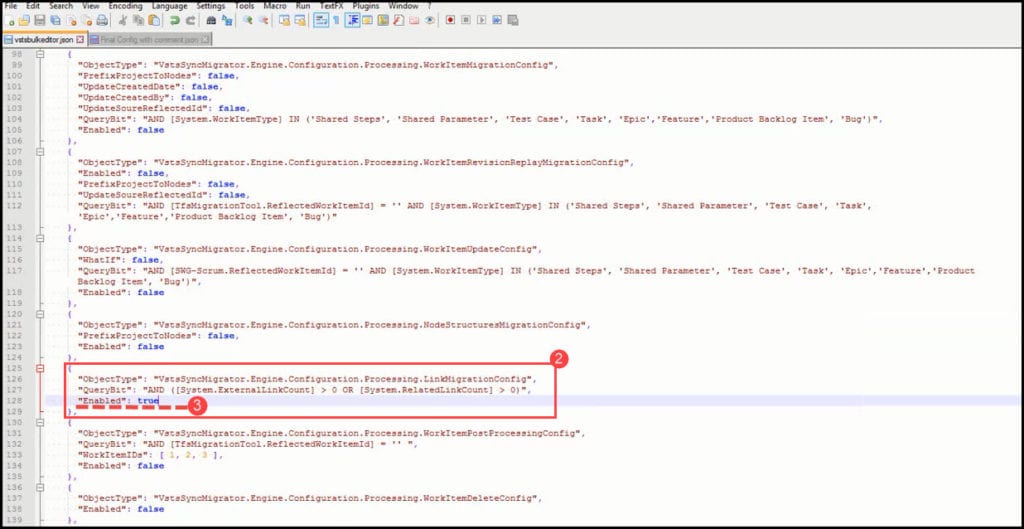
- Open the file again and make sure to set the Object VSTSSyncMigrator.Engine.Configuration.Processing.WorkItemRevisionReplayMigrationConfig to false. This is very important.
- Find the Object VSTSSyncMigrator.Engine.Configuration.Processing.LinkMigrationConfig.
- Set the Enabled flag for this object to true.
- Open the command prompt again and run the same command:
vstssyncmigrator.exe execute --config vstsbulkeditor.json. - This could take a few minutes.
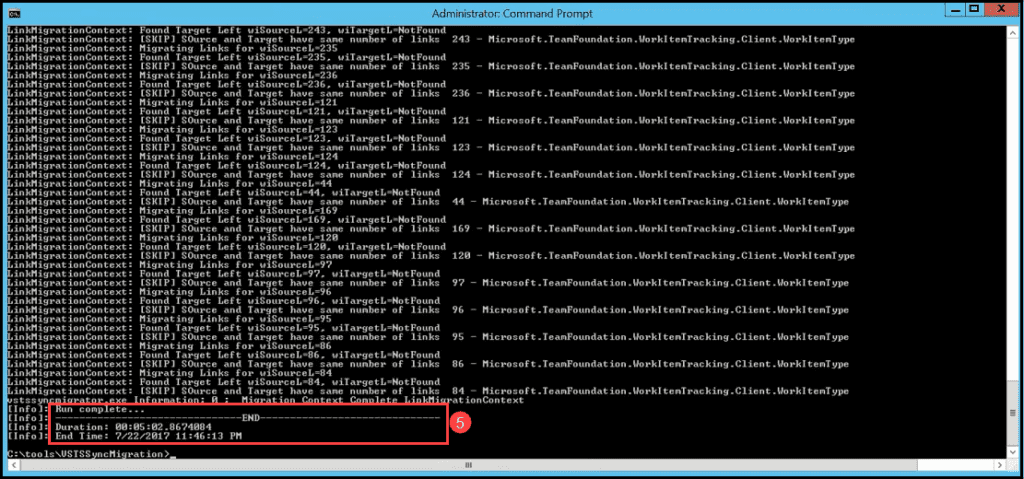
- If we check VSTS again, we’ll see that links have been migrated.

If you would like to learn more about enhancing frontend development code quality, it includes understanding different types of JavaScript unit testing frameworks like Jasmine, Mocha, Jest, different types of task runners like Grunt and Gulp, different types of linting tools like JSHint, ESLint, JSLint, CSSLint, and different types of code formatters like Prettier and Tidy.
Learn how to write your first JavaScript unit test with the Jasmine standalone version, how to run JavaScript unit tests using Grunt, Command Line, and PhantomJS, how to calculate code coverage for JavaScript unit tests using Istanbul, how to run JavaScript unit tests using Visual Studio Test Explorer using the Chutzpah extension, how to lint JavaScript code using JSHint and how to run that from the Command Line using Grunt. Finally, it shows how to integrate all the quality practices with Visual Studio Team Service Build automation so it can be part of CI/CD or Continuous Integration and Continuous Delivery. Have a look at this post.
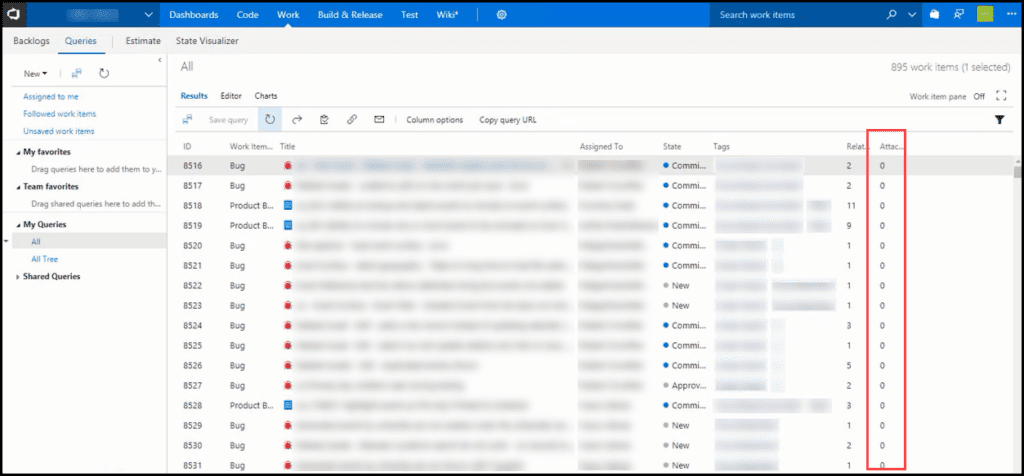
Step 8: Migrating Attachments
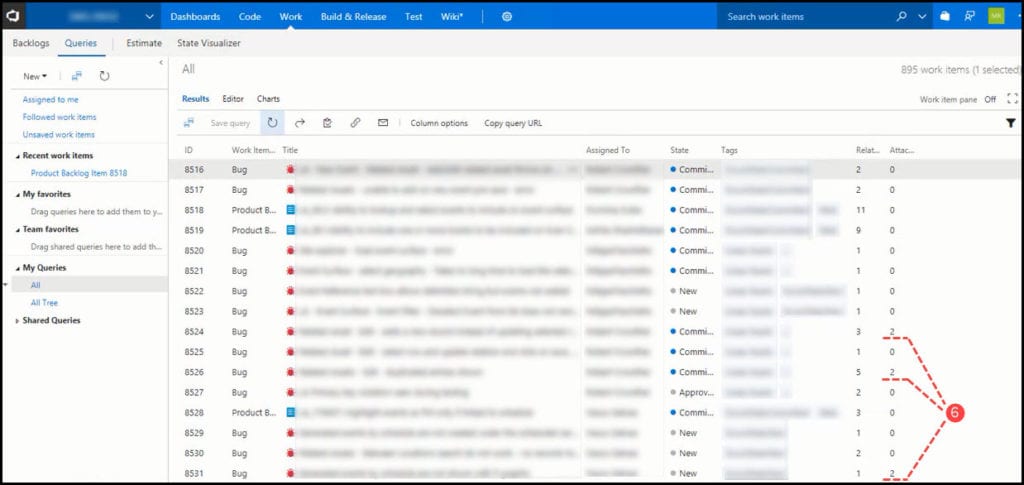
Now attachments for Work Items is the only remaining thing, as we can see the attachments count is zero.
Let’s get back to the file:
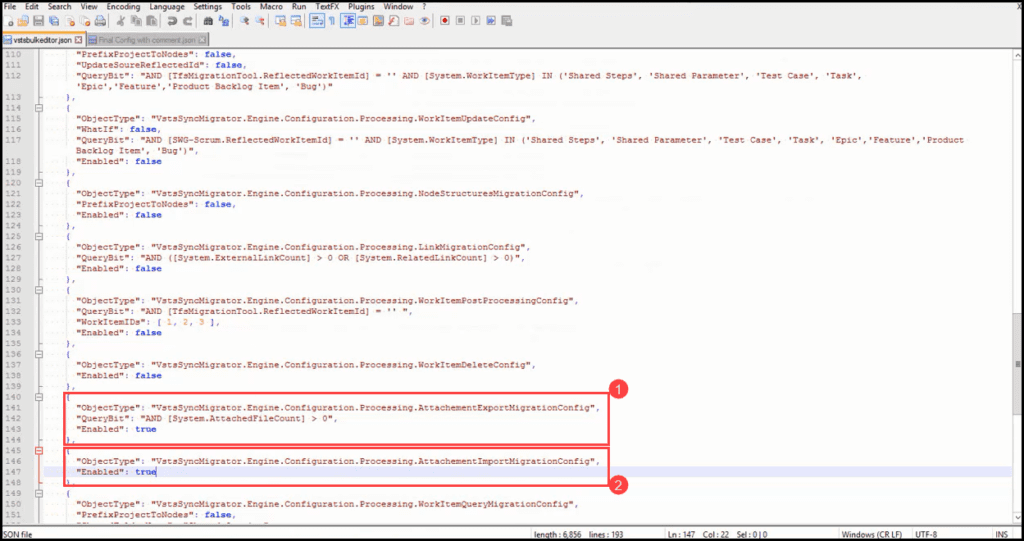
- Open the file again and make sure to set the Object VSTSSyncMigrator.Engine.Configuration.Processing.LinkMigrationConfig to false. This is very important.
For migrating attachments, we need two options to be enabled (true), not only one. The options are:
- VSTSSyncMigrator.Engine.Configuration.Processing.AttachmentExportMigrationConfig
- VSTSSyncMigrator.Engine.Configuration.Processing.AttachmentImportMigrationConfig
Both of them should be set to true.
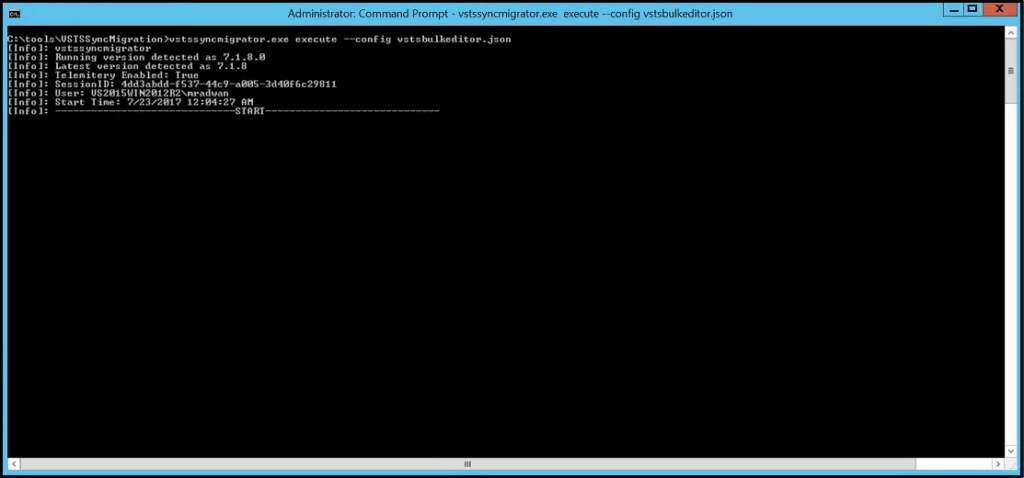
- Open the command prompt again and run the same command:
vstssyncmigrator.exe execute --config vstsbulkeditor.json.
- This might take a few minutes.
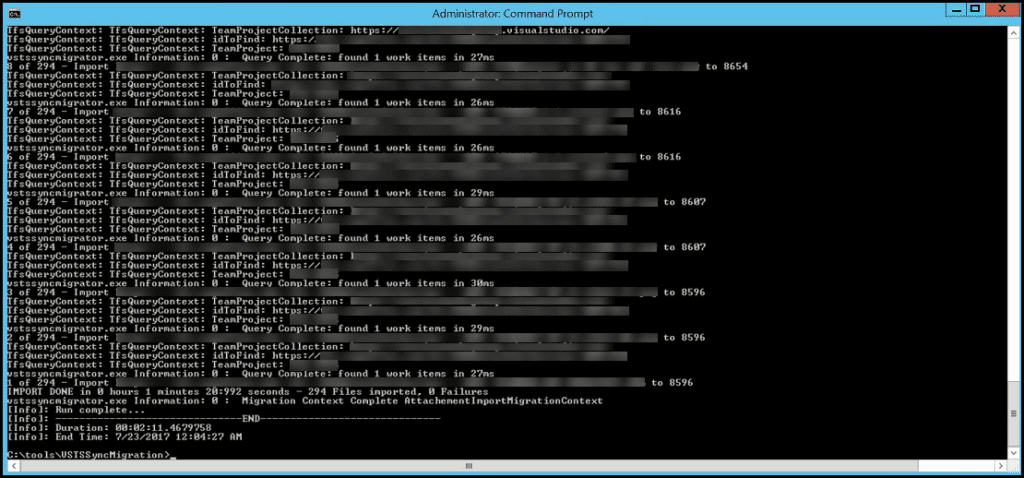
- Now let’s check the Attachment Count in VSTS again.
- Finally, here are the Work Items in VSTS with attachments migrated.
If you would like to learn more about how to change the credential of an IIS Application Pool using PowerShell, and how to restart the Application Pool using PowerShell, have a look at this post.
Conclusion
VSTS Sync Migrator is a very powerful tool developed by Martin Hinshelwood. The tool allows migrating high-fidelity work items between TFS and VSTS, including Work Items, Iterations, Attachments, Links between work items, and even more options found in the official documentation. The tool still requires a bit of experience and understanding of both TFS and VSTS, but it’s really valuable as it covers migrating many project artifacts.