
1.Introduction
Having or creating a new Dynamics 365 environment very quickly and in a reliable way is crucial for the business, it's needed for different scenarios for example, if you want to test new feature immediately, and you have many testers, you want to provide a separate environment for each one where it has the new solutions where the tester can verify the completed features before approve and merge that with the master branch with other accepted or verified features, or if your end user needs to evaluate the new module being developed, or if you want to run some automation testing on an environment without interrupting the current tester's environment, there are many scenarios where we will need to have that environment, created, has Dynamics 365 installed, has all CRM solutions, deployed all developed features and ready in no time and with less effort, so how to do that?
The answer is always very simple, by Automation.
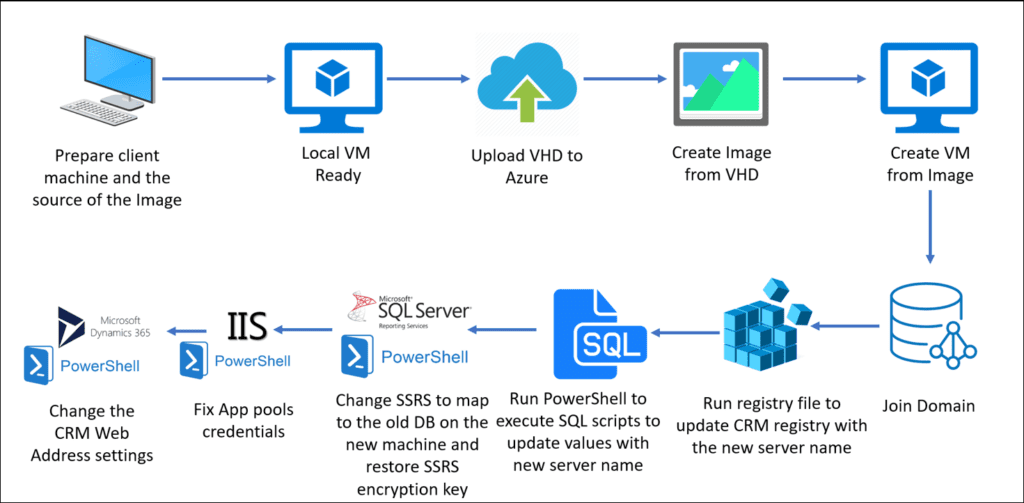
In the post and video, I am not going to show all the whole process as it's not completed yet but I will show big part of it and I will continue later. So we will see how to create new Dynamics 365 CRM environment locally with Windows Server 2016 Standard Edition, then prepare this machine to be ready to upload to the cloud (Azure), then upload the machine to Azure, then create image of that machine, after that, we will start using this image for creating new virtual machine with Dynamics 365 then reconfigure the machine to fix all the problems because changing the hard disk and the machine name which will make problem for SSRS (SQL Server Reporting Server), all IIS application pools crashed, the SQL Server name crashed, and of course Dynamics 365 CRM doesn't work, so I will show exactly how to solve all those problems so we can have a new copy of an existing Dynamics CRM machine and make it works fine. The following image is describing the process steps:
The following video describes the current post in action, in case anyone prefers videos, also the video and the post could be helpful for anyone wants to change CRM database name on live CRM system, or wants to rename CRM server.
2.Prepare client machine and the source of the Image
- Install MS Azure Storage Explorer on the client machine (my PC)
https://azure.microsoft.com/en-us/features/storage-explorer/
- Install Azure Copy on the client machine (my PC)
https://docs.microsoft.com/en-us/azure/storage/common/storage-use-azcopy
- Create new local VM
- Convert VHDX to VHD and Fixed Size to be ready for Azure
- Install Windows Server 2016 on VM
- Join Domain (VM)
- Install CRM and updates (VM)
- Install the latest Azure PowerShell on both machine, the VM and the client machine (my PC) in that date, it was (Azure PowerShell 5.7.0) so we can run our commands to Azure.
https://github.com/Azure/azure-powershell/releases/tag/v5.7.0-April2018
- Install SSRS PowerShell on (VM)
1
Install-Module -Name ReportingServicesTools
- Run some PowerShell Scripts to confirm the preparation of the machine, like enable remote desktop, firewall and many others (VM)
https://docs.microsoft.com/en-us/azure/virtual-machines/windows/prepare-for-upload-vhd-image
- Generalize the machine using Systprep (VM)
%windir%\system32\sysprep
If you would like to learn more about Microsoft Dynamics development, including the overview of the Microsoft Dynamics CRM itself, installing Microsoft Dynamics 2016 on Azure VM and how to upgrade to Dynamics 365, how to develop Dynamics CRM plugin, how to debug Microsoft Dynamics CRM project, create and run unit tests using FakeXRMEasy and Microsoft Fakes, JavaScript and front end unit tests as well code quality using JSHint, also how to create and run UI and how to integrate all the practices as part of the CI/CD (Continuous Integration and Continuous Delivery), - have a look at the this post
3.Upload the VHD
- Create new Resource Group to hold VHDs and Images
- Make Storage Account using Azure Portal
- Generate Blob Containers inside the Storage Account using Azure Storage Explorer to upload VHDs
- Generate Shared Access Signature (SAS)++for the target Blob Container using Azure Storage Explorer (UI)
- Upload the new VHD using Azure Copy or Azure Storage Explorer (UI) as Page blob, remember page blob is not the default.
- The following is how to upload using Azure Copy after generate SAS from Azure Storage Explorer with enough date:
https://docs.microsoft.com/en-us/azure/storage/common/storage-use-azcopy
1
AzCopy /Source:"C:\VMs\CRM\Virtual Hard Disks\CRMFromOnPrem.vhd" /Dest:https://myvmsimages.blob.core.windows.net/uploaded-vms/CRMFromOnPrem.vhd /DestSAS:"?st=2018-03-13T17%3A11%3A00Z&xxxxxxxxx" /BlobType:page
- Or upload using Azure Storage Explorer (UI)
4.Create Image from VHD
- Run PowerShell as Admin and connect to Azure using the following command (my PC)
1
Add-AzureRmAccount
- Create image from uploaded VHD in the target RG with the following command (my PC)
https://docs.microsoft.com/en-us/azure/virtual-machines/windows/capture-image-resource
1
2
3
4
5
6
7
8
9
10
11
12
13
$rgName = "Radwan"

$location = "westeurope"

$imageName = "CRMImage"

$osVhdUri = "https://myvmsimages.blob.core.windows.net/uploaded-vms/CRMConverted.vhd"

$imageConfig = New-AzureRmImageConfig -Location $location

$imageConfig = Set-AzureRmImageOsDisk -Image $imageConfig -OsType Windows -OsState Generalized -BlobUri $osVhdUri

$image = New-AzureRmImage -ImageName $imageName -ResourceGroupName $rgName -Image $imageConfig
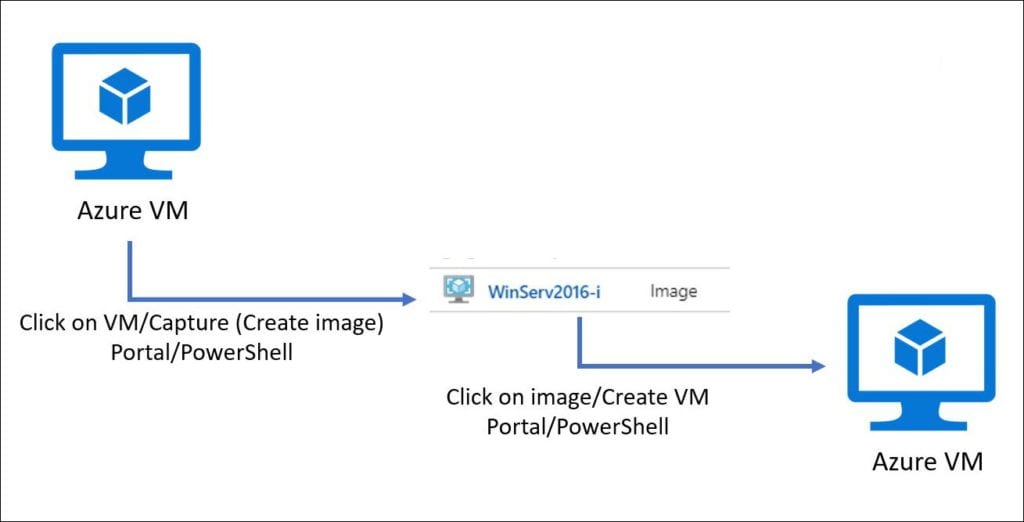
We can also create image from Azure Portal for new VMs by click capture, see the following image:
Remember, we must generalize the VM or the VHD "sysprep" before creating an image no matter what the way we create the image, otherwise, the VM from that image will not work properly.
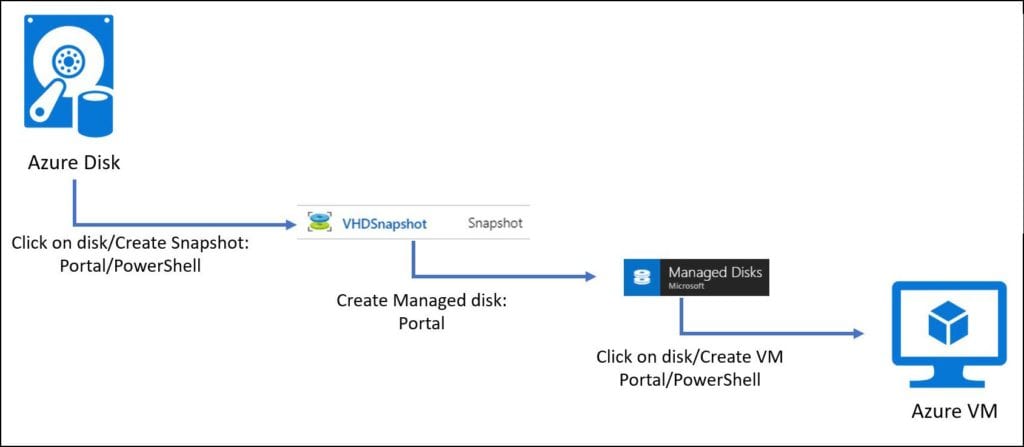
We can also create snapshot from VM disk and then create a new VM from that snapshot, see the following image:
The following image shows the icon of each type in Azure Portal:
![]()
5.Create VM from Image
- Click on the image then click create VM (Azure Portal)
- Or create VM from image using PowerShell (will be added later)
https://docs.microsoft.com/en-us/azure/virtual-machines/windows/create-vm-generalized-managed
6.Run to join domain Script
- After the machine created, remote login to the machine and run the join domain script
1
2
3
4
5
6
7
8
9
10
11
$domain = "myDomain.co.uk"

$password = "myAccountPassword" | ConvertTo-SecureString -asPlainText -Force

$username = "myDomain\myAccount"

$credential = New-Object System.Management.Automation.PSCredential($username,$password)

Add-Computer -DomainName $domain -Credential $credential

Restart-Computer
If the Azure V-Net not configure in the way that makes the VM to see the domain, I mean the DNS is not configured, I can manually configure the DNS to point to the AD so the VM can see and the domain and be able to join.
1
2
$wmi = Get-WmiObject win32_networkadapterconfiguration -filter "ipenabled = 'true'"
$wmi.SetDNSServerSearchOrder("10.1.0.4")
7.Run Registry file to update CRM registry with the new server name
- Change the reg file with the new server name and run it
1
2
3
4
5
6
7
Windows Registry Editor Version 5.00

[HKEY_LOCAL_MACHINE\SOFTWARE\Microsoft\MSCRM]

"configdb"="Data Source=My_New_CRM_Server_Name;Initial Catalog=MSCRM_CONFIG;Integrated Security=SSPI"

"ServerUrl"="http://My_New_CRM_Server_Name/MSCRMServices"
8.Run PowerShell script to execute SQL scripts to update values with new server name
- Open the two scripts and put the new server name and run the PowerShell Script as admin
1
2
3
Invoke-Sqlcmd -InputFile "C:\Partial Autoamtion\3-Update DB with new CRM Server name (CRM).sql"

Invoke-Sqlcmd -InputFile "C:\Partial Autoamtion\4-Update DB with new CRM Server name (SQL).sql"
Script 1
1
2
3
4
5
6
7
8
9
10
11
12
13
14
15
16
17
18
19
20
21
22
23
24
25
26
27
28
DECLARE  @NewCRMServerName nvarchar(300)

SET @NewCRMServerName='oooradwanooo'

use [MSCRM_CONFIG]
UPDATE
DeploymentProperties

SET
[NVarCharColumn] = @NewCRMServerName+':80' where [ColumnName]='ADDeploymentSdkRootDomain'
UPDATE
Server
SET
[FullName] =@NewCRMServerName +'.workspacegroup.co.uk' where [Fullname]='WIN-IAOJRE3CRCP.workspacegroup.co.uk'
UPDATE
ConfigSettings
SET
[HelpServerUrl] = 'http://'+ @NewCRMServerName +':5555/'
UPDATE
Organization
SET
[ConnectionString] = 'Provider=SQLOLEDB;Data Source='+ @NewCRMServerName +';Initial Catalog=Demo_MSCRM;Integrated Security=SSPI',
[SqlServerName] = @NewCRMServerName,
[SrsUrl] = 'http://'+ @NewCRMServerName +'/reportserver'
UPDATE
[Server]
SET [Name] = @NewCRMServerName
Go
Script 2
1
2
3
SP_DROPSERVER "WIN-IAOJRE3CRCP"
Go
SP_ADDSERVER "My_New_CRM_Server_Name", local
9.Change the SSRS to map to the old DB on the new machine and restore SSRS encryption key
- Open the script and put the new server name and run the PowerShell Script as admin
1
2
Set-RsDatabase -DatabaseServerName my_New_Machine_Name -Name my_DB_Name -IsExistingDatabase++ -DatabaseCredentialType ServiceAccount -Confirm:$false
Restore-RSEncryptionKey -Password 'My_SSRS_EncryptionKey_Password' -KeyPath 'C:\Partial Autoamtion\CRMSRSReportKey.snk'
If you would like to learn more about how to work with SSRS PowerShell so we can remap SSRS or SQL Sever Reporting Server Database to an existing DB, we will see also how to restore SSRS encryption key - have a look at this post- have a look at the this post
10. Fix App pools credentials
- Run the following PowerShell script as admin reenter the credential after creating the new machine
1
2
3
4
5
Import-Module WebAdministration
Set-ItemProperty IIS:\AppPools\CRMAppPool -name processModel -value @{userName="my_Domain\my_ServiceAccount";password="my_ServicePassword";identitytype=3}
Set-ItemProperty IIS:\AppPools\CrmDeploymentServiceAppPool -name processModel -value @{userName="my_Domain\my_ServiceAcccount";password="my_ServicePassword";identitytype=3}
Start-WebAppPool -Name "CRMAppPool"
Start-WebAppPool -Name "CrmDeploymentServiceAppPool"
If you would like to learn more about how to change the credential of IIS Application Pool using PowerShell, we will also use PowerShell to restart the Application Pool - have a look at this post - have a look at the this post
11. Change the CRM Web Address settings
- Open the script and put the new server name and run the PowerShell Script as admin
1
2
3
4
5
6
7
8
9
10
11
12
13
14
15
16
17
18
19
20
21
22
23
24
25
26
27
28
29
30
31
32
33
34
35
36
37
38
39
40
41
42
43
44
45
46
47
48
49
50
51
52
53
54
55
56
57
58
59
60
61
62
63
64
65
66
67
68
69
70
71
72
73
74
75
76
param
(

#optional params

[string]$RootDomainScheme,

[string]$DeploymentSdkRootDomain,

[string]$DiscoveryRootDomain,

[boolean]$NlbEnabled,

[string]$SdkRootDomain,

[string]$SslHeader,

[string]$WebAppRootDomain,

[string]$NewCRMMachineName

)

#$DeploymentSdkRootDomain="my_New_Machine_Name:80"

$NewCRMMachineName="My_New_Machine_Name:80"

$DiscoveryRootDomain=$NewCRMMachineName

$SdkRootDomain=$NewCRMMachineName

$WebAppRootDomain=$NewCRMMachineName

$RemoveSnapInWhenDone = $False

if (-not (Get-PSSnapin -Name Microsoft.Crm.PowerShell -ErrorAction SilentlyContinue))

{

Add-PSSnapin Microsoft.Crm.PowerShell

$RemoveSnapInWhenDone = $True

}

$WebAddressSettings = Get-CrmSetting -SettingType WebAddressSettings


#if($DeploymentSdkRootDomain) {$WebAddressSettings.DeploymentSdkRootDomain = $DeploymentSdkRootDomain}

if($DiscoveryRootDomain) {$WebAddressSettings.DiscoveryRootDomain = $DiscoveryRootDomain}

if($PSBoundParameters.ContainsKey('NlbEnabled')) {$WebAddressSettings.NlbEnabled = $NlbEnabled}

if($RootDomainScheme) {$WebAddressSettings.RootDomainScheme = $RootDomainScheme}

if($SdkRootDomain) {$WebAddressSettings.SdkRootDomain = $SdkRootDomain}

if($PSBoundParameters.ContainsKey('SslHeader')) {$WebAddressSettings.SslHeader = $SslHeader}

if($WebAppRootDomain) {$WebAddressSettings.WebAppRootDomain = $WebAppRootDomain}

Set-CrmSetting -Setting $WebAddressSettings


$WebAddressSettings

if($RemoveSnapInWhenDone)

{

Remove-PSSnapin Microsoft.Crm.PowerShell

}

Restart-Computer
https://technet.microsoft.com/en-us/library/gg985381.aspx
If you would like to learn more about how to use PowerShell to change some values for Microsoft Dynamics 365 - have a look at this post - have a look at the this post
If, after adding a new user to Dynamics 365, you get the following error: You do not have permissions to see this view. Contact a system administrator crm, - , - have a look at the this post
In many cases we might need to create progress bar if we copy many files or searching for many files and we can use the following command to do that. https://docs.microsoft.com/en-us/powershell/module/microsoft.powershell.utility/write-progress?view=powershell-6{target=”_blank” rel=”noopener noreferrer”}
1
2
for ($I = 1; $I -le 100; $I++ )
{Write-Progress -Activity "Search in Progress" -Status "$I% Complete:" -PercentComplete $I;}
I may add sleep for the loop so I can see or simulate the slow progress
1
2
3
4
for ($I = 1; $I -le 100; $I++ )
{Write-Progress -Activity "Search in Progress" -Status "$I% Complete:" -PercentComplete $I;
sleep 1;
}
Remember to use ConvertTo-SecureString cmdlet to converts encrypted standard strings into secure strings
1
2
3
4
5
6
7
8
9
10
11
$Secure = Read-Host -AsSecureString
$Secure
System.Security.SecureString
$Encrypted = ConvertFrom-SecureString -SecureString $Secure
$Encrypted
01000000d08c9ddf0115d1118c7a00c04fc297eb010000001a114d45b8dd3f4aa11ad7c0abdae9800000000002000000000003660000a8000000100000005df63cea84bfb7d70bd6842e7
efa79820000000004800000a000000010000000f10cd0f4a99a8d5814d94e0687d7430b100000008bf11f1960158405b2779613e9352c6d14000000e6b7bf46a9d485ff211b9b2a2df3bd
6eb67aae41
$Secure2 = ConvertTo-SecureString -String $Encrypted
$Secure2
System.Security.SecureString
Write-Host
PowerShell with VSTS
https://docs.microsoft.com/en-us/vsts/pipelines/tasks/utility/powershell?view=vsts#arguments